Difference between revisions of "Manual:Extension/BlueSpiceBookshelf"
| [unchecked revision] | [unchecked revision] |
(Tag: 2017 source edit) |
(Tag: 2017 source edit) |
Contents
- 1 What is Bookmaker?
- 2 Where to find Bookmaker?
-
3 Book manager
- 3.1 Create a new book
- 3. 1.2Edit the chapter structure of
- 2 Editing a book
- 3. 1.
- 3 Insert meta data
- 3.24 Export books
- 3.3 Your own books
- 4 Working hints
- 5 Administration 7
- 5.1 Which rights can be granted?
- 5.2 Further settings
- 5.3 Which extensions are part of Bookmaker?
- 5.4 Troubleshooting 6 Additional helpful extensions
- See also
What is Bookmaker?[edit | edit source]
The package Bookmaker expands the BlueSpice distribution, enabling combining and collecting multiple articles into a structured book. These books include convenient ways to navigate (by table of content or book navigation), and they can also be printed as a PDF file if needed. The PDF file includes an individual cover page, a clickable table of contents, and all attachments from the articles contained.
Where to find Bookmaker?[edit | edit source]
All the books that are available on the wiki are accessible through the left navigation menu, tab "Books" with a book icon. Here are shown all the types of books - "General books" and "Own books" by default. Clicking on one of these opens a list of all books available for that type. Clicking on any of the books will open selected book. View of books can be switched between list and grid view.
Once the book is opened, its table of content will appear in the left navigation, under the same tab - "Book". This table of content can be expanded/collapsed by chapters, and allows for easy navigation throught the book.
Book manager[edit | edit source]
Books can be managed through Special:BookshelfBookManager. It can be accessed from the overview of the books, as described in previous section, above the list of book or by navigating to Special:SpecialPages. In the Book manager allows creating new books, deleting or editing existing books. , where overview of all books is available, books can be:* Added - by clicking "Add" button
- Edited - by selecting a book and clicking the wrench icon
- Copied - by selecting a book and clicking "copy" icon
- Deleted - by selecting a book and clicking "delete" button
- Exported to PDF - by selecting a book and clicking PDF icon
- Assigned to a user/group - might be unavailble depending on the wiki configuration
Create a new book[edit | edit source]
Creating a new book is done by clicking the "plus" button. Here a name and a type for the book is given. After clicking "OK", book is created, and BookEditor is opened, which allows contentto content to be added to the book. Pages can be added one by one, by clicking "Add" button - which opens a dialog to type the name of the page to be inserted, or in a batch using "Mass add" button.
Mass adding pages[edit | edit source]
After clicking "Mass add" a dialog is opened, where criteria by which to select pages can be selected:
- All pages of a category
- All subpages of a certain page
- From a page collection - page collections are lists of pages located in MediaWiki namespace, which are usually created from search results.
- By a semantic property - pages can be selected based on a value of a certain semantic property.
After desired pages are added to the book, it can be saved by clicking "Save" button at the bottom.
Editing a book[edit | edit source]
Articles added by you will be shown as separate chapters in the order you added them. You now have several possibilities to revise the chapter structure:
a) Remove an article: Select the article you want to remove in the list. Click on the red button above the chapter structure. Alternatively you can open the context menu by right-clicking on the article. Choose Delete article from book. Please note that the article will only be removed from the book, not deleted from the wiki!
b) Add a new article: Choose an entry in the existing book structure. Click on the green button above the window. You can now add a new article as described in Step 3. The article will be added as a subchapter to the page you selected.
c) Change the order of the articles: You can change the order of the articles easily via drag&drop.
d) Create subchapters: To add a subchapter to an existing chapter, just drag an article onto another article in the book structure. You can adjust the order of subchapters via drag&drop as well. You can also turn a subchapter into a superordinate chapter by dragging the article to the corresponding spot in the structure.
By the way: if you want to move an article after a chapter with subchapters, you can hide the substructure of the chapter by clicking on the small arrow in front of the superordinate chapter. This way you can avoid turning the article into a new subchapter by accident.
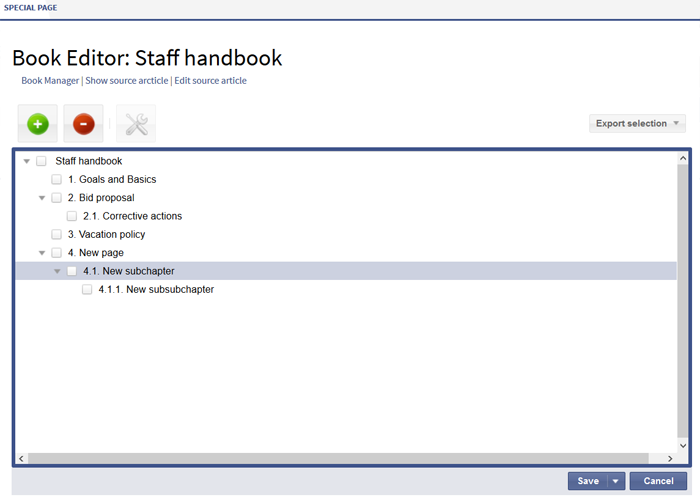 Screenshot: A structure with chapters and subchapters
Editing a book involves much of the same procedure as when creating a new book, regarding adding pages to the book. Pages can also be deleted by selecting a page in the book structure and clicking "delete" button. Chapters - and general book structure - can be rearanged by dragging and dropping pages in the book structure. By dragging and dropping PageA over the PageB, PageA will be placed underneat the PageB in the book hierarchy.
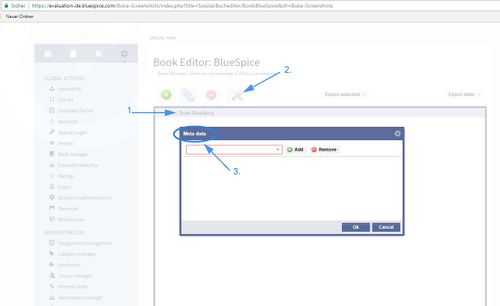
Insert meta data[edit | edit source]
Step 4: Select the first layer of a book and click on the edit button above the book structure. In the following popup window you can now add many different meta data to your bookWhile editing a book (adding or removing pages), meta-data for the book can be added. To edit metadata, select top-most node of the book (first page) and click the wrench icon. A dialog will be opened where various meta-data can be added or removed. Some of the most important meta-data include:
- Title
- Subtitle
- Author 1 and 2
- Document-ID
- Document type
- Department
- Version
- Template (PDF)
- Table of Contents (Only article titles, or Embed article TOCs)
Export books[edit | edit source]
You can export a bookBook can be exported, individual chapters or even pages into the pdf PDF or docx DOCX format:
Step 1: Open the book in the book editor.
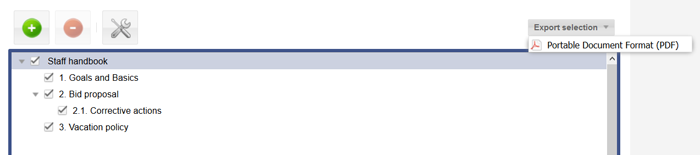
Step 2: Select all pages or chapters you want to export be exported by clicking the checkboxes in front of them. Subchapters will be automatically selected. You can of course deselect individual pages or chapters again.
Step 3: Click Clicking on Export selection. Choose the format you want to save the book in. Please note that only those formats will be available that are installed in your wiki.
Depending on the template, your book will now be printed in a specific style in the desired format. These templates can of course be adjusted to fit your needs.
 Screenshot: Book export made easy
Your own books[edit | edit source]
Your own books will be created in the namespace User as a subpage of the particular creator and are only available there. They will not be shown in the Books tab in the navigation bar on the left. You can open your own book like this:
Step 1: Open your user page. To do so, click on your login name in the upper right corner of the screen, and choose the first entry ("You user page") in the menu.
Step 2: In the statebar of your user page, you will find the link Subpages. Click on it to see the existing subpages.
Step 3: Choose the book you want to read and click on the link.
Step 4: The chapter structure of the book will now be shown in normal reading mode. Click on the page you want to read, and the book navigation you are used to from general books will also be available in the navigation bar on the left.
Alternatively you can also open your own books in the Book Manager. Choose a book and open it in the book editor. Right-click on the chapter you want to read. Choose Open article in new window. This will show you the book navigation on the left as well.
"Export selection" dropdown menu, open a list of availble formats. By clicking on one of the formats offered, book export will start
Working hints[edit | edit source]
- Use a competent team to decide on the content that should be transferred into an online book.
- Decide on how to handle existing numerations or references.
- Seize the opportunity: get rid of unnecessary content (or don't include it in your wiki in the first place)
- Decide on standards for documents: when does it make sense to link documents in the wiki? When is is sensible to include the documentsdocument's content into a wiki article?
- Decide on a fitting course of action: do you want to create the articles in the wiki first, and compile them in a book structure afterwards, or do you want to create the book structure first, and create and edit the articles contained gradually? Especially if you choose the latter, templates will be very important, because you can add the book navigation tag necessary already to the template. This saves a lot of time later on.
Administration[edit | edit source]
Which rights can be granted?[edit | edit source]ToIn order to create and edit books,
theuser needs
editing rights for the"edit" rights in Book namespace.
Further settings[edit | edit source]
Bookmaker offers the following settings for administrators:
-
In the Bookshelf tab:
- Prepend article table of contents and headlines with book numeration
- Suppress namespace prefix of book articles in output
- Use display title from book source on article
-
In the Universal export tab:
- Metadata (standard, JSON)
- Metadata (override, JSON)
-
In the UniversalExport Book PDF Module tab:
- Table of Contents (Only article titles, Embed article TOCs)
- Standard template for the export
- Template directory, showing the location of the templates
Additionally, users can add or exclude the Book namespace in their search queries (found in the individual user preferences under the tab Search). However, keep in mind that the articles contained in a book are still in their original namespaces, and not in the Book namespace.
Which extensions are part of Bookmaker?[edit | edit source]Bookmaker contains the following extensions:
- Bookshelf
- The extension Bookshelf supplies the main functions for creating and managing books.
- BookshelfUI
- BookshelfUI adds the user interface for the functions of Bookshelf.
Additionally, the following extensions are part of Bookmaker and expand the functionality of UniversalExport:
- UEModuleBookPDF
- This extension allows you to export a book in the pdf-format.
- UEModuleBookDOCX
- The extension UEModuleBookDOCX allows you to export a book in the docx-format. Please note: you need an additional license for an external extension for your wiki to use this feature.
- UEModuleBookHTML
- This extension enables you to export a whole book from your wiki to an external HTML structure. Please note: this feature is being revised and not available at the moment.
- UEModuleHTML
- This extension enables you to export a single page from your wiki to an external HTML structure. Please note: this feature is being revised and not available at the moment.
- UEModulePDFRecursive
- With UEModulePDFRecursive you can export pages from your wiki as a pdf file. This export also includes all pages that are linked in the respective article (recursion depth 1, so only articles directly linked in the page will be added to the export). Please note: this feature is being revised and not available at the moment.
- UEModulePDFSubpages
- The extension UEModulePDFSubpages lets you print individual articles from your wiki including all subpages as a pdf file. Please note: this feature is being revised and not available at the moment.
Troubleshooting[edit | edit source]
Problem: The following error occurs during the pdf-export of a book: "The book could not be exported, because it contains an article with no Bookshelf-Tag."
Solution: Try to refresh the book navigation before you export the book. To do so, mark all pages and click on the small arrow to the right of the Save button. Choose Save and add book navigation to each article".
Problem: An article has to be linked in more than one book, however this messes up the navigation of these books.Solution: You can link an article in more than one book by transcluding it. Create a page like this:
-
<bs:bookshelf src="Book: Name of the book" /> -
{{Article to be linked}}
The article will now be embedded in the book, not directly linked. The navigation of other books will not be compromised by this. Problem: I created my own book, but I can't access it via my user profile, because there are no subpages shown. Solution: It is possible that you have to create your own user page first. Click on your login name in the upper right corner of the screen. Choose the first entry (Your user page) in the context menu. If you now get the message "This page doesn't exist yet. [...]", you have to create it first. After saving the page you will find a link to existing subpages in the statebar. Click on it, and you will find a link to the book you created.
Additional helpful extensions[edit | edit source]
The BlueSpice package Bookmaker is part of BlueSpice pro. It can be purchased as an extension package in the ShopAdditionally, user can only add pages to the book that that user can read.
See also[edit | edit source]
Our reference Reference page for this extension.