Difference between revisions of "Manual:Extension/BlueSpiceUserManager"
| [unchecked revision] | [unchecked revision] |
Fbaeckmann (talk | contribs) m (Text replacement - "[[UserManager" to "[[Reference:UserManager") |
(Tag: 2017 source edit) |
Contents
- 1 What is UserManagerBlueSpiceUserManager?
- 2 Where to find UserManagerBlueSpiceUserManager?
-
3 Functions of UserManager Usage
- 3.1 Change settings Creating users
- 3.2 Edit GroupsEditing existing users
- 3.3 View disabled users
- 4 See also
What is UserManagerBlueSpiceUserManager?[edit | edit source]
UserManager BlueSpiceUserManager provides a visual interface to administrate usersfor managing users on the wiki.
Where to find UserManagerBlueSpiceUserManager?[edit | edit source]
In BlueSpiceUserManager is availble from the left navigation you will find "Admin". There is a listing of admin functions. Click on "User manager". You see the Admin navigation only if you have administration rights.
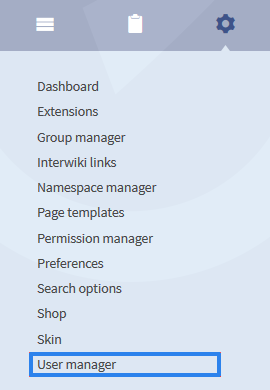
, under tab "Global actions", in "Management" section, or by navigating directly to Special:UserManager
Usage[edit | edit source]
In the user manager you can add and delete users as well as change settings.
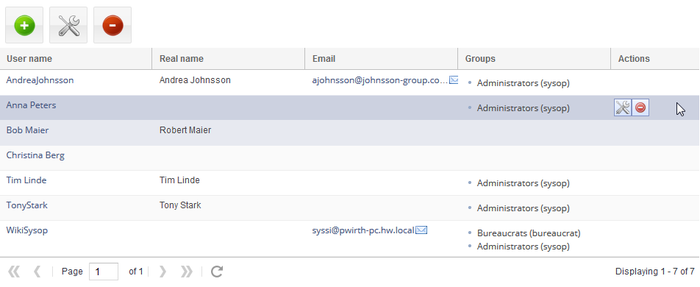 Screenshot: Overview of the User ManagerChange settings
When opened, BlueSpiceUserManager shows the list of all users currently registered on the wiki.
Creating users[edit | edit source]
You can change the following settings:

|
Add user
|
Add new users. You need to fill in the following information: User name, new password, retype password, e-mail, real name (this name will be shown in the articles) |

|
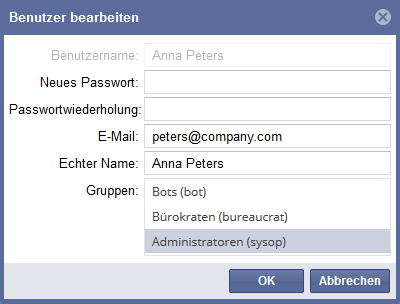
Edit user data
|
Change user name, e-mail or real name. In case you have forgotten your password, a new password can be allocated to you. Create a new password and confirm it. Change the groups a user belongs to. Mark the groups and click "ok". To define rights for groups have a look at the group manager or permission manager.
Attention: All users always belong to the groups "*" and "user". |

|
Delete user
|
After a confirmation the account will be deleted. |
Note: It is not allowed to use your user name as password. The system will show the error "wrong password". This is very important especially if you have an LDAP connection. MediaWiki will create a user but the user can't registrate with this password.
Edit Groups[edit | edit source]
 Screenshot: Group check in the User Manager
The following groups can be administrated:
bot - Permission for WikiBotbureaucrat - constitute sysops
sysop - Group of system adminstrators
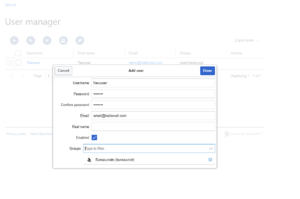
To create new users, click on "Plus" button above the list of users. This will open a dialog where user information can be filled:
- Username - must be unique on the wiki (no previous user can have this name). Cannot contain some special characters, namely "@".
- Password and Confirm password - the password for the new user. Users can later change their passwords.
- Email - email address of the user
- Real name - Full name of the user, can be duplicate of existing user's real name.
- Enabled - controls whether this user is able to access the wiki.
- Groups - list of groups user will belong to. Multiple group can be selected.
Once all data in filled, click on "Save" to create the user.
Editing existing users[edit | edit source]
All the tools for editing the users are shown in the table grid when hovering or selecting the user from the list. All these tools can be accessed from the buttons above the grid when a user is selected.
- Change password - indicated by key icon. Use this to reset user password.
- Groups - indicated by "people" icon. Use this to change user groups.
- Disable/enable user - indicated by "block" icon. Use this to disable users temporarely. This will disable user from loggin in to the wiki, without deleting the account. For already disabled users, use it to enable the user.
- Delete user - indicated by "x" icon. This will completely delete the user. This action is irreversible.
Tip User groups can be set for multiple users at a time by selecting mutliple users and clicking on "groups" icon above the grid.
View disabled users[edit | edit source]
By default, list will only display enabled users. In order to view disabled users, click on table header (any column), select "Columns", then select "Enabled". This will add additional column "Enabled" to the grid. Now click on the header of this column and select "Filter" -> "Show all deativated users"
See also[edit | edit source]
Our reference Reference page for this extension.