Difference between revisions of "Manual:Semantic MediaWiki/Examples/Customer data/Template styling"
← Manual:Semantic MediaWiki/Examples/Customer data/Template styling
| [unchecked revision] | [quality revision] |
(Tag: Visual edit) |
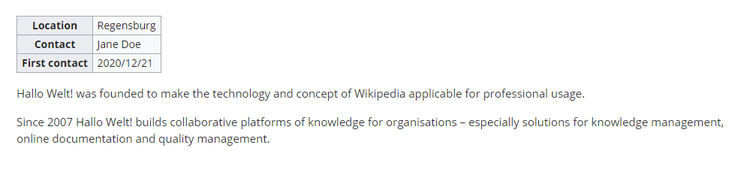
By default, a semantic template that was created with the page Special:CreateTemplate, is displayed in a basic table format. Each property/value pair is shown in a new table row.The table width adjusts to the table content.
To change the table layout, we can add some styling information to the template.
Adjusting the template styling[edit | edit source]
To format the table, we create a subpage to the template. It contains the custom template styles. In the following example, we create a variation of the original table with a width of 100%, left-aligned labels and more padding in the table cells.

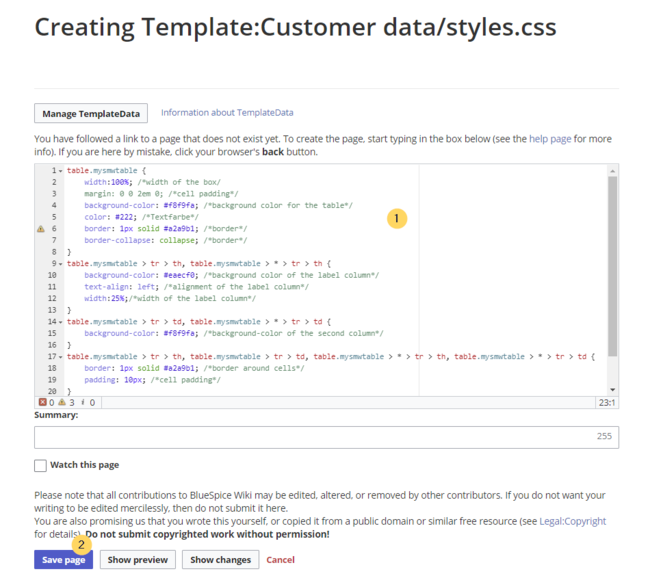
- Create the subpage styles.css. For the template Customer data, you need to create the page Template:Customer data/styles.css.
-
To achieve the shown table styling, add the following code to the new styles.css.
table.mysmwtable {
	width:100%; /*width of the box/
	margin: 0 0 2em 0; /*cell padding*/
	background-color: #f8f9fa; /*background color for the table*/
	color: #222; /*Textfarbe*/
	border: 1px solid #a2a9b1; /*border*/
	border-collapse: collapse; /*border*/
}
table.mysmwtable > tr > th, table.mysmwtable > * > tr > th {
	background-color: #eaecf0; /*background color of the label column*/
	text-align: left; /*alignment of the label column*/
	width:25%;/*width of the label column*/
}
table.mysmwtable > tr > td, table.mysmwtable > * > tr > td {
	background-color: #f8f9fa; /*background-color of the second column*/
}
table.mysmwtable > tr > th, table.mysmwtable > tr > td, table.mysmwtable > * > tr > th, table.mysmwtable > * > tr > td {
	border: 1px solid #a2a9b1; /*border around cells*/
	padding: 10px; /*cell padding*/
}
form.createbox table.formtable th {
	padding:10px 0; /*distance between form fields*/
}
Save the page. -
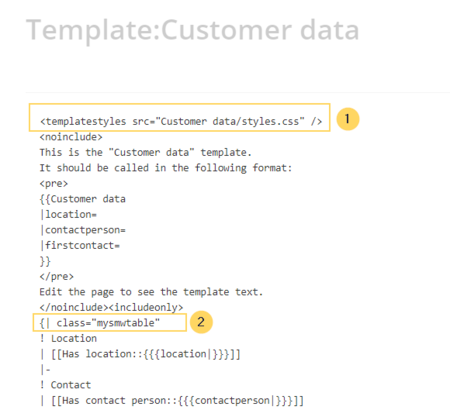
Now edit the page Template:Customer data.
(1) Add the reference to the page styles.css at the beginning of the template. You can copy the following tag:
<templatestyles src="Customer_data/styles.css" />
(2) Change the name of the css-class used in the table from wikitable mysmwtable.
Save the changes.
Now you can see the new table styling..
                        table.mysmwtable > tr > th, table.mysmwtable > * > tr > th {
	background-color: white; /*background color of the label column*/
}
                        table.smwtable > tr > td, table.smwtable > * > tr > td {
	background-color: white; /*Hintergrundfarbe der Wertespalte*/
}
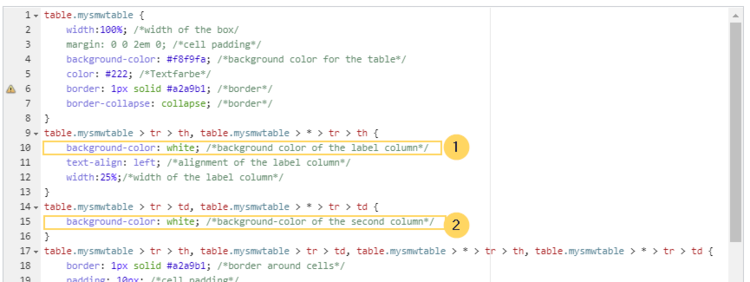
Die Zellhintergründe werden entsprechend angepasst.

Infobox[edit | edit source]
You can also format the table as an infobox. An infobox is floating to the left or right of the text flow.

-
Add the following css-code to the page Template:Customer_data/styles.css and save the template. Delete any previous styles for the class .mysmwtable to avoid any inheritance problems for the styles:
                                table.mysmwtable {
	float:right; /*right-aligned infobox*/
	width:300px; /*width of the box*/
	margin: 0 0 2em 2em; /*cell padding*/
	background-color: #f8f9fa; /*background color for the table*/
	color: #222; /*Textfarbe*/
	border: 1px solid #a2a9b1; /*border*/
	border-collapse: collapse; /*border*/
}
table.mysmwtable > tr > th, table.mysmwtable > * > tr > th {
	background-color: #eaecf0; /*background color of the label column*/
	text-align: left; /*alignment of the label column*/
}

table.mysmwtable > tr > th, table.mysmwtable > tr > td, table.mysmwtable > * > tr > th, table.mysmwtable > * > tr > td {
	border: 1px solid #a2a9b1; /*border around cells*/
	padding: 0.2em 0.4em; /*cell padding*/
}
form.createbox table.formtable th {
	padding:10px 0; /*distance between form fields*/
}
Tip: If you need different output formats, create separate templates to accomodate the styling. The templates can then use different subpages (styles.css) for each styling.