Difference between revisions of "Manual:Extension/BlueSpiceBookshelf"
| [unchecked revision] | [quality revision] |
(→Create and edit books) |
(Tag: Visual edit) |
Contents
The extensions Bookshelf and BookshelfUI expand the BlueSpice distribution, combining wiki pages into a structured book with chapter navigation. These books can also be printed as a PDF file with a cover page and a clickable table of contents
Contents
Characteristics of books[edit | edit source]
The package Bookmaker expands your BlueSpice distribution, enabling you to combine articles to books. These books include convenient ways to navigate (by table of content or book navigation), and they can also be printed as a pdf file if needed. The pdf file includes an individual cover page, a clickable table of contents, and all attachments from the articles contained.
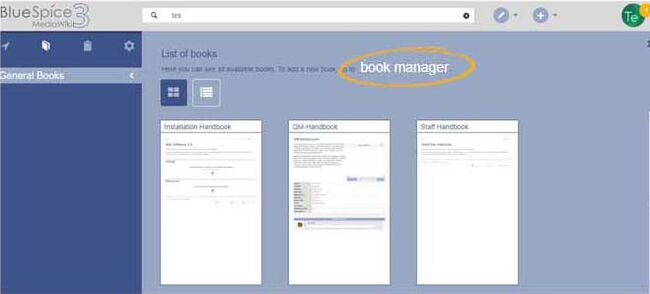
Where to find Bookmaker?With BlueSpice Pro, you can assemble individual wiki pages into a book. In a book, you can read through a collection of pages in a linear fashion by moving through the book navigation. This is useful if you have lots of related pages that should be read in a particular order. And it makes it easy to write documentation and to comply with your documentation standards. All the books that are available on the wiki are accessible through the left navigation menu, tab "Books" with the book icon. Books are displayed as list or grid view. Clicking on a book opens the selected book. Once the book is opened, its chapter navigation appears in the left navigation.
Book manager[edit | edit source]

Create a new book[edit | edit source]
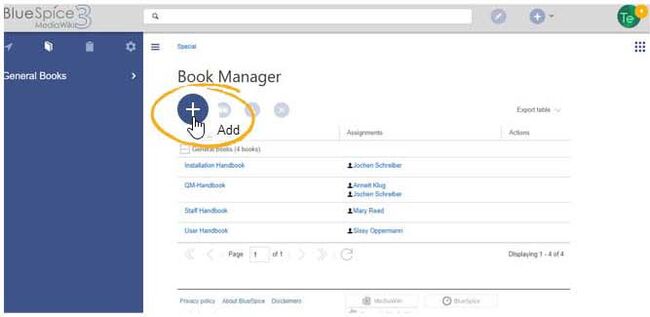
Step 1: Open the Book Manager as described above.
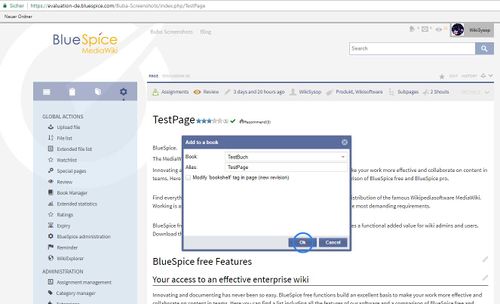
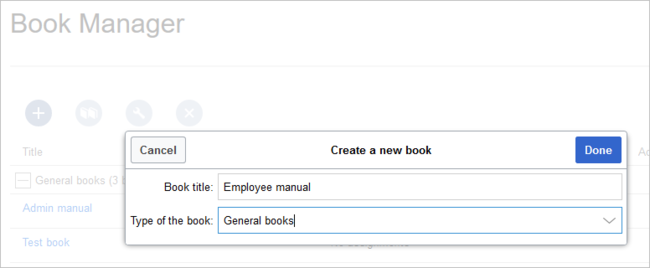
Step 2: Click on the green button to add a new book to your bookshelf. In the following popup window you can enter a book title, and decide if it will be a General book, which will be available for all users of the wiki via the navigation bar on the left side of the screen, or if it will be your own book, which will only be available for you. Click on Ok to start adding content.
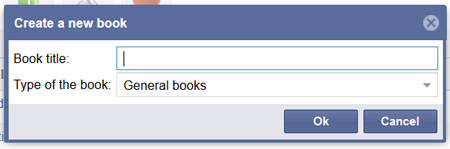 Screenshot: Choose a fitting name for your book!
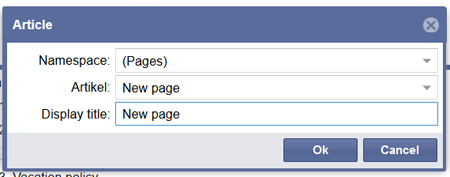 Screenshot: Expand your book with just a few clicks! Assign many pages to a book at once using the "Mass add" function. Select the pages of a category or the subpages of a page and you only have to sort the added pages. It is also possible to search for pages and export the search results and import them into the book.
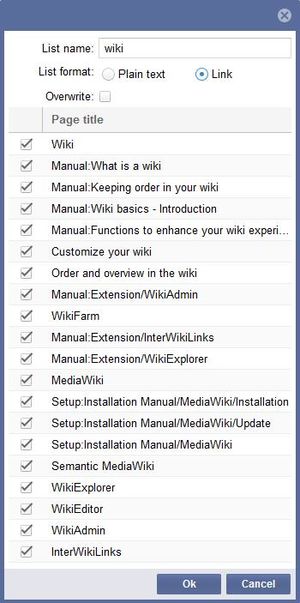 Mass add dialogue
Edit the chapter structure of a book[edit | edit source]
Articles added by you will be shown as separate chapters in the order you added them. You now have several possibilities to revise the chapter structure:
a) Remove an article: Select the article you want to remove in the list. Click on the red button above the chapter structure. Alternatively you can open the context menu by right-clicking on the article. Choose Delete article from book. Please note that the article will only be removed from the book, not deleted from the wiki!
b) Add a new article: Choose an entry in the existing book structure. Click on the green button above the window. You can now add a new article as described in Step 3. The article will be added as a subchapter to the page you selected.
c) Change the order of the articles: You can change the order of the articles easily via drag&drop.
d) Create subchapters: To add a subchapter to an existing chapter, just drag an article onto another article in the book structure. You can adjust the order of subchapters via drag&drop as well. You can also turn a subchapter into a superordinate chapter by dragging the article to the corresponding spot in the structure.
By the way: if you want to move an article after a chapter with subchapters, you can hide the substructure of the chapter by clicking on the small arrow in front of the superordinate chapter. This way you can avoid turning the article into a new subchapter by accident.
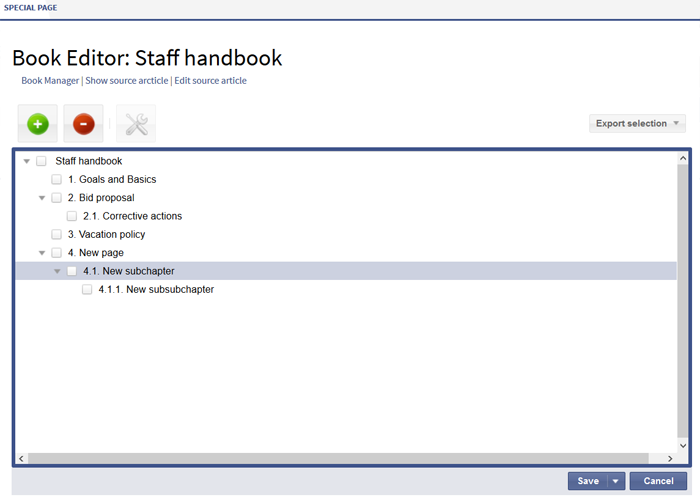 Screenshot: A structure with chapters and subchapters
Insert meta data[edit | edit source]
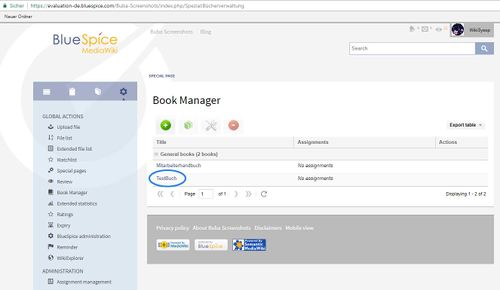
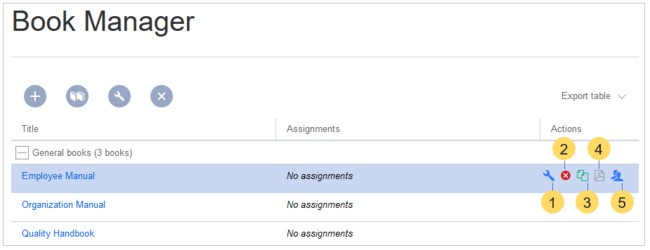
Step 4: Select the first layer of a book and click on the edit button above the book structure. In the following popup window you can now add many different meta data to your bookThe menu item Global Actions > Book manager loads the page Special:BookshelfBookManager. Here, you can add a new book by clicking the plus button.
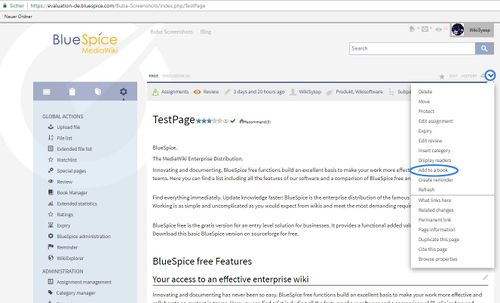
You can take the following actions on a book:
- Editing a book (1): Links to the Book editor where you can edit the book contents and metadata.
- Deleting a book (2): Deletes the book page in the namespace Book without deleting the wiki pages.
- Duplicating a book (3): Duplicates this book, including all the pages of the book.
- Export (4): Exports the wiki pages in this book to PDF.
-
Assign (5): Assigns the book to designated users.
Creating a book[edit | edit source]
To create a book:
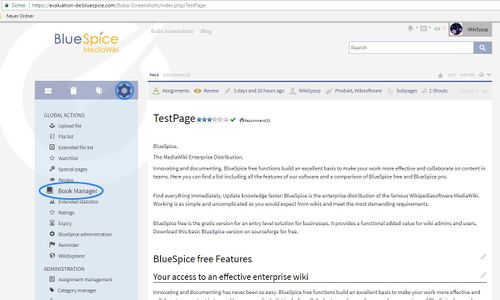
- Go to Global actions > Book manager.
- Select the Create (+) button.
-
Enter a Book title and the Type of the book:
- General books: Visible to all users. It should have a book navigation.
-
Own books: Books only visible to me.
- Click Done.
General books[edit | edit source]
General books are visible to all users and are usually characterized by their additionally generated book navigation.
Own books[edit | edit source]
Own books are only visible in the book list to the book creator. You cannot create chapter navigation in the navigation bar for your own books. However, like general books, your own books can be exported as a PDF with a title page.
Temporary books[edit | edit source]
This selection is available to wiki users who are logged in or not logged into the wiki. These books are only temporarily stored in the user's browser and not in the wiki itself. If the browser cache is deleted or the user switches to another browser, the book is no longer available. The main aim of temporary books is to enable users to print out a book as a PDF.
A chapter navigation cannot, therefore, be created for temporary books.
The book editor[edit | edit source]
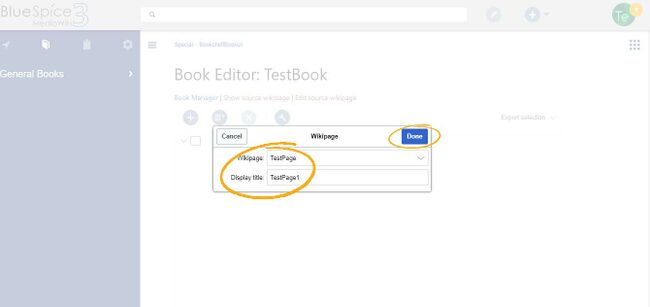
After that, the book editor opens. Here you can add pages to your book by clicking the plus button. A dialog opens, where you can select the pages you want to add to your book.You can also enter the name of a page that doesn't yet exist.
Mass-adding pages[edit | edit source]
After clicking "Mass add", a dialog is opened. It contains different criteria for page selection:
- All pages of a category
- All subpages of a certain page
- From a page collection - page collections are lists of pages located in the MediaWiki namespace. They are usually created from search results.
- By a semantic property - pages can be selected based on the value of a certain semantic property.
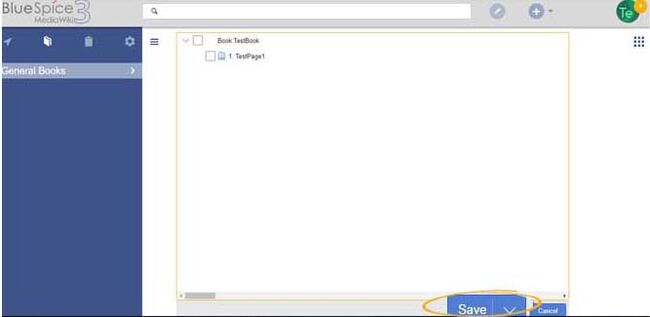
After adding your book pages click Save at the bottom of the page. Now you have created a page in the namespace Book. It contains the list of pages that have been added to the book.
[edit | edit source]
After saving a book page, you have created a wiki page in the namespace Book which contains a list of links to the wiki pages in the book. The chapter navigation is generated separately.
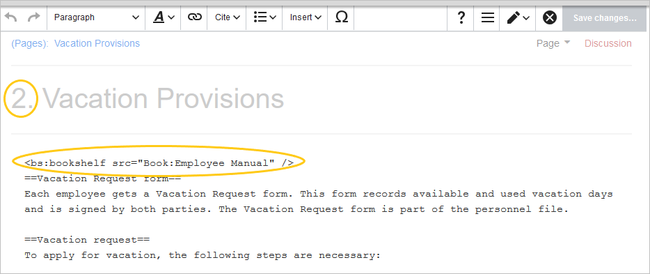
To add the chapter navigation, go back to the book page in the book manager. Clicking on the book title opens the book page in the book editor. Scroll down to the Save button and select the drop-down arrow. Click Save and add book navigation to each wiki page. This adds a bookshelf tag in the source code of all wiki pages that are part of this book. The tag, therefore, defines which book this page belongs to:
<bookshelf src="Book:EmployeeManual" />.
Note: If you later add more pages to a book, you have to generate the chapter navigation again. Without this step, the newly added pages will not have a bookshelf tag and therefore not be shown in the chapter navigation of the book. If you only added one or two new pages, you can also add the bookshelf tag manually to the source code of these new pages.
Important! Each wiki page can only be added to one book. If a page later is added to another book with chapter navigation, the page always leads to the chapter navigation of the book that last generated or updated its chapter navigation.
Editing a book[edit | edit source]
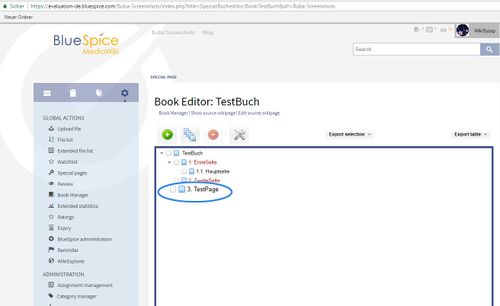
After you have created the book, click on the name of the book. This opens the Book Editor.
Editing a book is is similar to creating a new book regarding adding pages to the book. Pages can also be removed from a book by right-clicking on the page name and selecting Delete from book (this will not delete the wiki page itself). Chapters - and the general book structure - can be re-arranged by dragging and dropping pages in the book structure. By dragging and dropping Page A over Page B, Page A will be placed underneath Page B in the book hierarchy.
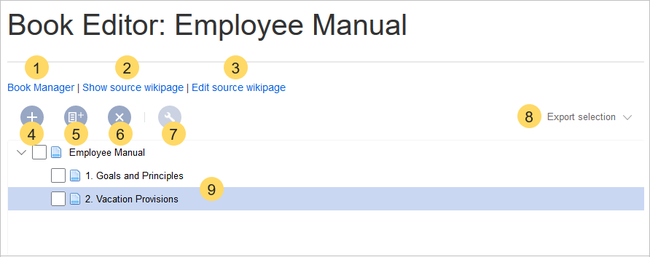
- Book Manager (1): Link to the main Book manager page (only up to v3.1).
- Show source wikipage (2): Opens the book navigation page in view mode (only up to v3.1)..
- Edit source wikipage (3): Opens the book navigation page in edit mode (only up to v3.1)..
- Add page (4): Button for adding a page.
- Mass-add pages (5): Button for adding a set of pages (by category, subpages of a page, page collection, or semantic property).
- Remove page (6): Removes the selected pages.
- Manage metadata (7): Add or remove metadata.
- Export selection (8): Exports the selected pages to a PDF file.
- Book contents (9): Shows all pages in the book hierarchy Pages can be arranged by drag-and-drop. A multi-level organization is possible.
Inserting meta data[edit | edit source]
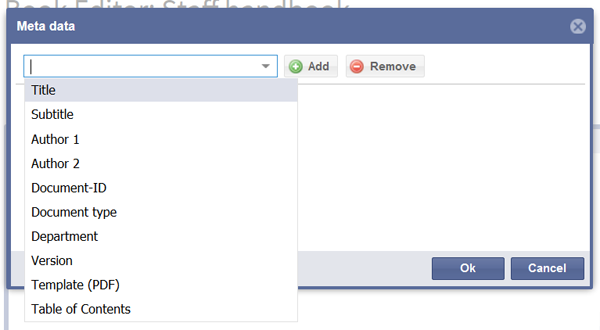
While editing a book (adding or removing pages), meta-data for the book can be added. To edit metadata, select top-most node of the book (first page) and click the wrench icon. A dialog will be opened where various meta-data can be added or removed. Some of the most important meta-data include:
- Title
- Subtitle
- Author 1 and 2
- Document-ID
- Document type
- Department
- Version
- Template (PDF)
- Table of Contents (Only article titles, or Embed article TOCs)
 Screenshot: Enter meta data for a bookSave the book
Adding a cover image[edit | edit source]
Step 5: Once you have finished the creation and editing of your book, you have to save of course. For this, you have two possibilities:
a) Click on Save to save the book. Please note this does not add any book navigation to a new book. So it's best to use the Save option only if you didn't change anything on the chapter structure of a book.
b) Click on the small arrow beside the Save button and choose Save and add book navigation to each article. After that you can use the navigation bar on the left to browse the book. Please also use this option if you changed or expanded an existing book, as this is the only way to add the changes to the book navigation.
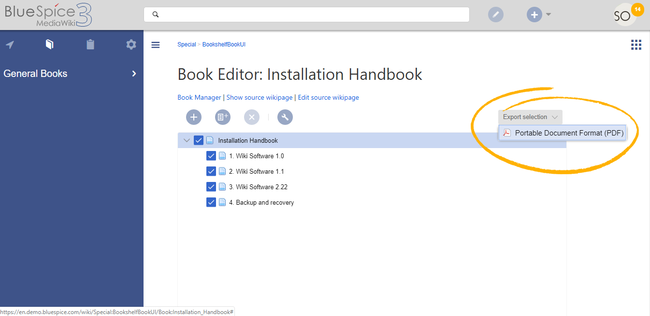
 Screenshot: Choose this option to apply the chapter structure to the book By the way: once you changed a book project, an orange border will appear around the book editor to remind you not to forget to save in the end. Export
To add a cover photo for the book, add a metadata item Bookshelf image. Select this option from the dropdown and click Add. Once the meta data is added enter the name of the image in the value field. Any image currently uploaded to the wiki can be used. Type the name without the "File:" prefix (enter the image name and file extension).
Exporting books[edit | edit source]
You can export a an entire book, individual chapters or even pages into the pdf or docx formatsingle pages as PDF: Step 1:
- Open the book in the book editor.
- Select all pages or chapters you want to export by clicking the associated checkboxes
- . Subchapters will be automatically selected.
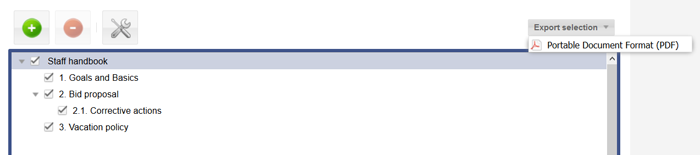
Step 3: Click on Export selection. Choose the format you want to save the book in. Please note that only those formats will be available that are installed in your wiki.
Depending on the template, your book will now be printed in a specific style in the desired format. These templates can of course be adjusted to fit your needs.
 Screenshot: Book export made easyEdit books via source code
- Clicking on the "Export selection" dropdown menu opens a list of availble formats. By clicking on one of the formats offered the book export starts.
Configuration[edit | edit source]
Especially with complex books, where you want to link articles that have not been created yet, it can be sensible to edit the book directly via the source code.
Step 1: Open the Book Manager as described above. Click on the book you want to edit to open the book editor.
Step 2: Click on the link Edit source article above the book editor. The book will now be shown to you as a list of all linked articles. You can change and expand this list to your liking. The indenting depth of the individual bullet points marks the existing hierarchy in the book (Chapter, subchapter etc.).
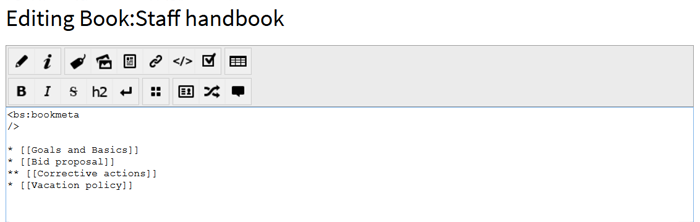 Screenshot: The chapter structure of a book in the source code Step 3: Save your changes. Open the Book Manager again and click on the respective book.
Step 4: Click on the small arrow beside the Save button and choose Save and add book navigation to each article. Only then will the changes you made be shown in the book navigation.
Read books[edit | edit source]
General books[edit | edit source]
Step 1: Click on the Books tab in the navigation bar on the left of your wiki. You will see a list of the general books that are available.
Step 2: Choose the book you want to read and click on it. The first page will be opened automatically. Furthermore you can now see the book navigation under the list of available books on the left. You can use this navigation to browse the book page by page or chapter by chapter.
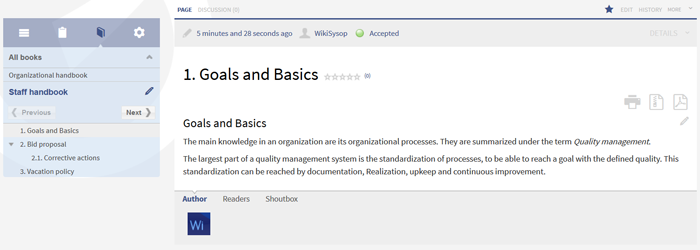 Screenshot: Simplified navigation, thanks to the chapter structure
Your own books[edit | edit source]
Your own books will be created in the namespace User as a subpage of the particular creator and are only available there. They will not be shown in the Books tab in the navigation bar on the left. You can open your own book like this:
Step 1: Open your user page. To do so, click on your login name in the upper right corner of the screen, and choose the first entry ("You user page") in the menu.
Step 2: In the statebar of your user page, you will find the link Subpages. Click on it to see the existing subpages.
Step 3: Choose the book you want to read and click on the link.
Step 4: The chapter structure of the book will now be shown in normal reading mode. Click on the page you want to read, and the book navigation you are used to from general books will also be available in the navigation bar on the left.
Alternatively you can also open your own books in the Book Manager. Choose a book and open it in the book editor. Right-click on the chapter you want to read. Choose Open article in new window. This will show you the book navigation on the left as well.
Working hintsDisplay options[edit | edit source]
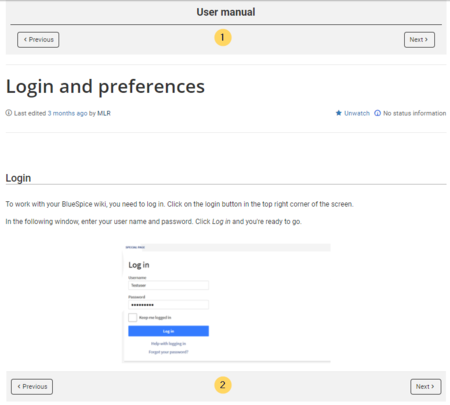
- Show book chapter pager after content: Displays previous/next book page navigation at the end of each book page. (1)
-
Show book chapter pager before content: Displays previous/next book page navigation at the beginning of each book page. (2)
-
Use the display title from book source on article: Shows the title from the book navigation as page title instead of the page name.
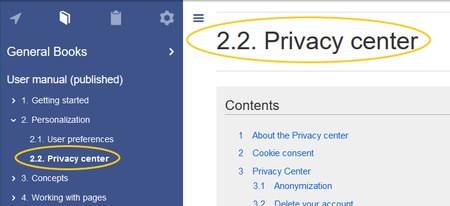
Note: If the page additionally contains a {{DISPLAYTITLE}} tag, the display title of the page is shown instead of the book title.
- Prepend article table of contents and headlines with book numberation
- Supress namespace prefix of book articles in output
Export options[edit | edit source]
Extension:DynamicPageList (DPL), version 3.3.2: Warning: No results.
Configuring the file size limits (server)[edit | edit source]
By default, the book export is limited to 50MB in file size. To adjust this value, complete the following steps:
-
In Apache Tomcat, open the file web.xml:
                            sudo -s
nano /opt/tomcat/webapps/manager/WEB-INF/web.xml
-
Look for the following lines and adjust the value (e.g. for 250MB=26214400)
                            <max-file-size>262144000</max-file-size>
<max-request-size>262144000</max-request-size>
-
The web app BShtml2PDF also has a setting that needs to be adjusted:
nano /opt/tomcat/webapps/BShtml2PDF/WEB-INF
-
Enter your values in the following lines:
                            <param-name>maxMemSize</param-name> <param-value>26214400</param-value>
<param-name>maxFileize</param-name> <param-value>26214400</param-value>
-
Apache Tomcat neu starten
service tomcat restart
Deleting a book[edit | edit source]
When you delete a book, you only remove the book page in the namespace Book from the Book manager. The wiki pages in the book, however, are not deleted. Before you delete the book, you are informed in a pop-up menu that the bookshelf tag is not automatically removed from the pages: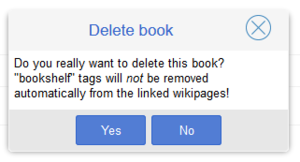
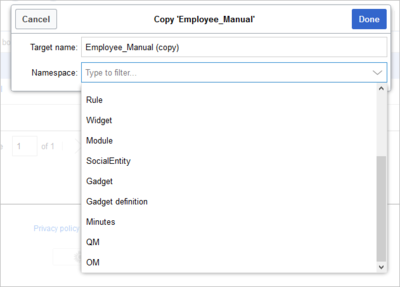
Duplicating a book[edit | edit source]
You can create an entire copy of the book by duplicating it:
To duplicate a book:
- Enter a target name: The default vlaue is the book name with the suffix (copy). Change this to create a different book title.
- Select a namespace: Choose a namespace that is different from the original namespace.
- Book page: A new page in the namespace book. If you don't enter a new title, the book will be created with the same title and the suffix (Copy). E.g. Employee Manual (Copy). This file includes a copy of the structure of your original book with the corresponding links to the duplicated pages in the new copy.
-
Wiki pages: All pages contained in the original book are duplicated. The following scenarios are possible:
-
Same namespace: If you duplicate a book in the same namespace, no actual duplicates of the actual wiki are created. Instead, the bookshelf tag is updated to point to the copy of the book. For example, if your original book contains the page HR:Quality assurance (the book is in the namespace HR), the Quality assurance page now contains the bookshelf tag
<bs:bookshelf src="Book:Employee Manual (Copy)" />. -
Different namespace: If you create the book copy in a different namespace, the bookshelf tag in the original files remains unchanged. The new pages in the different namespace are created with a bookshelf tag for the new book copy. This is most likely the scenario you want.
-
Same namespace: If you duplicate a book in the same namespace, no actual duplicates of the actual wiki are created. Instead, the bookshelf tag is updated to point to the copy of the book. For example, if your original book contains the page HR:Quality assurance (the book is in the namespace HR), the Quality assurance page now contains the bookshelf tag
Permissions[edit | edit source]
To create and edit books, users need edit rights in Book namespace. Additionally, a user can only add pages to the book that that user can read. If a user tries to export a book to PDF that contains pages for which the user does not have permissions, the user will get an error message.
Tips for working with books[edit | edit source]
- Use a competent team to decide on the content that should be transferred into an online book.
- Decide on how to handle existing numerations or references.
- Seize the opportunity: get Get rid of unnecessary content (or don't include it in your wiki in the first placebook).
- Decide on standards for documents: when When does it make sense to link documents in the wiki? When is is sensible to include the documentsdocument's content into a wiki article?
- Decide on a fitting course of action: do Do you want to create the articles in the wiki first, and compile them in a book structure afterwards, or do you want to create the book structure first, and create and edit the articles contained gradually? Especially if you choose the latter, templates will be very important, because you can add the book navigation tag necessary already to the template. This saves a lot of time later on.
Administration[edit | edit source]
Which rights can be granted?[edit | edit source]-
To create and edit books, the user needs editing rights for the
Booknamespace. - Apart from that, existing article rights apply. This means that a user can only include those articles in a book where he has editing rights.
Further settings[edit | edit source]
Bookmaker offers the following settings for administrators:
-
In the Bookshelf tab:
- Prepend article table of contents and headlines with book numeration
- Suppress namespace prefix of book articles in output
- Use display title from book source on article
-
In the Universal export tab:
- Metadata (standard, JSON)
- Metadata (override, JSON)
-
In the UniversalExport Book PDF Module tab:
- Table of Contents (Only article titles, Embed article TOCs)
- Standard template for the export
- Template directory, showing the location of the templates
Additionally, users can add or exclude the Book namespace in their search queries (found in the individual user preferences under the tab Search). However, keep in mind that the articles contained in a book are still in their original namespaces, and not in the Book namespace.
Which extensions are part of Bookmaker?[edit | edit source]Bookmaker contains the following extensions:
- Bookshelf
- The extension Bookshelf supplies the main functions for creating and managing books.
- BookshelfUI
- BookshelfUI adds the user interface for the functions of Bookshelf.
Additionally, the following extensions are part of Bookmaker and expand the functionality of UniversalExport:
- UEModuleBookPDF
- This extension allows you to export a book in the pdf-format.
- UEModuleBookDOCX
- The extension UEModuleBookDOCX allows you to export a book in the docx-format. Please note: you need an additional license for an external extension for your wiki to use this feature.
- UEModuleBookHTML
- This extension enables you to export a whole book from your wiki to an external HTML structure. Please note: this feature is being revised and not available at the moment.
- UEModuleHTML
- This extension enables you to export a single page from your wiki to an external HTML structure. Please note: this feature is being revised and not available at the moment.
- UEModulePDFRecursive
- With UEModulePDFRecursive you can export pages from your wiki as a pdf file. This export also includes all pages that are linked in the respective article (recursion depth 1, so only articles directly linked in the page will be added to the export). Please note: this feature is being revised and not available at the moment.
- UEModulePDFSubpages
- The extension UEModulePDFSubpages lets you print individual articles from your wiki including all subpages as a pdf file. Please note: this feature is being revised and not available at the moment.
Troubleshooting[edit | edit source]
Problem: The following error occurs during the pdf-export of a book: "The book could not be exported, because it contains an article with no Bookshelf-Tag."
Solution: Try to refresh the book navigation before you export the book. To do so, mark all pages and click on the small arrow to the right of the Save button. Choose Save and add book navigation to each article".
Problem: An article has to be linked in more than one book, however this messes up the navigation of these books.Solution: You can link an article in more than one book by transcluding it. Create a page like this:
-
<bs:bookshelf src="Book: Name of the book" /> -
{{Article to be linked}}
The article will now be embedded in the book, not directly linked. The navigation of other books will not be compromised by this. Problem: I created my own book, but I can't access it via my user profile, because there are no subpages shown. Solution: It is possible that you have to create your own user page first. Click on your login name in the upper right corner of the screen. Choose the first entry (Your user page) in the context menu. If you now get the message "This page doesn't exist yet. [...]", you have to create it first. After saving the page you will find a link to existing subpages in the statebar. Click on it, and you will find a link to the book you created.
Additional helpful extensions[edit | edit source]
|
The BlueSpice package Bookmaker is part of BlueSpice pro. It can be purchased as an extension package in the Shop. |
See also[edit | edit source]
Our reference page.