Difference between revisions of "Setup:Installation Manual/Webservices/Extended Search"
← Setup:Installation Manual/Webservices/Extended Search
| [unchecked revision] | [quality revision] |
(Created page with "{{DISPLAYTITLE:Webservice: Extended Search}} __TOC__ This document describes the installation of the extended search for BlueSpice. Please take into account, that the Setu...") |
(Redirected page to Setup:Installation Guide/Advanced/ExtendedSearch Configuration) (Tags: New redirect, Visual edit) |
Contents
- 1 Hinweise zum Dokument Tips for this Document
- 2Einrichten des Solr- Setting-up the Solr-Cores
- 3Konfiguration Configurating Tomcat
- 4 Kopieren der Solr Anwendung Copying of the Solr Application
- 5 Neustart Tomcat Restarting Tomcat
- 6Aktivieren der Erweiterten Suche Activating the Extended Search in BlueSpice
This document describes the installation of the extended search for BlueSpice. Please take into account, that the Apache Tomcat server must be installed and configured completely.
Hinweise zum DokumentTips for this Document[edit | edit source]
- Bitte lesen Sie diese Anleitung vollständig durch und arbeiten Sie die einzelnen Installationsschritte der Reihe nach ab.
- Beim Editieren von Konfigurationsdateien mit einem Texteditor müssen die Dateien in UTF-8 Kodierung ohne BOM Please, read this manual completely and work through the single installation steps one after another.
- For editing the configuration files with a text editor, the files must be saved in UTF-8 coding without BOM (Byte Order Mark) gespeichert werden.
-
Der Platzhalter The placeholder
<installpath-bluespice>steht stellvertretend für den Pfad zu Ihrer BlueSpice-Installation, z.B. stands for the path to your BlueSpice installation, e.gC:\inetpub\wwwroot\bluespice(Windows) oder or/var/www/bluespice(Linux). -
Der Platzhalter The placeholder
<tomcat-webapps>steht stellvertretend für den Pfad zum Webapps-Verzeichnis Ihres Tomcat-Servers, z.B. stands for the path to the Webapps directory of your Tomcat server, e.g.C:\Program Files\Apache Software Foundation\Tomcat 8.5\webapps(Windows) oder or/var/lib/tomcat8/webapps(Linux).
Einrichten des Solr-Setting-up the Solr-Cores[edit | edit source]
Legen Sie folgendes Verzeichnis anCreate the following directory:
/opt/bluespice/data (Linux)
C:\BlueSpice\bluespice_data (Windows)
left Wollen Sie davon abweichend ein anderes Verzeichnis wählen, so lesen Sie die Hinweise zur individuellen Ordnerstruktur für fortgeschrittene Anwender.
Verschieben Sie den Ordner Move the directory "solr" aus dem Verzeichnis from <installpath-bluespice>/extensions/BlueSpiceExtensions/ExtendedSearch/webservices in diesen soeben angelegten Ordner. Wechseln Sie in diesen Ordner und gehen in den Unterordner to the just created directory.
Switch to this directory and go to the subfolder bluespice/conf/lang. Wählen Sie die stopwordChoose stopwords_<LANG>.txt, die Ihrer Sprache entspricht und ersetzen Sie die Datei there, which matches your language and replace the file stopwords.txt im Ordner in the folder bluespice/conf (eine Ebene höher) durch diese Datei. leftUnter Linux übergeben Sie bitte unbedingt den Ordner one level higher) with this file.

Configurating Tomcat[edit | edit source]
Der Tomcat-Server muss das Verzeichnis zum Solr-Core kennen. Im folgenden wird beschrieben, wie dies konfiguriert wird. The Tomcat server needs to know the directory to the Solr core. The following describes how to configure this.
Linux[edit | edit source]
Die Distributionen unterscheiden sich an dieser Stelle, je nach Ort der Konfigurationsdatei. Wie es in der von Ihnen verwendeten Distribution konfiguriert werden muss entnehmen Sie bitte der jeweiligen Dokumentation des Distributors. Folgende Schritte erklären die Konfiguration am Beispiel Debian/Ubuntu und Tomcat 8:
Öffnen Sie die Datei The distributions differ at this point regarding the configuration file. How this needs to be configured with the distribution you are using can be found in the documentation of the distributor. The following steps explain the configuration using Debian/Ubuntu and Tomcat 8:
Open the file /etc/default/tomcat8 und fügen ganz am Ende folgende Zeile ein: and add the following line at the end:
JAVA_OPTS="${JAVA_OPTS} -Dsolr.solr.home=/opt/bluespice/data/solr"
Speichern und verlassen Sie die Datei wieder. Save the changes and exit the file.
Windows[edit | edit source]
Öffnen Sie die Konfigurationsoberfläche von Tomcat und wechseln Sie in die Registerkarte Open the configuration interface of Tomcat and switch to the tab "Java". Fügen Sie im Feld At the field "Java Options" als letzten Punkt die Zeile , add this as the last point in the line:
-Dsolr.solr.home=C:\BlueSpice\bluespice_data\solrhinzu.
Speichern Sie Ihre Einstellung durch Klick auf "Übernehmen".
Kopieren der Solr Anwendung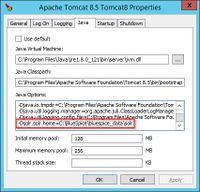
Save this settings by clicking at "Apply".
Copying of the Solr Application[edit | edit source]
Verschieben Sie die Datei Move the file "solr.war" aus dem Verzeichnis from the directory <installpath-bluespice>/extensions/BlueSpiceExtensions/ExtendedSearch/webservices nach to <tomcat-webapps>
Neustart TomcatRestarting Tomcat[edit | edit source]
Starten Sie den Tomcat Webserver neu, siehe auch Neustart von Tomcat.
Aktivieren der Erweiterten SucheRestart the Tomcat Webserver like described here.
Activating the Extended Search in BlueSpice[edit | edit source]
Wechseln Sie in das Verzeichnis Go to the directory <installpath-bluespice>/extensions/BlueSpiceExtensions. Sofern die Datei If the file BlueSpiceExtensions.local.php noch nicht existiert kopieren Sie bitte nun die Datei does not exist already, please copy the file BlueSpiceExtensions.default.php und legen Sie im selben Ordner unter dem Namen and paste it in the folder. Rename it to BlueSpiceExtensions.local.php ab. Öffnen Sie diese Datei in einem Texteditor. Scrollen Sie ans Ende der Datei. Dort finden Sie folgende Zeile. Open this file in a text editor.
Scroll to the end of the file. There you can find the following line:
#require_once( __DIR__."/ExtendedSearch/ExtendedSearch.setup.php" );
Entfernen Sie hier das erste Zeichen Delete the first character (#), speichern die Datei ab und verlassen Sie diese wieder. Öffnen Sie nun eine Kommandozeile und wechseln in den Ordner <installpath-bluespice>. Führen Sie dort folgenden Befehl aussave and exit the file.
Open a comman line and change to the directory <installpath-bluespice>. Run the following command there:
                php maintenance/update.php (Linux)
php maintenance\update.php (Windows))
left Achten Sie unter Windows darauf, dass die Umgebungsvariablen korrekt gesetzt sind, um auf den Befehl "php" zugreifen zu können.
left Beachten Sie unter Linux, dass Sie nach dem Ausführen der update.php die Dateisystemrechte neu anpassen müssen..
Sobald das Script mit der Meldung "Done" abgeschlossen ist führen Sie ein weiteres Maintenance-Script aus, um den Suchindex erstmalig anzulegen
With Linux. please take care that after running the update.php, the file system permissions must be set again.
As soon as the script finished its work with the message "Done", run a further maintenance script to create the search index:
                php extensions/BlueSpiceExtensions/ExtendedSearch/maintenance/searchUpdate.php (Linux)
php extensions\BlueSpiceExtensions\ExtendedSearch\maintenance\searchUpdate.php (Windows))
Die Ausführung des Scripts kann, je nach Menge der von Ihnen möglicherweise bereits angelegten Inhalte, etwas Zeit in Anspruch nehmen. Sobald das Script durchgelaufen ist ist die Erweiterte Suche erfolgreich installiert und einsatzbereitRunning this script may take some time. This depends on the amount of content, which has been created in the wiki. When the script was completely executed, the extended search is installed successfully and is ready to use.