Difference between revisions of "Setup:Installation Manual/Webservices/Extended Search"
← Setup:Installation Manual/Webservices/Extended Search
[unchecked revision] | [quality revision] |
(Redirected page to Setup:Installation Guide/Advanced/ExtendedSearch Configuration) (Tags: New redirect, Visual edit) |
Contents
This document describes the installation of the extended search for BlueSpice. Please take into account, that the Apache Tomcat server must be installed and configured completely.
Tips for this Document[edit | edit source]
- Please, read this manual completely and work through the single installtion installation steps one after another.
- For editing the configuration files with a text editor, the files must be saved in UTF-8 coding without BOM (Byte Order Mark).
-
The placeholder
<installpath-bluespice>
stands for the path to your BlueSpice installation, e.gC:\inetpub\wwwroot\bluespice
(Windows) or/var/www/bluespice
(Linux). -
The placeholder
<tomcat-webapps>
stands for the path to the Webapps directory of your Tomcat server, e.g.C:\Program Files\Apache Software Foundation\Tomcat 8.5\webapps
(Windows) or/var/lib/tomcat8/webapps
(Linux).
Setting-up the Solr-Cores[edit | edit source]
Create the following directory:
/opt/bluespice/data (Linux) C:\BlueSpice\bluespice_data (Windows)If you are going to use a different directory, please read the notes regarding a individual directory structure for advanced users.
Move the directory "solr" from <installpath-bluespice>/extensions/BlueSpiceExtensions/ExtendedSearch/webservices
to the just created directory.
Switch to this directory and go to the subfolder bluespice/conf/lang
. Choose stopwords_<LANG>.txt
there, which matches your language and replace the file stopwords.txt
in the folder bluespice/conf
(one level higher) with this file.
Configurating Tomcat[edit | edit source]
The Tomcat server needs to know the directory to the Solr core. The following describes how to configure this.
Linux[edit | edit source]
The distributions differ at this point regarding the configuration file. How this needs to be configured with the distribution you are using can be found in the documentation of the distributor. The following steps explain the configuration using Debian/Ubuntu and Tomcat 8:
Open the file /etc/default/tomcat8
and ad add the following line at the end:
JAVA_OPTS="${JAVA_OPTS} -Dsolr.solr.home=/opt/bluespice/data/solr"
Save the changes and exit the file.
Windows[edit | edit source]
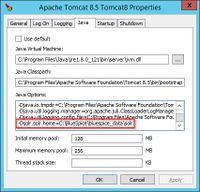
Open the configuration interface of Tomcat and switch to the tab "Java". At the field "Java Options", add this as the last point in the line:
-Dsolr.solr.home=C:\BlueSpice\bluespice_data\solr
Save this settings by clicking at "Apply".
Copying of the Solr Application[edit | edit source]
Move the file "solr.war" from the directory <installpath-bluespice>/extensions/BlueSpiceExtensions/ExtendedSearch/webservices
to <tomcat-webapps>
Restarting Tomcat[edit | edit source]
Restart the Tomcat Webserver like described here.
Activating the Extended Search in BlueSpice[edit | edit source]
Go to the directory <installpath-bluespice>/extensions/BlueSpiceExtensions
. If the file BlueSpiceExtensions.local.php does not exist already, please copy the file BlueSpiceExtensions.default.php and paste it in the folder. Rename it to BlueSpiceExtensions.local.php. Open this file in a text editor.
Scroll to the end of the file. There you can find the following line:
#require_once( __DIR__."/ExtendedSearch/ExtendedSearch.setup.php" );
Delete the first character (#), save and exit the file.
Open a comman line and change to the directory <installpath-bluespice>
. Run the following command there:
php maintenance/update.php (Linux) php maintenance\update.php (Windows))With Windows, please take care that the environment variables are set correctly to access the command "php".
With Linux. please take care that after running the update.php, the file system permissions must be set again.
As soon as the script finished its work with the message "Done", run a further maintenance script to create the search index:
php extensions/BlueSpiceExtensions/ExtendedSearch/maintenance/searchUpdate.php (Linux) php extensions\BlueSpiceExtensions\ExtendedSearch\maintenance\searchUpdate.php (Windows))
Running this script may take some time. This depends on the amount of content, which has been created in the wiki. When the script was completely executed, the extended search is installed successfully and is ready to use.
#REDIRECT [[Setup:Installation Guide/Advanced/ExtendedSearch Configuration]]{{DISPLAYTITLE:Webservice: Extended Search}} __TOC__ This document describes the installation of the extended search for BlueSpice. Please take into account, that the [[Setup:Installation_Manual/System_ConfigurationServices and system configuration/Apache_Tomcat|Apache Tomcat server]] must be installed and configured completely. ==Tips for this Document== * *Please, read this manual completely and work through the single installtioninstallation steps one after another. * For editing the configuration files with a text editor, the files must be saved in UTF-8 coding without BOM (Byte Order Mark). * The placeholder <code><installpath-bluespice></code> stands for the path to your BlueSpice installation, e.g <code>C:\inetpub\wwwroot\bluespice</code> (Windows) or <code>/var/www/bluespice</code> (Linux). * The placeholder <code><tomcat-webapps></code> stands for the path to the Webapps directory of your Tomcat server, e.g. <code>C:\Program Files\Apache Software Foundation\Tomcat 8.5\webapps</code> (Windows) or <code>/var/lib/tomcat8/webapps</code> (Linux). ==Setting-up the Solr-Cores== Create the following directory: /opt/bluespice/data (Linux) C:\BlueSpice\bluespice_data (Windows) [[File:Hint.jpg|left]] '''If you are going to use a different directory, please read the [[Setup:Installation_Manual/Advanced/Individual_File_Sturcture|notes regarding a individual directory structure for advanced users]].''' Move the directory "solr" from <code><installpath-bluespice>/extensions/BlueSpiceExtensions/ExtendedSearch/webservices</code> to the just created directory. Switch to this directory and go to the subfolder <code>bluespice/conf/lang</code>. Choose <code>stopwords_<LANG>.txt</code> there, which matches your language and replace the file <code>stopwords.txt</code> in the folder <code>bluespice/conf</code> (one level higher) with this file.<br /><br /> [[File:Hint.jpg|left]]'''With Linux, please transfer the folder /opt/bluespice/data/solr recursively to the user and group, under which the Tomcat server is running.''' ==Configurating Tomcat== The Tomcat server needs to know the directory to the Solr core. The following describes how to configure this. ===Linux=== The distributions differ at this point regarding the configuration file. How this needs to be configured with the distribution you are using can be found in the documentation of the distributor. The following steps explain the configuration using Debian/Ubuntu and Tomcat 8: Open the file <code>/etc/default/tomcat8</code> and adadd the following line at the end: JAVA_OPTS="${JAVA_OPTS} -Dsolr.solr.home=/opt/bluespice/data/solr" Save the changes and exit the file. ===Windows=== Open the [[Setup:Installation_Manual/System_Configuration/Apache_Tomcat#Configure_Tomcat|configuration interface of Tomcat]] and switch to the tab "Java". At the field "Java Options", add this as the last point in the line: -Dsolr.solr.home=C:\BlueSpice\bluespice_data\solr [[File:Setup:Setup_tomcat_configure_tomcat_03.jpg|center|200x192px]] Save this settings by clicking at "Apply". ==Copying of the Solr Application== Move the file "solr.war" from the directory <code><installpath-bluespice>/extensions/BlueSpiceExtensions/ExtendedSearch/webservices</code> to <code><tomcat-webapps></code> ==Restarting Tomcat== Restart the Tomcat Webserver like described [[Setup:Installation_Manual/System_Configuration/Apache_Tomcat#Restart_Tomcat|here]]. ==Activating the Extended Search in BlueSpice== Go to the directory <code><installpath-bluespice>/extensions/BlueSpiceExtensions</code>. If the file '''BlueSpiceExtensions.local.php''' does not exist already, please copy the file '''BlueSpiceExtensions.default.php''' and paste it in the folder. Rename it to '''BlueSpiceExtensions.local.php'''. Open this file in a text editor. Scroll to the end of the file. There you can find the following line: #require_once( __DIR__."/ExtendedSearch/ExtendedSearch.setup.php" ); Delete the first character ('''#'''), save and exit the file. Open a comman line and change to the directory <code><installpath-bluespice></code>. Run the following command there: php maintenance/update.php ''(Linux)'' php maintenance\update.php ''(Windows))'' [[File:Hint.jpg|left]] '''With Windows, please take care that the [[Setup:Installation_Manual/System_Configuration/Environment_Variables|environment variables]] are set correctly to access the command "php". ''' [[File:Hint.jpg|left]] '''With Linux. please take care that after running the update.php, the [[Setup:Installation_Manual/Security_Settings/File_System_Permissions#Assignment_of_Permissions_with_Linux|file system permissions]] must be set again.''' As soon as the script finished its work with the message "Done", run a further maintenance script to create the search index: php extensions/BlueSpiceExtensions/ExtendedSearch/maintenance/searchUpdate.php ''(Linux)'' php extensions\BlueSpiceExtensions\ExtendedSearch\maintenance\searchUpdate.php ''(Windows))'' Running this script may take some time. This depends on the amount of content, which has been created in the wiki. When the script was completely executed, the extended search is installed successfully and is ready to use. [[en:{{FULLPAGENAME}}]] [[de:Setup:Installationsanleitung/Webservices/Erweiterte_Suche]]
(9 intermediate revisions by 3 users not shown) | |||
Line 1: | Line 1: | ||
− | {{DISPLAYTITLE:Webservice: Extended Search}} | + | #REDIRECT [[Setup:Installation Guide/Advanced/ExtendedSearch Configuration]]{{DISPLAYTITLE:Webservice: Extended Search}} |
__TOC__ | __TOC__ | ||
− | This document describes the installation of the extended search for BlueSpice. Please take into account, that the [[Setup:Installation_Manual/ | + | This document describes the installation of the extended search for BlueSpice. Please take into account, that the [[Setup:Installation_Manual/Services and system configuration/Apache_Tomcat|Apache Tomcat server]] must be installed and configured completely. |
==Tips for this Document== | ==Tips for this Document== | ||
− | * Please, read this manual completely and work through the single | + | |
− | * For editing the configuration files with a text editor, the files must be saved in UTF-8 coding without BOM (Byte Order Mark). | + | *Please, read this manual completely and work through the single installation steps one after another. |
− | * The placeholder <code><installpath-bluespice></code> stands for the path to your BlueSpice installation, e.g <code>C:\inetpub\wwwroot\bluespice</code> (Windows) or <code>/var/www/bluespice</code> (Linux). | + | *For editing the configuration files with a text editor, the files must be saved in UTF-8 coding without BOM (Byte Order Mark). |
− | * The placeholder <code><tomcat-webapps></code> stands for the path to the Webapps directory of your Tomcat server, e.g. <code>C:\Program Files\Apache Software Foundation\Tomcat 8.5\webapps</code> (Windows) or <code>/var/lib/tomcat8/webapps</code> (Linux). | + | *The placeholder <code><installpath-bluespice></code> stands for the path to your BlueSpice installation, e.g <code>C:\inetpub\wwwroot\bluespice</code> (Windows) or <code>/var/www/bluespice</code> (Linux). |
+ | *The placeholder <code><tomcat-webapps></code> stands for the path to the Webapps directory of your Tomcat server, e.g. <code>C:\Program Files\Apache Software Foundation\Tomcat 8.5\webapps</code> (Windows) or <code>/var/lib/tomcat8/webapps</code> (Linux). | ||
==Setting-up the Solr-Cores== | ==Setting-up the Solr-Cores== | ||
Line 16: | Line 17: | ||
/opt/bluespice/data (Linux) | /opt/bluespice/data (Linux) | ||
C:\BlueSpice\bluespice_data (Windows) | C:\BlueSpice\bluespice_data (Windows) | ||
− | |||
− | |||
− | |||
Move the directory "solr" from <code><installpath-bluespice>/extensions/BlueSpiceExtensions/ExtendedSearch/webservices</code> to the just created directory. | Move the directory "solr" from <code><installpath-bluespice>/extensions/BlueSpiceExtensions/ExtendedSearch/webservices</code> to the just created directory. | ||
Line 24: | Line 22: | ||
[[File:Hint.jpg|left]]'''With Linux, please transfer the folder /opt/bluespice/data/solr recursively to the user and group, under which the Tomcat server is running.''' | [[File:Hint.jpg|left]]'''With Linux, please transfer the folder /opt/bluespice/data/solr recursively to the user and group, under which the Tomcat server is running.''' | ||
+ | |||
+ | |||
+ | |||
==Configurating Tomcat== | ==Configurating Tomcat== | ||
Line 31: | Line 32: | ||
The distributions differ at this point regarding the configuration file. How this needs to be configured with the distribution you are using can be found in the documentation of the distributor. The following steps explain the configuration using Debian/Ubuntu and Tomcat 8: | The distributions differ at this point regarding the configuration file. How this needs to be configured with the distribution you are using can be found in the documentation of the distributor. The following steps explain the configuration using Debian/Ubuntu and Tomcat 8: | ||
− | Open the file <code>/etc/default/tomcat8</code> and | + | Open the file <code>/etc/default/tomcat8</code> and add the following line at the end: |
JAVA_OPTS="${JAVA_OPTS} -Dsolr.solr.home=/opt/bluespice/data/solr" | JAVA_OPTS="${JAVA_OPTS} -Dsolr.solr.home=/opt/bluespice/data/solr" | ||
Line 69: | Line 70: | ||
[[File:Hint.jpg|left]] '''With Windows, please take care that the [[Setup:Installation_Manual/System_Configuration/Environment_Variables|environment variables]] are set correctly to access the command "php". ''' | [[File:Hint.jpg|left]] '''With Windows, please take care that the [[Setup:Installation_Manual/System_Configuration/Environment_Variables|environment variables]] are set correctly to access the command "php". ''' | ||
− | [[File:Hint.jpg|left]] '''With Linux. please take care that after running the update.php, the [[Setup:Installation_Manual/Security_Settings/File_System_Permissions#Assignment_of_Permissions_with_Linux|file system permissions]] must be set again.''' | + | |
+ | |||
+ | |||
+ | [[File:Hint.jpg|left]] | ||
+ | |||
+ | '''With Linux. please take care that after running the update.php, the [[Setup:Installation_Manual/Security_Settings/File_System_Permissions#Assignment_of_Permissions_with_Linux|file system permissions]] must be set again.''' | ||
+ | |||
+ | |||
+ | |||
+ | |||
As soon as the script finished its work with the message "Done", run a further maintenance script to create the search index: | As soon as the script finished its work with the message "Done", run a further maintenance script to create the search index: | ||
Line 77: | Line 87: | ||
Running this script may take some time. This depends on the amount of content, which has been created in the wiki. When the script was completely executed, the extended search is installed successfully and is ready to use. | Running this script may take some time. This depends on the amount of content, which has been created in the wiki. When the script was completely executed, the extended search is installed successfully and is ready to use. | ||
+ | |||
+ | [[en:{{FULLPAGENAME}}]] | ||
+ | [[de:Setup:Installationsanleitung/Webservices/Erweiterte_Suche]] |