Difference between revisions of "Setup:Installation Manual/Webservices/Extended Search"
← Setup:Installation Manual/Webservices/Extended Search
| [unchecked revision] | [unchecked revision] |
Contents
- 1 Tips for this Document
- 2 Setting-up the Solr-Cores
- 3 Configurating Tomcat
- 4 Kopieren der Solr Anwendung Copying of the Solr Application
- 5 Neustart Tomcat Restarting Tomcat
- 6 Aktivieren der Erweiterten Suche in BlueSpice
This document describes the installation of the extended search for BlueSpice. Please take into account, that the Apache Tomcat server must be installed and configured completely.
Tips for this Document[edit | edit source]
- Please, read this manual completely and work through the single installtion steps one after another.
- For editing the configuration files with a text editor, the files must be saved in UTF-8 coding without BOM (Byte Order Mark).
-
The placeholder
<installpath-bluespice>stands for the path to your BlueSpice installation, e.gC:\inetpub\wwwroot\bluespice(Windows) or/var/www/bluespice(Linux). -
The placeholder
<tomcat-webapps>stands for the path to the Webapps directory of your Tomcat server, e.g.C:\Program Files\Apache Software Foundation\Tomcat 8.5\webapps(Windows) or/var/lib/tomcat8/webapps(Linux).
Setting-up the Solr-Cores[edit | edit source]
Create the following directory:
/opt/bluespice/data (Linux)
C:\BlueSpice\bluespice_data (Windows)

Move the directory "solr" from <installpath-bluespice>/extensions/BlueSpiceExtensions/ExtendedSearch/webservices to the just created directory.
Switch to this directory and go to the subfolder bluespice/conf/lang. Choose stopword_<LANG>.txt there, which matches your language and replace the file stopwords.txt in the folder bluespice/conf (one level higher) with this file.
Configurating Tomcat[edit | edit source]
The Tomcat server needs to know the directory to the Solr core. The following describes how to configure this.
Linux[edit | edit source]
The distributions differ at this point regarding the configuration file. How this needs to be configured with the distribution you are using can be found in the documentation of the distributor. The following steps explain the configuration using Debian/Ubuntu and Tomcat 8:
Open the file /etc/default/tomcat8 and ad the following line at the end:
JAVA_OPTS="${JAVA_OPTS} -Dsolr.solr.home=/opt/bluespice/data/solr"
Save the changes and exit the file.
Windows[edit | edit source]
Open the configuration interface of Tomcat and switch to the tab "Java". At the fiel "Java Options", add this as the last point in the line:
-Dsolr.solr.home=C:\BlueSpice\bluespice_data\solrcenter
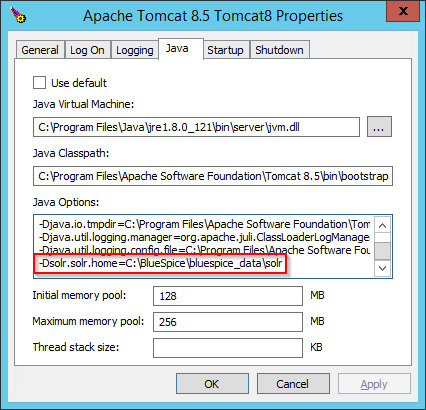
Save this settings by clicking at "Apply".
Kopieren der Solr AnwendungCopying of the Solr Application[edit | edit source]
Verschieben Sie die Datei Move the file "solr.war" aus dem Verzeichnis from the directory <installpath-bluespice>/extensions/BlueSpiceExtensions/ExtendedSearch/webservices nach to <tomcat-webapps>
Neustart TomcatRestarting Tomcat[edit | edit source]
Starten Sie den Tomcat Webserver neu, siehe auch Neustart von TomcatRestart the Tomcat Webserver like described here.
Aktivieren der Erweiterten Suche in BlueSpice[edit | edit source]
Wechseln Sie in das Verzeichnis <installpath-bluespice>/extensions/BlueSpiceExtensions. Sofern die Datei BlueSpiceExtensions.local.php noch nicht existiert kopieren Sie bitte nun die Datei BlueSpiceExtensions.default.php und legen Sie im selben Ordner unter dem Namen BlueSpiceExtensions.local.php ab. Öffnen Sie diese Datei in einem Texteditor.
Scrollen Sie ans Ende der Datei. Dort finden Sie folgende Zeile:
#require_once( __DIR__."/ExtendedSearch/ExtendedSearch.setup.php" );
Entfernen Sie hier das erste Zeichen (#), speichern die Datei ab und verlassen Sie diese wieder.
Öffnen Sie nun eine Kommandozeile und wechseln in den Ordner <installpath-bluespice>. Führen Sie dort folgenden Befehl aus:
                php maintenance/update.php (Linux)
php maintenance\update.php (Windows))
left
left
Sobald das Script mit der Meldung "Done" abgeschlossen ist führen Sie ein weiteres Maintenance-Script aus, um den Suchindex erstmalig anzulegen:
                php extensions/BlueSpiceExtensions/ExtendedSearch/maintenance/searchUpdate.php (Linux)
php extensions\BlueSpiceExtensions\ExtendedSearch\maintenance\searchUpdate.php (Windows))
Die Ausführung des Scripts kann, je nach Menge der von Ihnen möglicherweise bereits angelegten Inhalte, etwas Zeit in Anspruch nehmen. Sobald das Script durchgelaufen ist ist die Erweiterte Suche erfolgreich installiert und einsatzbereit.
{{DISPLAYTITLE:Webservice: Extended Search}}
__TOC__
This document describes the installation of the extended search for BlueSpice. Please take into account, that the [[Setup:Installation_Manual/System-Configuration/Apache_Tomcat|Apache Tomcat server]] must be installed and configured completely.
==Tips for this Document==
* Please, read this manual completely and work through the single installtion steps one after another.
* For editing the configuration files with a text editor, the files must be saved in UTF-8 coding without BOM (Byte Order Mark).
* The placeholder <code><installpath-bluespice></code> stands for the path to your BlueSpice installation, e.g <code>C:\inetpub\wwwroot\bluespice</code> (Windows) or <code>/var/www/bluespice</code> (Linux).
* The placeholder <code><tomcat-webapps></code> stands for the path to the Webapps directory of your Tomcat server, e.g. <code>C:\Program Files\Apache Software Foundation\Tomcat 8.5\webapps</code> (Windows) or <code>/var/lib/tomcat8/webapps</code> (Linux).
==Setting-up the Solr-Cores==
Create the following directory:
/opt/bluespice/data (Linux)
C:\BlueSpice\bluespice_data (Windows)
[[File:Hint.jpg|left]] '''If you are going to use a different directory, please read the [[Setup:Installation_Manual/Advanced/Individual_File_Sturcture|Notesnotes regarding a individual directory structure for advanced users]].'''
Move the directory "solr" from <code><installpath-bluespice>/extensions/BlueSpiceExtensions/ExtendedSearch/webservices</code> to the just created directory.
Switch to this directory and go to the subfolder <code>bluespice/conf/lang</code>. Choose <code>stopword_<LANG>.txt</code> there, which matches your language and replace the file <code>stopwords.txt</code> in the folder <code>bluespice/conf</code> (one level higher) with this file.
[[File:Hint.jpg|left]]'''With Linux, please transfer the folder /opt/bluespice/data/solr recursively to the user and group, under which the Tomcat server is running. '''
==Configurating Tomcat==
The Tomcat server needs to know the directory to the Solr core. The following describes how to configure this.
===Linux===
The distributions differ at this point regarding the configuration file. How this needs to be configured with the distribution you are using can be found in the documentation of the distributor. The following steps explain the configuration using Debian/Ubuntu and Tomcat 8:
Open the file <code>/etc/default/tomcat8</code> and ad the following line at the end:
JAVA_OPTS="${JAVA_OPTS} -Dsolr.solr.home=/opt/bluespice/data/solr"
Save the changes and exit the file.
===Windows===
Open the [[Setup:Installation_Manual/System_Configuration/Apache_Tomcat#Configure_Tomcat|configuration interface of Tomcat]] and switch to the tab "Java". At the fiel "Java Options", add this as the last point in the line:
-Dsolr.solr.home=C:\BlueSpice\bluespice_data\solr
[[Datei[[File:Setup:Setup_tomcat_configure_tomcat_03.jpg|center]]
Save this settings by clicking at "Apply".
==Kopieren der Solr Anwendung==
Verschieben Sie die Datei "solr.war" aus dem VerzeichnisCopying of the Solr Application==
Move the file "solr.war" from the directory <code><installpath-bluespice>/extensions/BlueSpiceExtensions/ExtendedSearch/webservices</code> nach to <code><tomcat-webapps></code>
==Neustart Tomcat==
Starten Sie den Tomcat Webserver neu, siehe auch [[Setup:Installationshandbuch/Systemkonfigurationen/Apache_Tomcat#Neustart_von_Tomcat|Neustart von TomcatRestarting Tomcat==
Restart the Tomcat Webserver like described [[Setup:Installation_Manual/System_Configuration/Apache_Tomcat#Restart_Tomcat|here]].
==Aktivieren der Erweiterten Suche in BlueSpice==
Wechseln Sie in das Verzeichnis <code><installpath-bluespice>/extensions/BlueSpiceExtensions</code>. Sofern die Datei '''BlueSpiceExtensions.local.php''' noch nicht existiert kopieren Sie bitte nun die Datei '''BlueSpiceExtensions.default.php''' und legen Sie im selben Ordner unter dem Namen '''BlueSpiceExtensions.local.php''' ab.
Öffnen Sie diese Datei in einem Texteditor.
Scrollen Sie ans Ende der Datei. Dort finden Sie folgende Zeile:
#require_once( __DIR__."/ExtendedSearch/ExtendedSearch.setup.php" );
Entfernen Sie hier das erste Zeichen ('''#'''), speichern die Datei ab und verlassen Sie diese wieder.
Öffnen Sie nun eine Kommandozeile und wechseln in den Ordner <code><installpath-bluespice></code>. Führen Sie dort folgenden Befehl aus:
php maintenance/update.php ''(Linux)''
php maintenance\update.php ''(Windows))''
[[Datei:HinweisFile:Hint.jpg|left]] '''Achten Sie unter Windows darauf, dass die [[Setup:Installationshandbuch/Systemkonfigurationen/Umgebungsvariablen|Umgebungsvariablen]] korrekt gesetzt sind, um auf den Befehl "php" zugreifen zu können.'''<br style="clear: left;" /><br />
[[Datei:HinweisFile:Hint.jpg|left]] '''Beachten Sie unter Linux, dass Sie nach dem Ausführen der update.php die [[Setup:Installationshandbuch/Sicherheitseinstellungen/Dateisystemrechte#Verrechtung_unter_Linux|Dateisystemrechte]] neu anpassen müssen..'''
Sobald das Script mit der Meldung "Done" abgeschlossen ist führen Sie ein weiteres Maintenance-Script aus, um den Suchindex erstmalig anzulegen:
php extensions/BlueSpiceExtensions/ExtendedSearch/maintenance/searchUpdate.php ''(Linux)''
php extensions\BlueSpiceExtensions\ExtendedSearch\maintenance\searchUpdate.php ''(Windows))''
Die Ausführung des Scripts kann, je nach Menge der von Ihnen möglicherweise bereits angelegten Inhalte, etwas Zeit in Anspruch nehmen. Sobald das Script durchgelaufen ist ist die Erweiterte Suche erfolgreich installiert und einsatzbereit.| Line 17: | Line 17: | ||
C:\BlueSpice\bluespice_data (Windows) | C:\BlueSpice\bluespice_data (Windows) | ||
| − | [[File:Hint.jpg|left]] '''If you are going to use a different directory, please read [[Setup:Installation_Manual/Advanced/Individual_File_Sturcture| | + | [[File:Hint.jpg|left]] '''If you are going to use a different directory, please read the [[Setup:Installation_Manual/Advanced/Individual_File_Sturcture|notes regarding a individual directory structure for advanced users]].''' |
| Line 51: | Line 51: | ||
-Dsolr.solr.home=C:\BlueSpice\bluespice_data\solr | -Dsolr.solr.home=C:\BlueSpice\bluespice_data\solr | ||
| − | + | [[File:Setup:Setup_tomcat_configure_tomcat_03.jpg|center]] | |
| − | [[ | ||
Save this settings by clicking at "Apply". | Save this settings by clicking at "Apply". | ||
| − | == | + | ==Copying of the Solr Application== |
| − | + | Move the file "solr.war" from the directory <code><installpath-bluespice>/extensions/BlueSpiceExtensions/ExtendedSearch/webservices</code> to <code><tomcat-webapps></code> | |
| − | == | + | ==Restarting Tomcat== |
| − | + | Restart the Tomcat Webserver like described [[Setup:Installation_Manual/System_Configuration/Apache_Tomcat#Restart_Tomcat|here]]. | |
==Aktivieren der Erweiterten Suche in BlueSpice== | ==Aktivieren der Erweiterten Suche in BlueSpice== | ||
| Line 77: | Line 76: | ||
php maintenance\update.php ''(Windows))'' | php maintenance\update.php ''(Windows))'' | ||
| − | [[ | + | [[File:Hint.jpg|left]] '''Achten Sie unter Windows darauf, dass die [[Setup:Installationshandbuch/Systemkonfigurationen/Umgebungsvariablen|Umgebungsvariablen]] korrekt gesetzt sind, um auf den Befehl "php" zugreifen zu können.'''<br style="clear: left;" /><br /> |
| − | [[ | + | [[File:Hint.jpg|left]] '''Beachten Sie unter Linux, dass Sie nach dem Ausführen der update.php die [[Setup:Installationshandbuch/Sicherheitseinstellungen/Dateisystemrechte#Verrechtung_unter_Linux|Dateisystemrechte]] neu anpassen müssen..''' |
Sobald das Script mit der Meldung "Done" abgeschlossen ist führen Sie ein weiteres Maintenance-Script aus, um den Suchindex erstmalig anzulegen: | Sobald das Script mit der Meldung "Done" abgeschlossen ist führen Sie ein weiteres Maintenance-Script aus, um den Suchindex erstmalig anzulegen: | ||