Difference between revisions of "Manual:Extension/BlueSpiceUserManager"
| [unchecked revision] | [quality revision] |
m (Text replacement - "<bs:bookshelf src="Book:User manual" />" to "") |
m (Tag: Visual edit) |
Contents
- 1 What is BlueSpiceUserManager?
- 2 Where to find BlueSpiceUserManager? 3 Usage 3.1
- About User manager
- 2 Creating users
- 3.2Editing existing users3.3 View disabled
- 4 Inactive users
- 4 See also
BlueSpiceUserManager provides a visual interface for managing users on the wiki.
About User manager[edit | edit source]
BlueSpiceUserManager is availble from the left navigation, under tab "Global actions", in "Management" section, or by navigating directly to Special:UserManager
Usage[edit | edit source]
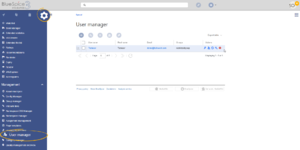
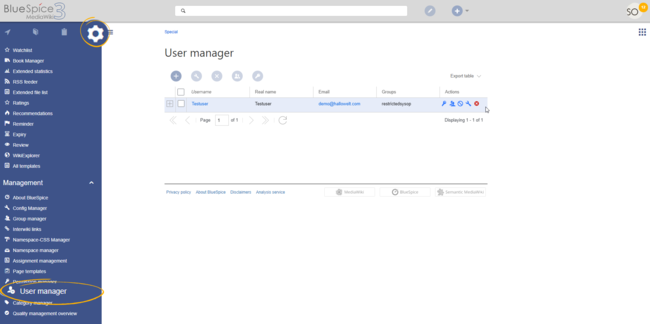
When opened, BlueSpiceUserManager shows the list of all users currently registered on the wiki.
Administrators can access the User manager under Global actions > Management > User Manager. The User manager link opens the page Special:UserManager. It shows an editable list of all registered users.
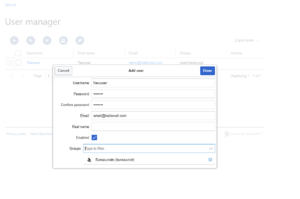
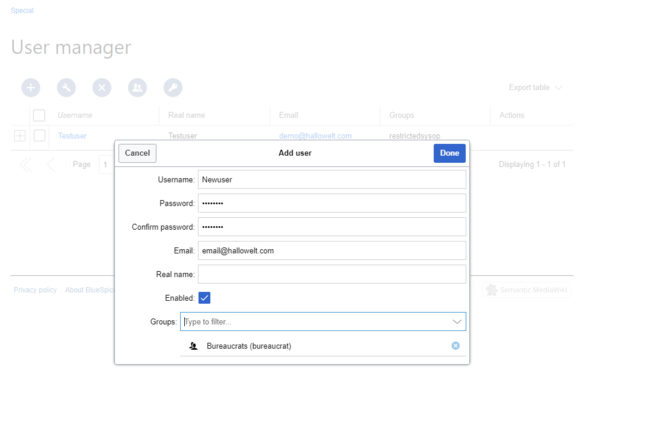
Creating users[edit | edit source]
 Creating new user
To create new users, click on "Plus" button above the list of users. This will open a dialog where user information can be filled:
Username - must be unique on the wiki (no previous user can have this name). Cannot contain some special characters, namely "@".To create a user:
-
Click the "+"-button. This opens a dialog.
-
Enter the user information in the dialog:
- Username: must be unique and cannot contain special characters
- Password and Confirm password
-
- : the password for the new user. Users can later change their passwords.
-
- : The email address of the user (optional)
- Real name
-
- : can be a duplicate of an existing user's real name
-
- (optional)
- Enabled
-
- : if checked, user account is active
- Groups: a user can be assigned to multiple groups. If no group is selected, the user belongs to the default group user.
- Click Done to create the user account.
Editing
existingusers[edit | edit source]
All the The tools for editing the users a user are shown in the table grid when hovering over or selecting the user from the list. All these tools can be accessed from the buttons above the grid when a user is selected.

- Key icon: change password
- People icon: assign groups to this user
- Block icon: disable/enable user. Disabling does not delete the account.
- Wrench icon: edit email and real name
- "x" icon: Delete user. This action is irreversible.
Tip: User groups can be set for multiple users at
the same time by selecting
the users and clicking on the "groups" icon above the grid.
Inactive users[edit | edit source]
By default, list will only display enabled users. In order to view disabled users, click on the list displays users with active user accounts (enabled).
To view inactive users:
- Click on the table header (any column)
- .
- Select "Columns", then select "Enabled". This will add additional column "Enabled" to the grid.
- Click on the header of this column and select
- Filter
- >
- Show all
- deactivated users
- .
See alsoTechnical details[edit | edit source]
Reference page for this extension.
The extension BlueSpiceUserManager provides this visual interface for managing users.
Related info
            __TOC__


            ==What is BlueSpiceUserManager?==


            '''BlueSpiceUserManager''' provides a visual interface for managing users on the wiki.


            ==Where to find BlueSpiceUserManager?==

            BlueSpiceUserManager is availble from the left navigation, under tab "Global actions", in "Management" section, or by navigating directly to <code>Special:UserManager</code>


            ==Usage==

            [[File:UserManager1a.png|thumb]]

            When opened, BlueSpiceUserManager shows the list of all users currently registered on the wiki.


            ===Creating users===

            [[File:UserManager2.png|thumb|Creating new user]]

            To create new users, click on "Plus" button above the list of users. This will open a dialog where user information can be filled:

            * Username - must be unique on the wiki (no previous user can have this name). Cannot contain some special characters, namely "@".

            * {{DISPLAYTITLE:User manager}}

            __TOC__


            ==About User manager==

            Administrators can access the User manager under ''Global actions > Management > User Manager''. The User manager link opens the page <code>Special:UserManager.</code> It shows an editable list of all registered users.


            <br />

            [[File:UserManager1a.png|alt=Screenshot: user manager|border|center|650x650px]]


            <br />


            ==Creating users==

            '''To create a user:'''


            #'''Click''' the "+"-button. This opens a dialog.[[File:UserManager2.png|Creating new user|link=https://en.wiki.bluespice.com/wiki/File:UserManager2.png|border|center|650x650px]]

            #'''Enter''' the user information in the dialog:

            #*''Username:'' must be unique and cannot contain special characters

            #*''Password and Confirm password - :'' the password for the new user. Users can later change their passwords.


        * #*''Email -:'' The email address of the user * Real name - Full name of the user, can be duplicate of (optional)

            #*''Real name:'' can be a duplicate of an existing user's real name.

            * Enabled - controls whether this user is able to access the wiki.

            * Groups - list of groups user will belong to. Multiple group can be selected.


            Once all data in filled, click on "Save"  (optional)

            #*''Enabled:'' if checked, user account is active

            #*Groups: a user can be assigned to multiple groups. If no group is selected, the user belongs to the default group ''user''.

            #Click '''Done''' to create the user.


            ===Editing existing users===

            All the tools for editing the users account.


            ==Editing  users==

            The tools for editing a user are shown in the table grid when hovering over or selecting the user from the list. All these tools can be accessed from the buttons above the grid when a user is selected.

            * Change password - indicated by key icon. Use this to reset user password.

            * Groups - indicated by "people" icon. Use this to change user groups.

            * Disable/enable user - indicated by "block" icon. Use this to disable users temporarely. This will disable user from loggin in to the wiki, without deleting the account. For already disabled users, use it to enable the user.

            * Delete user - indicated by "x" icon. This will completely delete the

            [[File:Manual:usermanager-tools.png|alt=Screenshot:user manager tools|center|650x650px]]


            <br />


            *''Key icon:'' change password

            *''People icon:'' assign groups to this user

            *''Block icon:'' disable/enable user. Disabling does not delete the account.

            *''Wrench icon:'' edit email and real name

            *''"x" icon:'' Delete user. This action is irreversible.


            '''Tip''' {{Box Note|boxtype=tip|Note text=User groups can be set for multiple users at a the same time by selecting mutliplethe users and clicking on the "groups" icon above the grid.


            ===View disabled users===

            By default, list will only display enabled users. In order to view disabled users, click on }}


            ==Inactive users==

            By default, the list displays users with active user accounts (enabled).


            '''To view inactive users:'''


            #'''Click''' on the table header (any column), select.

            #'''Select''' "Columns", then select "Enabled". This will add additional column "Enabled" to the grid.


        Now click #'''Click''' on the header of this column and '''select "Filter" -> "Show all deativated users"


            ==See also==


            [[Reference:UserManager|Reference page]] for this extension.''' ''Filter > Show all deactivated users''.


            ==Technical details==

            The extension '''BlueSpiceUserManager''' provides this visual interface for managing users.

            {{Box Links-en|Topic1=[[Reference:UserManager|Reference:UserManager]]}}
| Line 1: | Line 1: | ||
| − | + | {{DISPLAYTITLE:User manager}} | |
| − | |||
__TOC__ | __TOC__ | ||
| − | == | + | ==About User manager== |
| − | + | Administrators can access the User manager under ''Global actions > Management > User Manager''. The User manager link opens the page <code>Special:UserManager.</code> It shows an editable list of all registered users. | |
| − | '' | + | <br /> |
| − | + | [[File:UserManager1a.png|alt=Screenshot: user manager|border|center|650x650px]] | |
| − | + | <br /> | |
| − | |||
| − | == | + | ==Creating users== |
| − | + | '''To create a user:''' | |
| − | |||
| − | + | #'''Click''' the "+"-button. This opens a dialog.[[File:UserManager2.png|Creating new user|link=https://en.wiki.bluespice.com/wiki/File:UserManager2.png|border|center|650x650px]] | |
| − | [[File:UserManager2.png | + | #'''Enter''' the user information in the dialog: |
| − | + | #*''Username:'' must be unique and cannot contain special characters | |
| − | * Username | + | #*''Password and Confirm password:'' the password for the new user. Users can later change their passwords. |
| − | * Password and Confirm password | + | #*''Email:'' The email address of the user (optional) |
| − | * Email | + | #*''Real name:'' can be a duplicate of an existing user's real name (optional) |
| − | * Real name | + | #*''Enabled:'' if checked, user account is active |
| − | * Enabled | + | #*Groups: a user can be assigned to multiple groups. If no group is selected, the user belongs to the default group ''user''. |
| − | * Groups | + | #Click '''Done''' to create the user account. |
| − | + | ==Editing users== | |
| + | The tools for editing a user are shown in the table grid when hovering over or selecting the user from the list. | ||
| + | [[File:Manual:usermanager-tools.png|alt=Screenshot:user manager tools|center|650x650px]] | ||
| + | <br /> | ||
| − | + | *''Key icon:'' change password | |
| − | + | *''People icon:'' assign groups to this user | |
| − | * | + | *''Block icon:'' disable/enable user. Disabling does not delete the account. |
| − | * | + | *''Wrench icon:'' edit email and real name |
| − | * | + | *''"x" icon:'' Delete user. This action is irreversible. |
| − | * | + | {{Box Note|boxtype=tip|Note text=User groups can be set for multiple users at the same time by selecting the users and clicking on the "groups" icon above the grid.}} |
| − | + | ==Inactive users== | |
| + | By default, the list displays users with active user accounts (enabled). | ||
| − | + | '''To view inactive users:''' | |
| − | |||
| − | + | #'''Click''' on the table header (any column). | |
| + | #'''Select''' "Columns", then select "Enabled". This will add additional column "Enabled" to the grid. | ||
| + | #'''Click''' on the header of this column and '''select''' ''Filter > Show all deactivated users''. | ||
| − | [[Reference:UserManager|Reference | + | ==Technical details== |
| + | The extension '''BlueSpiceUserManager''' provides this visual interface for managing users. | ||
| + | {{Box Links-en|Topic1=[[Reference:UserManager|Reference:UserManager]]}} | ||