Difference between revisions of "Manual:Semantic MediaWiki/Examples/Customer data/Form"
← Manual:Semantic MediaWiki/Examples/Customer data/Form
[unchecked revision] | [unchecked revision] |
(Created page with "With the page ''Special:CreateForm'', you now create the data entry form. Datei:Formular-erstellen1.png|alternativtext=Spezialseite: Formular erstellen|zentriert|mini|600x6...") (Tag: 2017 source edit) |
(Tag: 2017 source edit) |
With the page Special:CreateForm, you now create the data entry form.
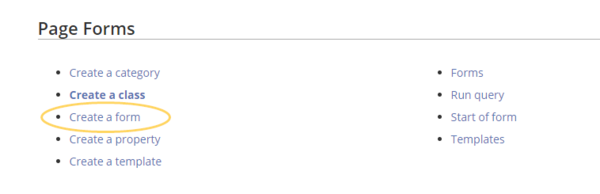
Creating the form[edit | edit source]
-
Geben Sie auf der Formularseite einen Namen für Ihr neues Formular ein. Am einfachsten ist es, das Formular genau wie die Vorlage zu bezeichnen. In unserem Beispiel geben Sie daher den Namen Kundendaten ein (1). Wählen Sie die Vorlage Kundendaten aus dem Auswahlmenü aus und klicken Sie Hinzufügen (2).
alternativtext=Formular erstellen|zentriert|mini|500x500px|Formular erstellen -
Die in der Vorlage Kundendaten angelegten Felder werden automatisch in das Formular integriert. Um die Dateneingabe zu erleichtern, ändern Sie den Eingabetyp des Feldes Erstkontakt zu datepicker. (1) Anschließend klicken Sie Seite speichern (2).
alternativtext=Formularfelder überprüfen|zentriert|mini|750x750px|Formularfelder überprüfen
Nun steht Ihnen das Formular Kundendaten zur Verfügung. Dieses Formular ist entsprechend im Namensraum Formular abgelegt.
Formular verwenden[edit | edit source]
Wenn wir nun eine neue Kundenseite im Wiki anlegen, können wir die Kundendatenvorlage entsprechend automatisch über die Formularseite einbinden. Die Formularseite hat den Namen Formular:Kundendaten.
-
Um eine neue Kundenseite zu erstellen, geben Sie den Kundennamen (d.h. den gewünschten Seitennamen) ein (1) und klicken Sie Erstellen oder bearbeiten (2).
alternativtext=Neue Kundenseite erstellen|zentriert|mini|750x750px|Neue Kundenseite erstellen -
Geben Sie nun die Kundendaten ein (1). Fügen Sie optional noch weiteren Freitext hinzu (2) und klicken Sie dann auf Seite speichern (3).
alternativtext=Kundendaten auf Kundenseite eingeben|zentriert|mini|650x650px|Kundendaten auf Kundenseite eingeben
Nun haben Sie eine Kundenseite erstellt, die die Kundendaten Standort, Ansprechpartner und Erstkontakt über das Eingabeformular sammelt und darstellt.
alternativtext=Kundenseite mit Kundendatenformular.|zentriert|mini|650x650px|Kundenseite mit Kundendatenformular.Note: Die Gestaltung der Vorlage können Sie später jederzeit noch anpassen. Zuerst sollten Sie jedoch noch das Formular zur Bearbeitung der Vorlage erstellen.
Seiten im Formularmodus bearbeiten
Template:Box Links-
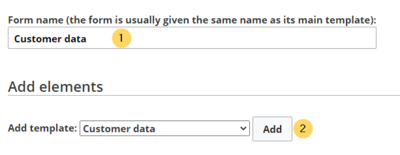
On the "Create a form" page, enter a name for your new form. Since we create it for template Customer data, we give the form the same name (1). Select the template Customer data from the choice menu and click Add (2).
-
The customer data fields from the template Customer data are automatically integrated in the form. To facilitate the data entry for the date field, change the input type of the field firstcontact to datepicker. (1) Then, click Save page (2).
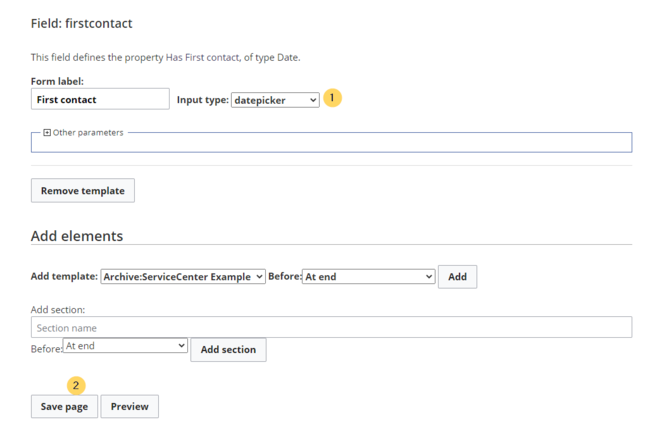
Now the form is available for data entry. It can be found in the namspace Form.
Using the form[edit | edit source]
When we create a new customer page, we can now use the form page to create the page and to automatically include the customer data template in the page. The form page has the name Form:Customer data.
-
To create a customer page, enter a page name in the form field (1) and click Create or edit (2).
-
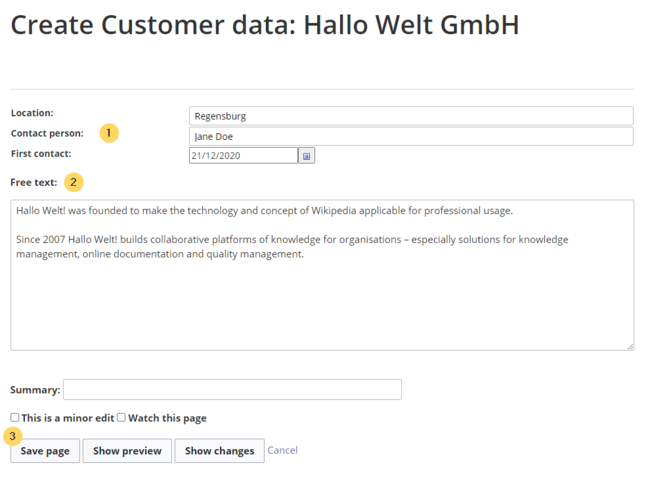
Enter the customer data (1). You can additionally create some free text (2). Click Save page after editing the page (3).
Now you have created a customer page that collects customer data and shows the entered data on the page.
Next step[edit | edit source]
__KEIN_INHALTSVERZEICHNIS__
With the page ''Special:CreateForm'', you now create the data entry form. [[Datei:Formular-erstellen1.png|alternativtext=Spezialseite: Formular erstellen|zentriert|mini|600x600px|Spezialseite: Formular erstellen|verweis=https://de.wiki.bluespice.com/wiki/Datei:Formular-erstellen1.png]] ==Create the form== <div class="steps"> #Geben Sie auf der Formularseite einen Namen für Ihr neues Formular ein. Am einfachsten ist es, das Formular genau wie die Vorlage zu bezeichnen. In unserem Beispiel geben Sie daher den Namen K''undendaten'' ein (1). Wählen Sie die Vorlage Kundendaten aus dem Auswahlmenü aus und klicken Sie ''Hinzufügen'' (2). <br />[[Datei:Formular-erstellen2.png|alternativtext=Formular erstellen|zentriert|mini|500x500px|Formular erstellen]] #Die in der Vorlage Kundendaten angelegten Felder werden automatisch in das Formular integriert. Um die Dateneingabe zu erleichtern, ändern Sie den ''Eingabetyp'' des Feldes Erstkontakt zu ''datepicker.'' (1) Anschließend klicken Sie ''Seite speichern'' (2). <br />[[Datei:Formular-erstellen3.png|alternativtext=Formularfelder überprüfen|zentriert|mini|750x750px|Formularfelder überprüfen]] Nun steht Ihnen das Formular Kundendaten zur Verfügung. Dieses Formular ist entsprechend im [[Das Konzept der Namensräume|Namensraum]] Formular abgelegt. ==Formular verwenden== Wenn wir nun eine neue Kundenseite im Wiki anlegen, können wir die Kundendatenvorlage entsprechend automatisch über die Formularseite einbinden. Die Formularseite hat den Namen ''Formular:Kundendaten''. #Um eine neue Kundenseite zu erstellen, geben Sie den Kundennamen (d.h. den gewünschten Seitennamen) ein (1) und klicken Sie ''Erstellen oder bearbeiten'' (2)''.'' <br />[[Datei:Formular-fertig.png|alternativtext=Neue Kundenseite erstellen|zentriert|mini|750x750px|Neue Kundenseite erstellen]] #Geben Sie nun die Kundendaten ein (1). Fügen Sie optional noch weiteren Freitext hinzu (2) und klicken Sie dann auf Seite speichern (3). <br />[[Datei:Formular-dateneingabe.png|alternativtext=Kundendaten auf Kundenseite eingeben|zentriert|mini|650x650px|Kundendaten auf Kundenseite eingeben]] Nun haben Sie eine Kundenseite erstellt, die die Kundendaten Standort, Ansprechpartner und Erstkontakt über das Eingabeformular sammelt und darstellt. [[Datei:Kundenseite-beispiel.png|alternativtext=Kundenseite mit Kundendatenformular.|zentriert|mini|650x650px|Kundenseite mit Kundendatenformular.]]{{Box Note|boxtype=note|Note text=Die [[Handbuch:Semantic MediaWiki/Beispiele/Kundendaten/Vorlage gestalten|Gestaltung der Vorlage]] können Sie später jederzeit noch anpassen. Zuerst sollten Sie jedoch noch das Formular zur Bearbeitung der Vorlage erstellen.}} ==Nächster Schritt== </div>Als nächsten Schritt fügen wir dem Bearbeitungsmenü auf den Kundenseiten noch die Möglichkeit hinzu, die Seiten in Zukunft auch über das Kundendatenformular zu bearbeiten. <span class="nextstep">[[Handbuch:Semantic MediaWiki/Beispiele/Kundendaten/Formularmodus|Seiten im Formularmodus bearbeiten]]</span> {{Box Links|Thema1<br /> [[File:Manual:Formular-erstellen1-EN.png|alt=Create a form|center|thumb|600x600px|Create a form]] <br /> ==Creating the form== <div class="steps"> #On the "Create a form" page, enter a name for your new form. Since we create it for template ''Customer data'', we give the form the same name (1). Select the template Customer data from the choice menu and click ''Add'' (2).<br />[[File:Manual:Formular-erstellen2-EN.png|alt=Select template|center|thumb|400x400px|Select template]]<br /> #The customer data fields from the template Customer data are automatically integrated in the form. To facilitate the data entry for the date field, change the input type of the field ''firstcontact'' to ''datepicker.'' (1) Then, click ''Save page'' (2). <br />[[File:Manual:Formular-erstellen3-EN.png|alt=Selecting the input type|center|thumb|650x650px|Selecting the input type]]<br /> Now the form is available for data entry. It can be found in the namspace ''Form.'' ==Using the form== When we create a new customer page, we can now use the form page to create the page and to automatically include the customer data template in the page. The form page has the name ''Form:Customer data''. #To create a customer page, enter a page name in the form field (1) and click ''Create or edit'' (2)''.'' <br />[[File:Manual:Formular-fertig-EN.png|alt=Create a customer page|center|thumb|650x650px|Create a customer page]]<br /> #Enter the customer data (1). You can additionally create some free text (2). Click ''Save page'' after editing the page (3). <br />[[File:Manual:Formular-dateneingabe-EN.png|alt=Dateneingabe während Seitenerstellung|center|thumb|650x650px|Dateneingabe während Seitenerstellung]]<br /> Now you have created a customer page that collects customer data and shows the entered data on the page. ==Next step== </div>As the next step, we add the form edit mode option to pages that include the ''Customer data'' template. <span class="nextstep">[[Manual:Semantic MediaWiki/Examples/Customer data/Form edit mode|Edit pages in form edit mode]]</span> {{Box Links_en|Topic1=[https://www.mediawiki.org/wiki/Extension:Page_Forms/Quick_start_guide https://www.mediawiki.org/wiki/Extension:Page_Forms/Quick_start_guide] Hilfeseite zur Erweiterung ''PageForms'' (Englisch)Help page for the extension ''PageForms''}} __KEIN_INHALTSVERZEICHNIS__
Line 1: | Line 1: | ||
With the page ''Special:CreateForm'', you now create the data entry form. | With the page ''Special:CreateForm'', you now create the data entry form. | ||
− | + | <br /> | |
− | [[ | + | [[File:Manual:Formular-erstellen1-EN.png|alt=Create a form|center|thumb|600x600px|Create a form]] |
− | == | + | <br /> |
+ | ==Creating the form== | ||
<div class="steps"> | <div class="steps"> | ||
− | # | + | #On the "Create a form" page, enter a name for your new form. Since we create it for template ''Customer data'', we give the form the same name (1). Select the template Customer data from the choice menu and click ''Add'' (2).<br />[[File:Manual:Formular-erstellen2-EN.png|alt=Select template|center|thumb|400x400px|Select template]]<br /> |
− | # | + | #The customer data fields from the template Customer data are automatically integrated in the form. To facilitate the data entry for the date field, change the input type of the field ''firstcontact'' to ''datepicker.'' (1) Then, click ''Save page'' (2). <br />[[File:Manual:Formular-erstellen3-EN.png|alt=Selecting the input type|center|thumb|650x650px|Selecting the input type]]<br /> |
− | + | Now the form is available for data entry. It can be found in the namspace ''Form.'' | |
− | == | + | ==Using the form== |
− | + | When we create a new customer page, we can now use the form page to create the page and to automatically include the customer data template in the page. The form page has the name ''Form:Customer data''. | |
− | # | + | #To create a customer page, enter a page name in the form field (1) and click ''Create or edit'' (2)''.'' <br />[[File:Manual:Formular-fertig-EN.png|alt=Create a customer page|center|thumb|650x650px|Create a customer page]]<br /> |
− | # | + | #Enter the customer data (1). You can additionally create some free text (2). Click ''Save page'' after editing the page (3). <br />[[File:Manual:Formular-dateneingabe-EN.png|alt=Dateneingabe während Seitenerstellung|center|thumb|650x650px|Dateneingabe während Seitenerstellung]]<br /> |
− | + | Now you have created a customer page that collects customer data and shows the entered data on the page. | |
+ | ==Next step== | ||
+ | </div>As the next step, we add the form edit mode option to pages that include the ''Customer data'' template. | ||
− | |||
− | |||
− | |||
− | <span class="nextstep">[[ | + | <span class="nextstep">[[Manual:Semantic MediaWiki/Examples/Customer data/Form edit mode|Edit pages in form edit mode]]</span> |
− | {{Box | + | {{Box Links_en|Topic1=[https://www.mediawiki.org/wiki/Extension:Page_Forms/Quick_start_guide https://www.mediawiki.org/wiki/Extension:Page_Forms/Quick_start_guide] Help page for the extension ''PageForms''}} |
__KEIN_INHALTSVERZEICHNIS__ | __KEIN_INHALTSVERZEICHNIS__ |