Difference between revisions of "Manual:Extension/BlueSpiceUserManager"
[unchecked revision] | [quality revision] |
(Undo revision 24597 by Mlink-rodrigue (talk)) (Tag: Undo) |
(Tag: 2017 source edit) |
The extension BlueSpiceUserManager provides the visual interface for user administration.
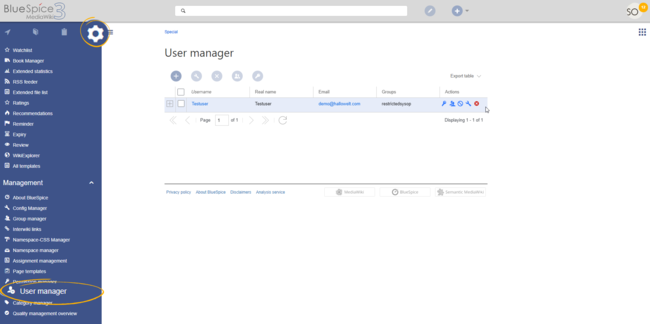
About User manager[edit | edit source]
Administrators can access the User manager under Global actions > Management > User Manager. The User manager link opens the page Special:UserManager. It shows an editable list of all registered users.
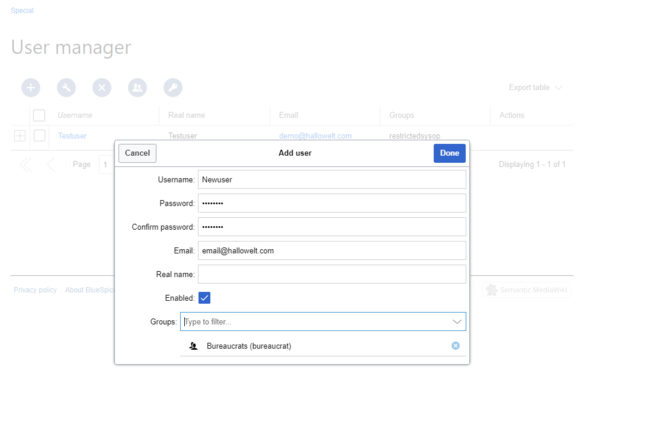
Creating users[edit | edit source]
To create a user:
- Click the "+"-button. This opens a dialog.
-
Enter the user information in the dialog:
- Username: must be unique and cannot contain special characters
- Password and Confirm password: the password for the new user. Users can later change their passwords.
- Email: The email address of the user (optional)
- Real name: can be a duplicate of an existing user's real name (optional)
- Enabled: if checked, user account is active
- Groups: a user can be assigned to multiple groups. If no group is selected, the user belongs to the default group user.
- Click Done to create the user account.
Editing users[edit | edit source]
The tools for editing a user are shown in the table grid when hovering over or selecting the user from the list.
- Key icon: change password
- People icon: assign groups to this user
- Block icon: disable/enable user. Disabling does not delete the account.
- Wrench icon: edit email and real name
- "x" icon: Delete user. This action is irreversible.
Tip: User groups can be set for multiple users at the same time by selecting the users and clicking on the "groups" icon above the grid. This resets the groups for the selected users and assigns the newly chosen groups.
Inactive users[edit | edit source]
By default, the list displays users with active user accounts (enabled).
To view inactive users:
- Click on the table header (any column).
- Select "Columns", then select "Enabled". This will add additional column "Enabled" to the grid.
- Click on the header of this column and select Filter > Show all deactivated users.
Related info
{{DISPLAYTITLE:User manager}} The extension '''BlueSpiceUserManager''' provides the visual interface for user administration. ==About User manager== Administrators can access the User manager under ''Global actions > Management > User Manager''. The User manager link opens the page ''Special:UserManager.'' It shows an editable list of all registered users. <br /> [[File:UserManager1a.png|alt=Screenshot: user manager|border|center|650x650px]] <br /> ==Creating users== '''To create a user:''' #'''Click''' the "+"-button. This opens a dialog.[[File:UserManager2.png|Creating new user|link=https://en.wiki.bluespice.com/wiki/File:UserManager2.png|border|center|650x650px]] #'''Enter''' the user information in the dialog: #*''Username:'' must be unique and cannot contain special characters #*''Password and Confirm password:'' the password for the new user. Users can later change their passwords. #*''Email:'' The email address of the user (optional) #*''Real name:'' can be a duplicate of an existing user's real name (optional) #*''Enabled:'' if checked, user account is active #*Groups: a user can be assigned to multiple groups. If no group is selected, the user belongs to the default group ''user''. #Click '''Done''' to create the user account. ==Editing users== The tools for editing a user are shown in the table grid when hovering over or selecting the user from the list. [[File:Manual:usermanager-tools.png|alt=Screenshot:user manager tools|center|650x650px]] <br /> *''Key icon:'' change password *''People icon:'' assign groups to this user *''Block icon:'' disable/enable user. Disabling does not delete the account. *''Wrench icon:'' edit email and real name *''"x" icon:'' Delete user. This action is irreversible. {{Box Note|boxtype=tip|Note text=User groups can be set for multiple users at the same time by selecting the users and clicking on the "groups" icon above the grid. This resets the groups for the selected users and assigns the newly chosen groups.}} ==Inactive users== By default, the list displays users with active user accounts (enabled). '''To view inactive users:''' #'''Click''' on the table header (any column). #'''Select''' "Columns", then select "Enabled". This will add additional column "Enabled" to the grid. #'''Click''' on the header of this column and '''select''' ''Filter > Show all deactivated users''. <br /> {{Box Links-en|Topic1=[[Reference:BlueSpiceUserManager]]}} [[en:{{FULLPAGENAME}}]] [[de:Handbuch:Erweiterung/BlueSpiceUserManager]] [[Category:Permissions]]
Line 12: | Line 12: | ||
'''To create a user:''' | '''To create a user:''' | ||
− | #'''Click''' the "+"-button. This opens a dialog.[[File:UserManager2.png|Creating new user | + | #'''Click''' the "+"-button. This opens a dialog.[[File:UserManager2.png|Creating new user|border|center|650x650px]] |
#'''Enter''' the user information in the dialog: | #'''Enter''' the user information in the dialog: | ||
#*''Username:'' must be unique and cannot contain special characters | #*''Username:'' must be unique and cannot contain special characters |