Images
-
- Last edited 7 years ago by Florian Bäckmann
-
-
- No status information
Images can be easily embedded using InsertImage. Though it may be useful to optimize the image files beforehand. For the advanced handling of image documents, some background knowledge about the functionality of MediaWiki is necessary.
Contents
Uploading and inserting images
Upload
To upload and edit images clickt the button ![]() in the Visual Editor. Also, when working with the Wiki-editor you can access this function via the button
in the Visual Editor. Also, when working with the Wiki-editor you can access this function via the button ![]() .
.
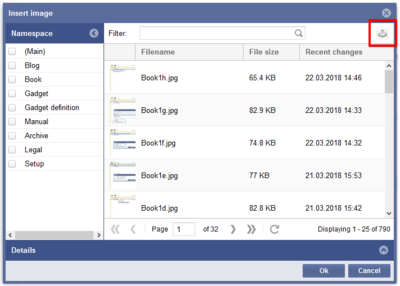
- Click the upload button on the top right of the insert image dialogue.
- Choose the desired file after clicking on Browse. You can change the title and destination filename, add categories and a description and choose a license if you wish. Continue with Ok.
- After that you can specify the link type, decoration, alignment, size and alternative text and you can choose if and whereto the image should be linked. Finish with Ok.
Insert
You find all the image files which where already uploaded and are available in the Wiki in the preview
- For faster orientation you can filter and sort the preview.
- Recenty uploaded images are shown first; if not sort the list by "Recent changes".
- Open the bottom panel "Details" to specify the link type, decoration, alignment, size and alternative text and you can choose if and whereto the image should be linked. Finish with Ok.
Optimize image files before uploading
To keep loading times as short as possible it is recommended to optimize images before uploading them to the Wiki.
A simple image manipulation programme like the free IrfanView is enough. With that you can:
- define image section
- adjust height and width
- compress the file
Edit image files in the Wikicode
MediaWiki funktionality
Generally all files - and therefore images, too - are placed in the namespace "File". In MediaWiki you find all uploaded files via the special page "File list".
MediaWiki differentiates whether files are emedded as images or for download.
To embed an image:
- [[File:File.jpg]]
- [[File:File.jpg|Link-Text]]
Embed for download:
- [[Media:Datei.ogg]]
Formatting
To format image files several attributs can be added to the corresponding tag. For example:
[[File:Imagename.jpg|thumb|50px|left|Description]]
- Full-scale images
- Images can be inserted into an article with
[[File:Filename|Description]]. Like this the image will be shown full-scale on the left side of the article. - The option „
framed“, e.g.[[File:Filename|framed|Description]]put a frame around the image.
- Scale images
[[File:Feather.svg|thumb|100px|Description]]will set the width of the generated thumbnail to 100 pixels (default value: 180 pixels). The height is calculated automatically keeping the original aspect ratio.- It is also possible to set a maximum height. By specifying for example
100x200pxthe image will be scaled to fit inside an imaginary rectangle with a width of 100 pixels and a height of 200 pixels. The aspect ration will be preserved. Usingx200px(with an „x“ in front of the indication of size) andthumbyou can set the height of images. Withoutthumbyou need to add some (oversized) width e.g.800x200pxto images that should be displayed wider than a thumbnail (caution: that width is user dependent). - Using
[[File:Feather.svg|100px|left|Feather without thumbnailframe]]the image will be scaled and displayed without a thumbnail frame. - Though, static image sizes should be avoided in general because this will ignore the individual display options for thumbnails of the users.
- Alignment in text
- The options
left,right,centerandnonealign images left and right. Though this may be displayed differently in different browsers it is still wise to use since the text will float around the image. - Dabei ist jedoch zu beachten, dass die Darstellung je nach Browser sehr unterschiedlich sein kann. Die Ausrichtung ist aber sinnvoll, weil dann der Text um das Bild herum "fließt".
- Der Parameter
noneschaltet jegliche automatische Ausrichtung (bei Thumbnails) ab und stellt das Bild inline dar. Das ist vor allem zum Einfügen von Thumbnails in Tabellen praktisch.
- Thumbnails
- MediaWiki can create thumbnails automatically. Therefore add
thumborthumbnailbetween filename and alternative text, for example[[File:Feather.jpg|thumb|Text of the image description]]. - The generated thumbnail will be aligned right-justified with the alternative text underneath. The article text will be floating around the image. Clicking on the magnifying glass you jump to the larger version on the image's description page.
- Registrated users can set the display size of thumbnails in their user settings; not registrated viewers will them with a width of 180 pixels.
- This way of displaying images in articles should be used in general.
- Captions support all possibilities of text layout (e.g. bold, italic, links,...).
- Differing Thumbnails
- With the option
[[File:Gnome-fs-trash-full.svg|thumbnail=Gnome-fs-trash-empty.svg|Please click on the image to open the trash can.]]a thumbnail will be displayed, which does not correspond to the deposited image. A useful application is to take a section of a large image as a thumbnail. For example, topoint out a detail or to display a part with a common format (4: 3) as a thumbnail in a panoramic image (extreme aspect ratio).
- Update pictures quickly
- Pictures can be brought up to date quickly: Just click on the image to be replaced. You will be redirected directly to the image page and can upload the original image by clicking on "Upload a new version of this file". So you bypass the detour via the file list.
- Images from websites (HTML)
- Images from websites can not be copied and pasted. Also not in the WYSIWYG editor. The reason is: In the browser you can basically not access the image buffer. This is a problem that only the browser makers (Microsoft, Mozilla) could solve.
External Images
To allow showing images inline to wikitext without having to upload the image first. An administrator has to configure the site:
Since the integration can be a security problem, this extension is disabled by default.
