CreateTables
-
- Last edited 8 years ago by FlorianFuessl
-
-
- No status information
Wiki code can be very confusing in tables and can take a lot of time and getting used to, particularly when you go into details like editing the colour of a border. However, in the WYSIWYG editor, you can work with tables quickly and easily.
Where can I find the function for inserting tables?
Call up the article you want to edit. Click on "Edit" and change to the WYSIWYG view ![]() , if you are not already on it ; the table functions are only available in this view. Keep in mind that most of the buttons for table formatting are only active when you have selected a table.
, if you are not already on it ; the table functions are only available in this view. Keep in mind that most of the buttons for table formatting are only active when you have selected a table.
Inserting a table with the WYSIWYG editor
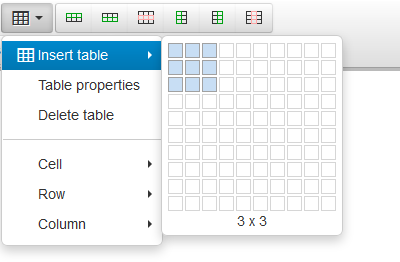
Click on this button ![]() to insert a table. Enter the number of columns and rows you want. This can, naturally, be easily changed later using the buttons in the WYSIWYG editor. Confirm by left clicking.
to insert a table. Enter the number of columns and rows you want. This can, naturally, be easily changed later using the buttons in the WYSIWYG editor. Confirm by left clicking.
In the dropdown menu there are more table functions:
- Table properties
- Delete table
- Cell: Cell properties, merge cells, split cells
- Row: Insert row before/after, delete row, row properties, cut or copy row, paste row before/after
- Column: Insert column before/after, delete column
Some of these functions you can see as buttons above if the cursors is in a table ![]()
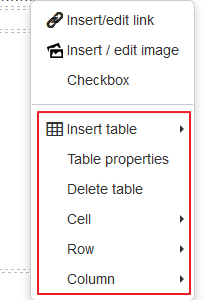
If you need more table functions it's also possible to do right clicking.
Using predefined table designs
If you want to create a uniform layout, for example for borders and rules, you should use a predefined table design. This will let you edit it as quickly and easily as possible and make the whole wiki homogeneous. You can find the predefined table designs in the WYSIWYG under "formats" ![]() "table":
"table":
- Sorttable for content which should be sortable by columns.
- Standard: white background
- Content" for normal content (grey background)
Changes like changing the width of tales and cells are, of course, still possible!
Settings affecting the table
Whole table
You can find the table settings in the WYSIWYG function bar above the edit box, but you can also access them by right clicking inside the table. Choose Table Properties. You can make all the setting you wish to adjust the table to your wishes.
Note: If you want to export a page that contains a table as a PDF, it is important to first set the table width manually to a maximum of 750px. Only by using this width or smaller can the correct display on the PDF be assured.
| General | Advanced |
|---|---|
|
|
Settings for individual table elements
If you would still like to create your own table, then you can make the following settings:You can, of course, make settings not just for the whole table, but also for individual cells, rows or columns. To do this, right click on the column, row or cell you want to change. Then choose cell, row or column and then the action you want to take.
If you are changing the cell settings, note "scope" at the right hand side of the dialogue. This lets you choose which cells should be affected by the change.
- Cell properties: Width, height, cell typ (cell, header cell), scope and alignment
- Row properties: Row type (body, header, footer), alignemnt and height
- Column properties: Can only be changed in cell properties (use scope "column" or "column group")!
Copying and pasting tables from Excel
BlueSpice lets you copy tables from Excel and paste them in the WYSIWYG editor. If you paste the table into the wiki code directly, then only the text content will be shown. You can then edit the table in the WYSIWYG editor as described above.
Note: Copying and pasting tables from Excel into the wiki works best for simple tables. The height and width of the cells are transferred but not formatting like text colour, background and so on.

