Create a review
-
- Last edited 4 years ago by MLR
-
-
- This page is approved
BlueSpiceReview is a workflow tool for MediaWiki. It allows assigning users to a page who then should complete their review within a certain timeframe.
Contents
The review page
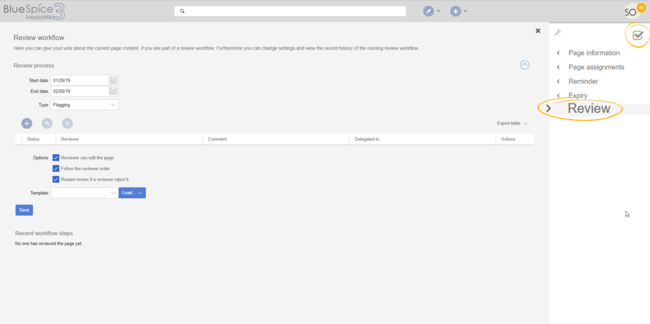
All relevant info can be accessed from the Review flyout in the Quality management tools. This screen shows the review settings. If a review is running, users see a form to cast their votes. They can also expand the collapsed workflow settings to see the details for this review.
Starting a review
All users with sufficient permissions can start (or edit) a review on a page.
Possible settings:
- Start date: The date when the review officially begins. Please note that you cannot schedule a review in advance. The page is locked for editing as soon as the workflow is saved.
- End date: The date on which the review is listed as expired. It has no effect on the review itself and is simply used for managing workflow lists.
- Type: The review type determines what will happen to the page once the review has been succesfuly completed. The default type is Approval so that it can be used in conjunction with the Approval feature if this feature is activated in a namespace. BlueSpice 3.1 only ships with this one type. BlueSpice 3.2 has a Default and an Approval option which is explained in the steps to set up a workflow template.
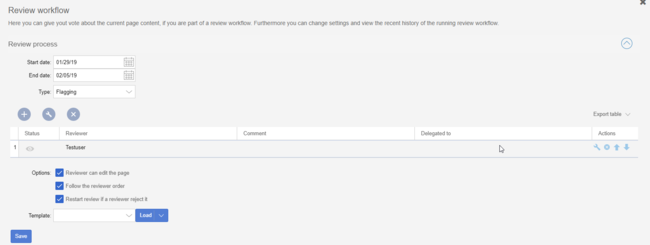
- Reviewers grid: A list of all reviewers assigned to review a particular page. Reviewers can be added by clicking on the "Plus" button above the grid and by typing in the name of the user in the dialog that pops up. Existing reviewers can be removed by selecting a reviewer and clicking on the "x" button.
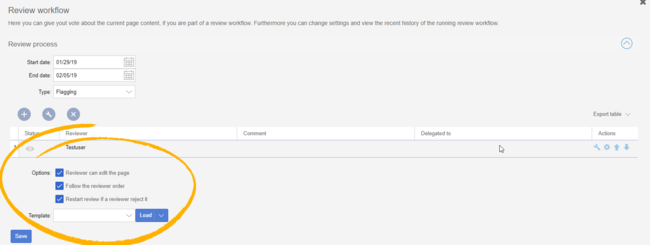
When you set up a new workflow, the following options are available:
- Reviewer can edit the page: Everybody that is assigned as reviewer can edit the page while the review is active. Other users cannot edit the page during this time. If this box is not checked, then reviewers will also not be allowed to make changes to the page.
- Follow the reviewer order: Reviewers need to cast their votes in sequence. Only when one is finished casting a vote, the next reviewer can start. The order of the reviewers can be adjusted by clicking on up and down arrows that appear when hovering over the reviewer in the grid.
- Restart review if a reviewer rejects it: If any of the reviewers rejects the page, the review is restarted and all of the reviewers must cast their votes again.
To minimize the effort when starting a review, templates are introduced.
Managing templates
In BlueSpice 3.2
Click Manager next to the template select menu if you are already setting up a review.
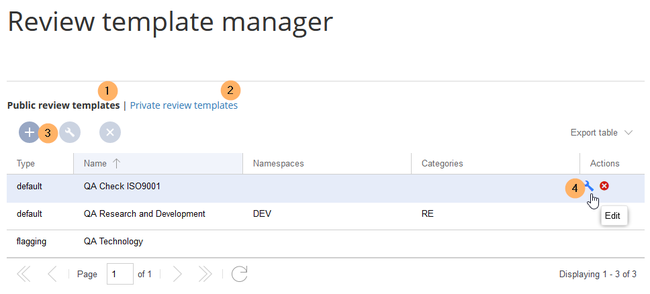
Alternatively, you can create a workflow template by going to Global actions > Management > Review template manager in the navigation panel of the wiki.
Create a new template:
- Select if you want to create a template that is available to all users (1) or that is available only to you (2).
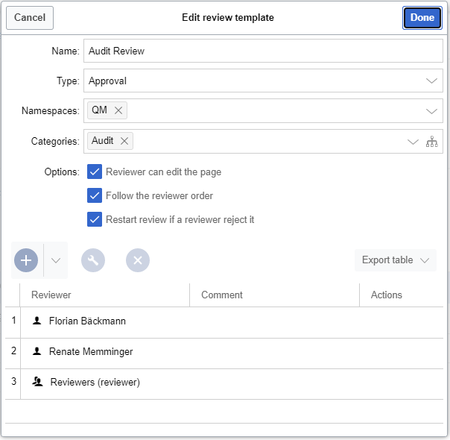
- Click the "+"-button (3). This opens the template dialog. Create your template.
- Enter a name.
- Select the template type:
- Default: The review is independent of settings in the Config manager. For reviews in namespaces with approvals, the page is not automatically approved at the end of the review.
- Approval: The review applies the setting from the Config manager for automatically deleting the workflow after the page has been approved. Pages in namespaces that do not create draft versions are not affected by this setting.
- If the template should only appear on pages in certain namespaces, specify the appropriate namespaces.
- If the template should only appear on pages that are assigned to certain categories, specify the categories.
- Select the review options described above.
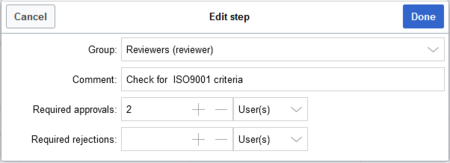
- Use the "+"-button to add the reviewers. If you enter a comment here, it will be displayed in the version history. Note: A group vote can also be set up for an individual workflow step using the plus button. For this purpose, a wiki group is selected as the reviewer.
- Group: The group that will vote on the selected step.
- Comment: Comment that is displayed in the workflow and in the version history for this step.
- Required approvals: If this number is reached first, the process step will be completed positively.
- Required rejections: If this number is reached first, the process step will be completed negatively.
- Click Done.
The template can now be selected accordingly in a review.
Note: The review type can be changed after loading the template and then behaves according to the newly selected type. This means that the "Approval" type from a template can be set to be a "Standard" workflow on a page. In that case, the draft version of the page will not be approved after the workflow has finished.
In BlueSpice 3.1
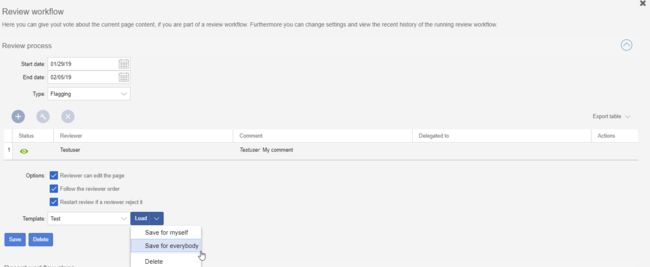
Once the list of reviewers is entered and the other options have been set, enter the name for the template in the input field and click on the arrow next to the "Load" button. Several options are available:
- Save for myself: The template will be shown only to the user who saves it
- Save for everybody: the template will be shown to everybody
Pick the desired option and the template will be saved.
Applying a template
Once there are templates saved, users can choose from the list of templates. After clicking the "Load" button, the reviewers that have been saved in this template are added to the reviewer list.
In BlueSpice 3.1, only the list of reviewers is stored in the template.
Deleting a template
To delete a template, choose the template to delete, click on the arrow in the "Load" button and select "Delete".
A review can only be started if at least one review has beed added.
Once all settings are set, click save to start the review. At this point, all assigned reviewers receive a notification (depending on their notification settings) that there is a review pending, and that they need to review it. During the review process, editing of the page is disabled unless the setting to allow editing has been activated.
Casting votes
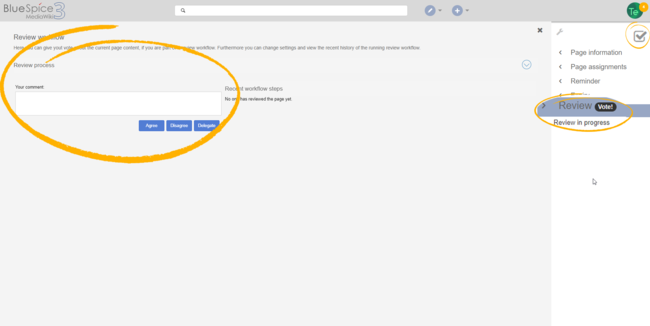
When assigned reviewers visit that page, they are prompted to cast their vote.
The voting form consists of:
- Comment box - here reviewers can explain the reason for their vote
- Agree button - by clicking this button, users cast a "yes" vote and agree to the proposed version of the page.
- Disagree button - by clicking this button, users cast a "no" vote and reject the proposed version.
- Delegate button - users can delegate their assignment to another user. This button opens a dialog for delegating the vote.
All votes along with comments are displayed under "Recent workflow steps" in the same flyout as the vote form and in the page history.
Review overview
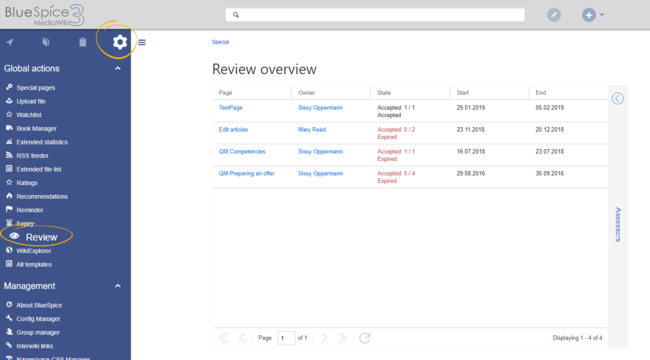
The page Special:Review provides an overview of all ongoing reviews. It can be accessed from the main navigation under "Global actions", item "Review". Clicking on an individual review opens a list of all reviewers assigned to review this page along with their votes (indicated by the eye icon before the username). A grey eye icon means the reviewer has not yet reviewed the page, green means a "yes" vote, while red means a "no" vote.
Configuration
In the Config manager, you can change the following settings:
- Only the owner of a review can change it: If this is unchecked, any user with edit rights can update a workflow.
