BlueSpiceVisualDiff
-
- Last edited 7 years ago by Lsireta
-
-
- This page is a draft but has an approved version
Contents
What is VisualDiff?
VisualDiff enables users to easily compare two versions of an article with just a few clicks.
Where to find VisualDiff?
VisualDiff is integrated in the history page of every article. Users with reading rights for the corresponding article can access the version comparison tool by clicking on the "History" link on the upper right corner of the screen.
How to use VisualDiff? (Step-by-step)
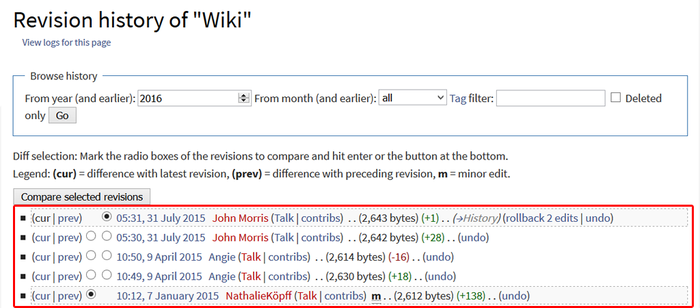
Step 1: Open the version history of the article by clicking on the "History" link in the upper right corner.
Step 2: Choose the two versions of the article you want to compare.
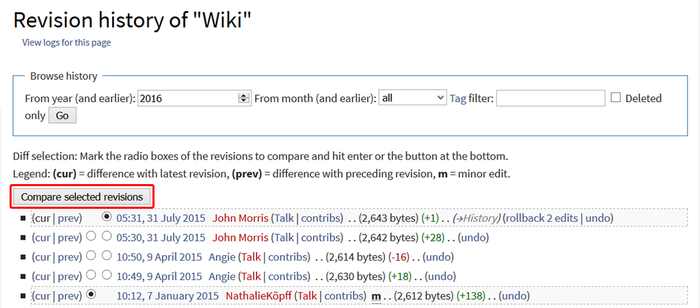
Step 3: Click on "Compare selected revisions".
Choose a view
VisualDiff highlights the changes between the two chosen versions in three different views:
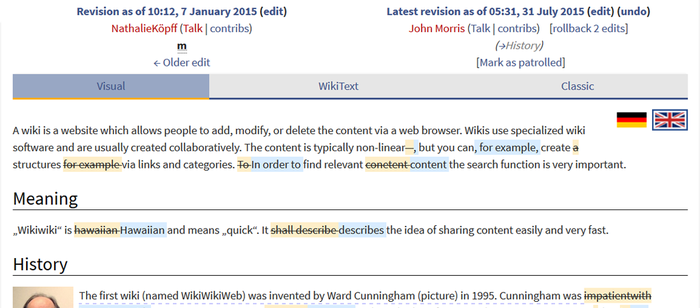
1) Visual
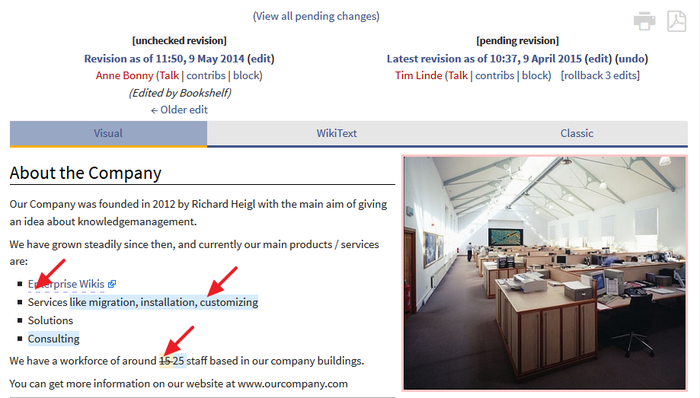
- In the visual view, the article will be displayed like in the reading mode of the wiki. The changes between the versions are color coded, making it easy to find and compare changes, especially in large tables.
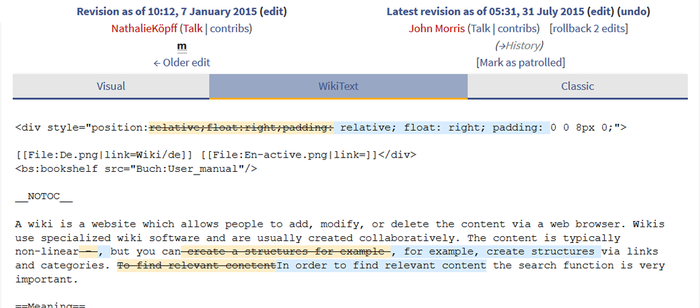
2) WikiText
- In this view, the changes between the versions are shown in Wikicode, but without tabular form and the lineup of the changes (see Classic view). The view corresponds to the editing mode of an article. Changes are also color coded.
3) Classic
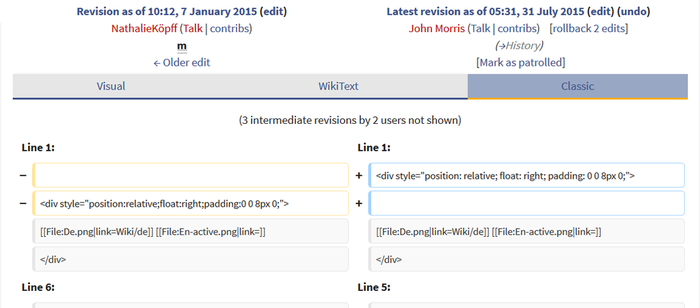
- The common view of the changes in MediaWiki style. The changes are listed and compared in a tabular form, and organized and sorted by lines. VisualDiff aids this comparison by color coding as well.
Note: You can switch between the views by clicking on the corresponding tab with your mouse.
Color coding
A change can be “added”, “deleted”, “changed”, or “conflict” content. Due to the nature of wiki articles, “changed” and “conflict” will be very rare. “Changed” will be shown e.g. if a word was linked subsequently. All other changes (although being “changed” as well) are shown as “added” or “deleted”.
Color code for text changes:
- Light blue: additions to the text.
- Orange and crossed-out: deletions from the text.
- Blue dashed lines: Changes in the structure of the article. This is usually the case when a word has been linked subsequently, or a header has been changed.
Color code for image changes:
- Light blue frame: added picture, or the current format of a changed image.
- Red frame: deleted picture, or the former format of a changed image.
How to adapt VisualDiff?
VisualDiff works as is, so no further adaptations are necessary.
Administrators can change the Html diff engine url in the admin settings of the wiki.
See also
Our reference page.
|
The BlueSpice extension VisualDiff is part of BlueSpice pro. It can also be purchased as a single extension in the BlueSpice Shop. |

