|
|
|
PasteImage
Summary
The package PasteImage for BlueSpice allows users to include images in an article, either via Drag&Drop, or by copying it from the clipboard.
At a glance: Advantages
- Intuitive use
- No complicated code necessary
- Various possibilities for the user
Where do I find PasteImage?
PasteImage is integrated in the edit mode of the wiki. Every time an image is pasted or dropped into one of the two editors, PasteImage is automatically loaded and provides you a special window to enter further data.
How do I use PasteImage? (Step-by-step)
Note: Please see the entry Technical background for system requirements and compatibility!
Option 1: Via Drag & drop
- Step 1: Open the respective wiki article in edit mode. Choose either the WYSIWYG editor or the wikicode view.
- Step 2: Open your Explorer and choose the picture you want to add to your article.
- Step 3: Drag and drop the picture into your editor window. A separate window will pop up where you can enter additional information and credentials.
Option 2: Via Copy & Paste
- Step 1: Open the respective wiki article in edit mode. Choose either view.
- Step 2: Open your Explorer and copy the image you want to add. Alternatively you can also press the screenshot key to save your current screen to the clipboard.
- Step 3: Move your mouse cursor to the spot in the editor where you want to insert the image and press
ctrl+v. You can now also enter additional information in a separate pop-up window.
Features of PasteImage
Additional data
When inserting the image, a pop-up window appears, allowing you to add the following information to the image:
- The categories the image can be found in
- A summary description that will appear on the file page of the image
- The license the image is under. Note: make sure that you only upload images you are allowed to!
- Furthermore you can place the image on a watch list, so you will always be informed about future changes of the image.
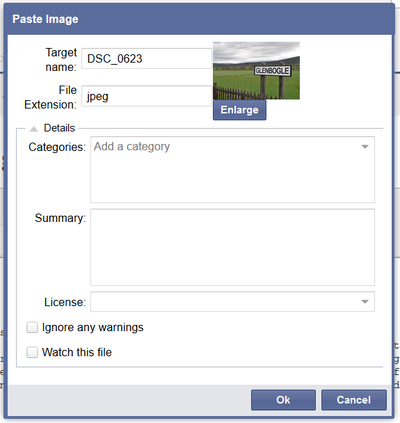 Screenshot: Adding additional data to the inserted image Further editing of images
After inserting an image with PasteImage, you can of course modify it further (resizing, adding alt-text or links, etc.) via the normal functions of your chosen editor.
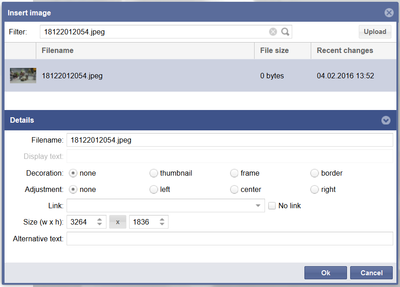 Screenshot: Further editing of an inserted image
Administration
How can I adapt PasteImage?
Administrators can change the following settings in the preference tab PasteImage:
- Default File Extension if none provided
- Activate Java Applet (This setting can also be activated or deactived by the user in the personal user settings under the tab BlueSpice)
Which rights are needed to use PasteImage?
To use PasteImage, users need editing rights in the respective namespace. Furthermore, rights to import new images (upload, reupload, reupload-shared) are also necessary.
Additional system requirements
PasteImage uses Java for the "Copy & Paste" functionality. So for using this feature, Java 1.7 or higher is required. Please keep your Java version up-to-date.
Browser compatibility
PasteImage is tested and ready-to-use for
- Firefox version 22 and higher
- Internet Explorer version 9 and higher
- Chrome version 13 and higher
Please note: Chrome stopped supporting Java from version 43, so "Copy & Paste" is also not supported anymore. Other features however are not affected.
Troubleshooting
- Application blocked for security reasons
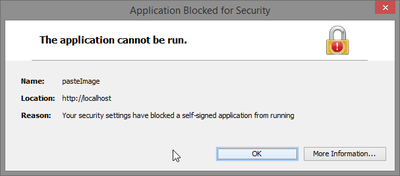 Screenshot: Security Blocking Error - If the applet is blocked for security reasons, you can add your wiki to the Exception Site List (required: Java 1.7.0_51 or higher):
- Step 1: Open your system settings and click on "Java".
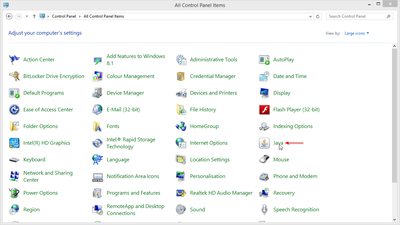 Screenshot: System settings - Step 2: Access the "Security" tab and click on "Edit Site List...".
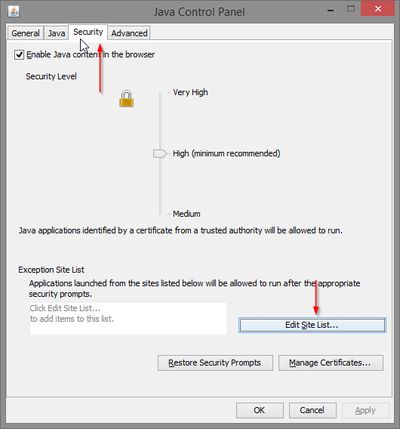 Screenshot: Java Control Panel - Security Tab - Step 3: Click "Add" to add your website to the trusted pages.
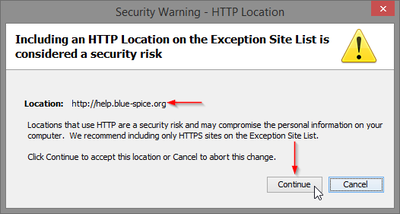
 Screenshot: Exception Site List - Step 4: Enter the corresponding URL, then click "OK". In the following window, re-check your URL. Click on "Continue".
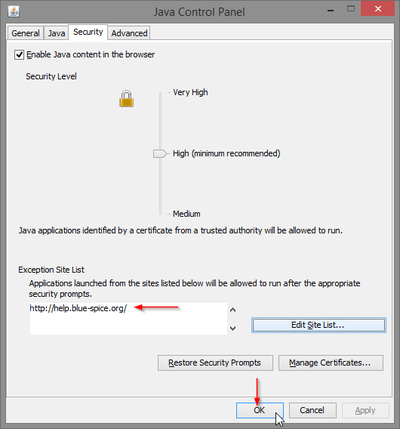
 Screenshot: Security Warning - Step 5: The URL should appear in the Exception Site List. Click "OK" to save your changes.
 Screenshot: New Exception Site Entry - If you are running Java version 1.7.0_40 or 1.7.0_45, you need to import the certificate the applet uses:
- Step 1: Open your system settings and click on "Java".
Screenshot: System settings - Step 2: Access the "Security" tab and click on "Manage Certificates...".
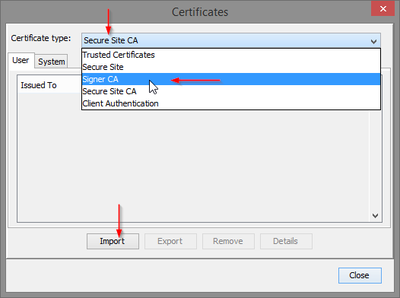
 Screenshot: Java Control Panel - Security Tab - Step 3: Choose "Signer CA" as Certificate type. Click on "Import".
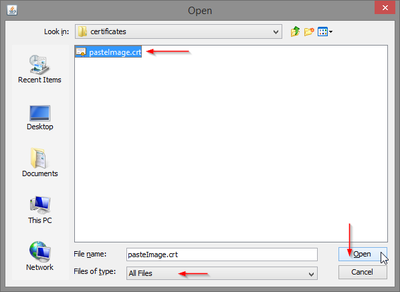
 Screenshot: Import Certificate - Step 4: Choose the
pasteImage.crt file. If you can't see the file, choose "All Files" from the "Files of type" dropdown menu. Click on "Open".
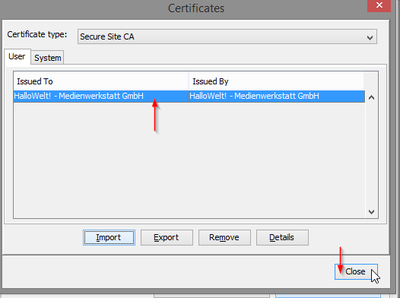
 Screenshot: Choose pasteImage.crt - Step 5: Verify that you imported the correct certificate. You can see "HalloWelt! - Medienwerkstatt GmbH" as the issuer. Click on "Close".
 Screenshot: New certicate entry - Please note: regardless of your Java version, always restart your browser for the changes to take effect!
- Stop the applet from asking if you want to execute it
- To stop Java from asking you if you want to execute this applet, you need to import the certificate as described above. In addition to that, with Java version 1.7.0_51 or higher, you need to add your wiki to the trusted sites (as described above).
- If all is correct, you see the following window:
- To stop Java asking for permissions for this applet, check the checkbox on the left hand side.
|


