Difference between revisions of "Navigation"
Fbaeckmann (talk | contribs) m (Text replacement - "[[UserSideBar" to "[[Reference:UserSideBar") |
Fbaeckmann (talk | contribs) (Tag: 2017 source edit) |
The main navigation can be found on the left side of the wiki page. This bar contains the navigation, every use user can see and use (in contrast to the Focus, which can be customized from the user as individual and personal navigation). To change the main navigation, you need to have administrator rights. Besides: in the navigation bar, you can link important areas and portals (like departments or main topics).
Fold navigation in and out[edit | edit source]
Since the BlueSpice version 2.22.0 you have the possibility to fold the navigation in and out. Just click on the white arrows on top of the navigation bar.


Change the content of the navigation[edit | edit source]
You can find the code of the navigation bar on this page:
MediaWiki:Sidebar
You can also go to Special pages -> System messages -> sidebarIf you have the administratior right, also a link "Edit sidebar" will be shown at the bottom of the navigation panel.
Coding[edit | edit source]
If you take a look at MediaWiki:Sidebar
, you may see that it is a list. * is a header and ** a list item under the header.
The list items are like normal wiki links. The first part after the ** is the name of the page, you want to link to. In normal wiki code, this name is in brackets, e.g. [Testpage]
. You don´t need this these brackets here. Just type in the name of the page. The second part after the |
is the description, this means it´s the text which will be shown in the navigation.
Example:
* Navigation
** Main_Page|Main page
** Special:AllPages|From A to Z
* Enterprise
** Company|Company
** Staff|Staff
** Sales and Marketing|Sales, Marketing, Projectmangement
** Products and services|Products
** Category:Organisation|Customers and Organisationen
Note: It is not possible to create subitems in the navigation bar and also linking to a file doesn´t work, because the Sidebar can´t interpret this kind of links.
Insert icons in the navigation[edit | edit source]
Starting with version 2.22.0 you can add icons. To do this, follow these steps:
Go to the special page Special:Upload. Upload the icons, you want to use. Note: An icon should have a size of 24px x 24px. Recommended formats are .jpg, .pngYou can assign individual icons to the navigation points by adjusting the styling using CSS.
To do so, proceed as follows:
Suppose you have created a menu item "Hints" as described above and now want to equip it with an appropriate icon.
-
Open the page
MediaWiki:
Sidebar and put behind the menu item a pipe ("|") and write behind the file name of the icon. Then save.
* Recentchanges-url | Recent Changes | Icon-for-recent-changes.png
-
Refresh the page by pressing F5, then should your icons appear in the menu.
Common.css
in edit mode. - Add the following lines to the end of the page and save:
#n-Hints i::before {
content: '\e90e';
font-family: 'entypo';
- To make the change visible, it is usually necessary to empty the browser cache.
Please note that the display name (in this case "Hints") and not the page title must be used here; spaces must be replaced by hyphens ("-").
When special characters are used, there may be difficulties because they are converted in the HTML code of the page. In such a case, right-click on the corresponding entry and, depending on the browser used, select "Examine element" or similar. You will now see the underlying source code and should see a part that has this form:
<a id="n-MENUENTRY" class="list-group-item" ..... >
In the above example, replace #n-Hints
with #n-MENUENTRY
.
You can see all available icons on the page ../extensions/BlueSpiceFoundation/resources/bs.icons.php
of your wiki. Here you find an overview of the symbols available in this particlar wiki.
In the upper line you can click through different fonts, below you find the icons with the corresponding character keys. In MediaWiki:Common.css
you have to adjust the entries font-family
(font) and content
(character key) accordingly.
__NOTOC__ The main navigation can be found on the left side of the wiki page. This bar contains the navigation, every useuser can see and use (in contrast to the [[Reference:UserSideBar|Focus]], which can be customized from the user as individual and personal navigation). To change the main navigation, you need to have administrator rights. Besides: in the navigation bar, you can link important areas and portals (like departments or main topics). ==Fold navigation in and out== Since the BlueSpice version 2.22.0 you have the possibility to fold the navigation in and out. Just click on the white arrows on top of the navigation bar. {| |- | valign="bottom"|[[File:BlueSpice2-Navigation-ausgeklappt.png|thumb|right|220px|
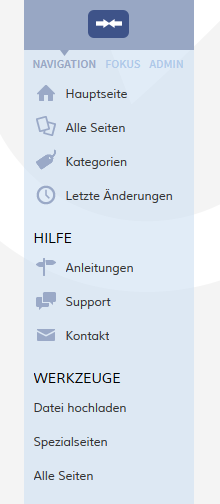
Screenshot: Die ausgeklappte Navigation mit allen Informationen
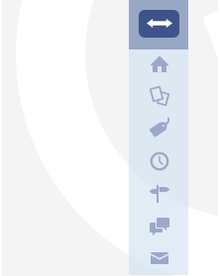
]] | valign="bottom"|[[File:BlueSpice2-Navigation-eingeklappt.png|thumb|right|220px|Screenshot: Die eingeklappte Navigation mit Icons als Hinweis]] |} == ==Change the content of the navigation== You can find the code of the navigation bar on this page: <pre>MediaWiki:Sidebar</pre> You can also go to Special pages -> System messages -> sidebar. If you have the administratior right, also a link "Edit sidebar" will be shown at the bottom of the navigation panel. ===Coding=== If you take a look at <code>MediaWiki:Sidebar</code>, you may see that it is a list. <nowiki>*</nowiki> is a header and <nowiki>**</nowiki> a list item under the header. The list items are like normal wiki links. The first part after the <nowiki>**</nowiki> is the name of the page, you want to link to. In normal wiki code, this name is in brackets, e.g. <code>[[Testpage]]</code>. You don´t need thisthese brackets here. Just type in the name of the page. The second part after the <code>|</code> is the description, this means it´s the text which will be shown in the navigation. Example: <pre>* Navigation ** Main_Page|Main page ** Special:AllPages|From A to Z * Enterprise ** Company|Company ** Staff|Staff ** Sales and Marketing|Sales, Marketing, Projectmangement ** Products and services|Products ** Category:Organisation|Customers and Organisationen </pre> {{Box_Note|Note text = It is not possible to create subitems in the navigation bar and also linking to a file doesn´t work, because the Sidebar can´t interpret this kind of links.}} <!-- ===Nesting=== Die Seiten werden in der Regel per MediaWiki-Systemtextnamen angesprochen, die Hauptseite etwa mit <span class="mceNonEditable tag" id="bs_specialtag:@@@ST3@@@" data-bs-name="code" data-bs-type="tag" data-bs-id="3" >< code ></span> oder die Letzten Änderungen mit <span class="mceNonEditable tag" id="bs_specialtag:@@@ST4@@@" data-bs-name="code" data-bs-type="tag" data-bs-id="4" >< code ></span>. Das heißt, die Linkadressen sind außerhalb der Seite <span class="mceNonEditable tag" id="bs_specialtag:@@@ST5@@@" data-bs-name="code" data-bs-type="tag" data-bs-id="5" >< code ></span> auf einer eigenen Seite im Namensraum MediaWiki notiert. Der wirklichen Links liegen dann zum Beispiel auf der Seite <span class="mceNonEditable tag" id="bs_specialtag:@@@ST6@@@" data-bs-name="code" data-bs-type="tag" data-bs-id="6" >< code ></span> oder auf einer Seite <span class="mceNonEditable tag" id="bs_specialtag:@@@ST7@@@" data-bs-name="code" data-bs-type="tag" data-bs-id="7" >< code ></span>. Der Hintergrund dieser Regelung im MediaWiki ist nicht ganz klar. Wahrscheinlich geht es um eine Konvention für die Vereinfachung der Internationalisierung. ====Beispiel==== Zufälliger Artikel als Unterpunkt von Navigation:<br />Um einen Link zur Spezialseite ''zufälliger Artikel'' in die Navigationsleiste setzen, müssen Sie zunächst nachsehen wie der MediaWiki-Systemtext heißt, in diesem Fall <span class="mceNonEditable tag" id="bs_specialtag:@@@ST8@@@" data-bs-name="code" data-bs-type="tag" data-bs-id="8" >< code ></span>. Um nun einen Unterpunkt zu machen, gehen Sie wie bei einer Liste vor und setzen <span class="mceNonEditable tag" id="bs_specialtag:@@@ST9@@@" data-bs-name="code" data-bs-type="tag" data-bs-id="9" >< code ></span> bzw. <span class="mceNonEditable tag" id="bs_specialtag:@@@ST10@@@" data-bs-name="code" data-bs-type="tag" data-bs-id="10" >< code ></span> an der jeweiligen Stelle und fügen dann <span class="mceNonEditable tag" id="bs_specialtag:@@@ST11@@@" data-bs-name="code" data-bs-type="tag" data-bs-id="11" >< code ></span> ein, danach fehlt nur noch eine Beschreibung, die nach dem <span class="mceNonEditable tag" id="bs_specialtag:@@@ST12@@@" data-bs-name="code" data-bs-type="tag" data-bs-id="12" >< code ></span> eingefügt wird, z.B. <span class="mceNonEditable tag" id="bs_specialtag:@@@ST13@@@" data-bs-name="code" data-bs-type="tag" data-bs-id="13" >< code ></span>. Ihr Unterpunkt ''Zufälliger Artikel'' könnte z.B. so aussehen: <pre>** randompage|Zufälliger Artikel</pre> <br /> --> ==Insert icons in the navigation== Starting with version 2.22.0 you can add icons. To do this, follow these steps: * Go to the special page '''Special:Upload'''. Upload the icons, you want to use. Note: An icon should have a size of 24px x 24px. Recommended formats are .jpg, .png * Open the page '''MediaWiki:Sidebar''' and put behind the menu item a pipe ("|") and write behind the file name of the icon. Then save. <pre> * Recentchanges-url | Recent Changes | Icon-for-recent-changes.png </pre> * Refresh the page by pressing F5, then should your icons appear in the menuYou can assign individual icons to the navigation points by adjusting the styling using CSS. To do so, proceed as follows: Suppose you have created a menu item "Hints" as described above and now want to equip it with an appropriate icon. * Open the page <code>MediaWiki:Common.css</code> in edit mode. * Add the following lines to the end of the page and save: <pre>#n-Hints i::before { content: '\e90e'; font-family: 'entypo'; </pre> * To make the change visible, it is usually necessary to empty the browser cache. Please note that the display name (in this case "Hints") and not the page title must be used here; spaces must be replaced by hyphens ("-"). When special characters are used, there may be difficulties because they are converted in the HTML code of the page. In such a case, right-click on the corresponding entry and, depending on the browser used, select "Examine element" or similar. You will now see the underlying source code and should see a part that has this form: <pre><a id="n-MENUENTRY" class="list-group-item" ..... ></pre> In the above example, replace <code>#n-Hints</code> with <code>#n-MENUENTRY</code>. You can see all available icons on the page <code>../extensions/BlueSpiceFoundation/resources/bs.icons.php</code> of your wiki. [https://wiki.hallowelt.com/extensions/BlueSpiceFoundation/resources/bs.icons.php Here] you find an overview of the symbols available in this particlar wiki. In the upper line you can click through different fonts, below you find the icons with the corresponding character keys. In <code>MediaWiki:Common.css</code> you have to adjust the entries <code>font-family</code> (font) and <code>content</code> (character key) accordingly. <!-- ==Navigation in mehrsprachigen Wikis== In mehrsprachigen Wikis sollen natürlich nicht nur die Inhalte, sondern auch die Navigation in unterschiedlichen Sprachen verfügbar sein. Um einen neuen Navigationspunkt in MediaWiki anzulegen, benötigen Sie deshalb immer zwei Seiten, auf die die Navigation zurückgreift: * Zum einen eine Seite, die den Link auf die Zielseite enthält * Zum anderen eine Seite, die den Alias Namen, der in der Navigation auftauschen soll enthält ===Ein Beispiel=== '''Sie wollen den Menüpunkt "User manual" anlegen und Ihr Wiki hat als Hauptsprache Englisch.'''1. Legen Sie eine Seite im MediaWiki Namensraum an, die den Menüpunkt widerspiegelt z.B. <pre>MediaWiki:User_manual</pre> Auf dieser Seite gehen Sie auf Bearbeiten und tragen dort den Alias Namen ein, der nachher in der Navigation erscheinen soll, z.B. "User Manual". Speichern Sie die Seite ab.<br /><br />2. Legen Sie eine Seite im MediaWiki Namensraum an, die später den Link enthält. Achtung verwenden Sie denselben Namen wie den vorher angelegten Alias! <pre>MediaWiki:User_manual-url</pre> Auf dieser Seite gehen Sie auf Bearbeiten und tragen dort das Linkziel (d.h. einen Seitenlink) ein. Der Link erscheint später unter dem Alias in der Navigation, z.B. "UserManual". Achtung auf dieser Seite wird der Link ''ohne'' eckige Klammern eingetragen! Speichern Sie die Seite ab.<br /><br />3. Gehen Sie auf die MediaWiki Seite, die für die Navigation verantwortlich ist (Beschreibung s.o.). Hier unter "MediaWiki:Sidebar" tragen Sie nun den neuen Link ein: <pre><nowiki>* User manual-url|User manual</nowiki></pre> Dann erscheint in der Navigation der Aliasname und der Link, den Sie vorher auf den beiden Unterseiten eingetragen haben. <br /><br /> '''Nun möchten Sie die deutsche Entsprechung der Navigation erstellen:'''<br /><br /> 1. Legen Sie die (z.B. deutsche) Unterseite zu der vorher erstellten Alias Seite an: <pre>MediaWiki:User_manual/de</pre> Tragen Sie hier den deutschen Aliasnamen ein: "Nutzerhandbuch"<br /><br /> 2. Legen Sie die Unterseite (z.B. deutsche) Unterseite zu der vorher erstellten Linkseite an: <pre>MediaWiki:User_manual-url/de</pre> Hinterlegen Sie hier den entsprechenden Link auf die deutschsprachige Seite. Achtung, auch hier nur die Zielseite ohne eckige Klammern eintragen. Kommt nun ein deutschsprachiger Nutzer auf ihr Wiki, sieht er in der Naviagtion "Nutzerhandbuch" und wird auf die deutsche Seite geleitet, während der englischsprachige Nutzer "User Manual" sieht und auf die englischsprachige Seite weitergeleitet wird. <br /><br /> '''Zusammenfassend:''' Um einen Link in der Navigation in zwei Sprachen zu hinterlegen, müssen vier neue Seiten erstellt werden und ein Link auf der Seite <span class="mceNonEditable tag" id="bs_specialtag:@@@ST17@@@" data-bs-name="code" data-bs-type="tag" data-bs-id="17" >< code ></span> hinterlegt werden. ==Portal anlegen== Wenn Sie in der Navigationsleiste ein neues Portal anlegen wollen, geben Sie einfach das Linkziel ein: ''Linkziel|Beschriftung''. '''Achtung''': ''portal-url|Themenportale'' greift immer auf das selbe Portal zu. ==Weblinks== * [http://www.mediawiki.org/wiki/Manual:Interface/Sidebar Eintrag im MediaWiki Manual] --> [[Category:MediaWiki]] [[en:{{FULLPAGENAME}}]][[de:Navigation]]
Line 1: | Line 1: | ||
__NOTOC__ | __NOTOC__ | ||
− | The main navigation can be found on the left side of the wiki page. This bar contains the navigation, every | + | The main navigation can be found on the left side of the wiki page. This bar contains the navigation, every user can see and use (in contrast to the [[Reference:UserSideBar|Focus]], which can be customized from the user as individual and personal navigation). To change the main navigation, you need to have administrator rights. |
Besides: in the navigation bar, you can link important areas and portals (like departments or main topics). | Besides: in the navigation bar, you can link important areas and portals (like departments or main topics). | ||
− | |||
− | |||
− | |||
− | |||
− | |||
− | |||
− | |||
− | |||
==Change the content of the navigation== | ==Change the content of the navigation== | ||
Line 18: | Line 10: | ||
<pre>MediaWiki:Sidebar</pre> | <pre>MediaWiki:Sidebar</pre> | ||
− | + | If you have the administratior right, also a link "Edit sidebar" will be shown at the bottom of the navigation panel. | |
===Coding=== | ===Coding=== | ||
If you take a look at <code>MediaWiki:Sidebar</code>, you may see that it is a list. <nowiki>*</nowiki> is a header and <nowiki>**</nowiki> a list item under the header. | If you take a look at <code>MediaWiki:Sidebar</code>, you may see that it is a list. <nowiki>*</nowiki> is a header and <nowiki>**</nowiki> a list item under the header. | ||
− | The list items are like normal wiki links. The first part after the <nowiki>**</nowiki> is the name of the page, you want to link to. In normal wiki code, this name is in brackets, e.g. <code>[Testpage]</code>. You don´t need | + | The list items are like normal wiki links. The first part after the <nowiki>**</nowiki> is the name of the page, you want to link to. In normal wiki code, this name is in brackets, e.g. <code>[[Testpage]]</code>. You don´t need these brackets here. Just type in the name of the page. The second part after the <code>|</code> is the description, this means it´s the text which will be shown in the navigation. |
+ | |||
+ | Example: | ||
+ | |||
+ | <pre>* Navigation | ||
+ | ** Main_Page|Main page | ||
+ | ** Special:AllPages|From A to Z | ||
+ | * Enterprise | ||
+ | ** Company|Company | ||
+ | ** Staff|Staff | ||
+ | ** Sales and Marketing|Sales, Marketing, Projectmangement | ||
+ | ** Products and services|Products | ||
+ | ** Category:Organisation|Customers and Organisationen | ||
+ | </pre> | ||
+ | |||
− | {{Box_Note|Note text = It is not possible to create subitems in the navigation bar | + | {{Box_Note|Note text = It is not possible to create subitems in the navigation bar.}} |
<!-- | <!-- | ||
===Nesting=== | ===Nesting=== | ||
Line 45: | Line 51: | ||
==Insert icons in the navigation== | ==Insert icons in the navigation== | ||
− | + | You can assign individual icons to the navigation points by adjusting the styling using CSS. | |
− | + | To do so, proceed as follows: | |
− | |||
− | <pre> | + | Suppose you have created a menu item "Hints" as described above and now want to equip it with an appropriate icon. |
+ | * Open the page <code>MediaWiki:Common.css</code> in edit mode. | ||
+ | * Add the following lines to the end of the page and save: | ||
+ | <pre>#n-Hints i::before { | ||
+ | content: '\e90e'; | ||
+ | font-family: 'entypo'; | ||
</pre> | </pre> | ||
+ | * To make the change visible, it is usually necessary to empty the browser cache. | ||
+ | Please note that the display name (in this case "Hints") and not the page title must be used here; spaces must be replaced by hyphens ("-"). | ||
+ | |||
+ | |||
+ | When special characters are used, there may be difficulties because they are converted in the HTML code of the page. In such a case, right-click on the corresponding entry and, depending on the browser used, select "Examine element" or similar. | ||
+ | You will now see the underlying source code and should see a part that has this form: | ||
+ | <pre><a id="n-MENUENTRY" class="list-group-item" ..... ></pre> | ||
+ | In the above example, replace <code>#n-Hints</code> with <code>#n-MENUENTRY</code>. | ||
+ | |||
+ | You can see all available icons on the page <code>../extensions/BlueSpiceFoundation/resources/bs.icons.php</code> of your wiki. [https://wiki.hallowelt.com/extensions/BlueSpiceFoundation/resources/bs.icons.php Here] you find an overview of the symbols available in this particlar wiki. | ||
− | + | In the upper line you can click through different fonts, below you find the icons with the corresponding character keys. In <code>MediaWiki:Common.css</code> you have to adjust the entries <code>font-family</code> (font) and <code>content</code> (character key) accordingly. | |
<!-- | <!-- |