Difference between revisions of "Setup:Installation Guide/System Preparation/Windows/Parsoid"
← Setup:Installation Guide/System Preparation/Windows/Parsoid
| [quality revision] | [quality revision] |
(Tag: Visual edit) |
(Tag: 2017 source edit) |
Contents
|
|
Parsoid is the rendering service for the Visual Editor. The steps listed here are optional and only required if you want to use Visual Editor in your BlueSpice installation. After your BlueSpice Installation, you still have to activate VisualEditor. |

|
For the installation and operation of Parsoid, Git and Node.js are required. If you have not installed them yet, follow the links that are provided here. |
Installing Parsoid[edit | edit source]
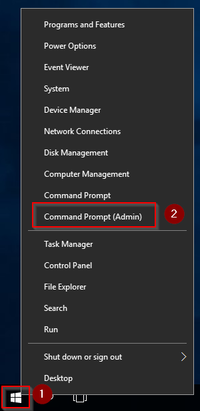
First, open the Windows Command Prompt as administrator. To do this, right-click "Start" (1) and select "Command Prompt (Administrator)" (2):
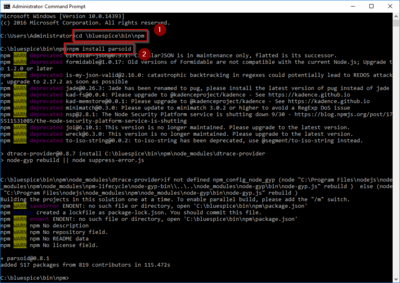
Change into the directory C:\bluespice\bin\npm (1) execute the command "npm install parsoid" (2):
Keep the command prompt open and complete the following step
Creating the configuration file[edit | edit source]
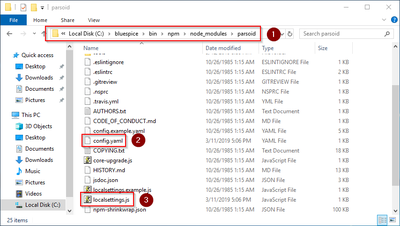
In the BlueSpice codebase you will find two files in the folder extensions/BlueSpiceVisualEditorConnector/docs/parsoid:
- config.yaml
- localsettings.js
Copy them into the folder C:\bluespice\bin\npm\node_modules\parsoid\.
This provides an already finished configuration of Parsoid, which should work in the standard setup without further iadjustments.
Parsoid installation and configuration check[edit | edit source]
To test the installation and configuration, go back to the command prompt.
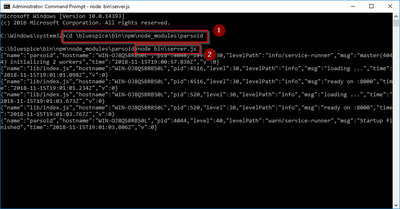
Change into the directory C:\bluespice\bin\npm\node_modules\parsoid (1) and start the service with the command "node bin\server.js" (2):
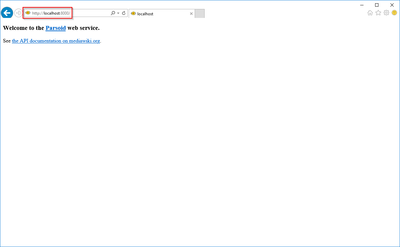
The service should now start without an error message. For further review, call the URL "http://localhost: 8000" in Internet Explorer. You should see the following page:
Change back to the command prompt and quit Parsoid by pressing "Ctrl+C". Keep the command prompt open and go to the next step.
Installation as a service[edit | edit source]
To run Parsoid in the background in the future, you need to install Parsoid in a Windows service. To do this, proceed as follows:
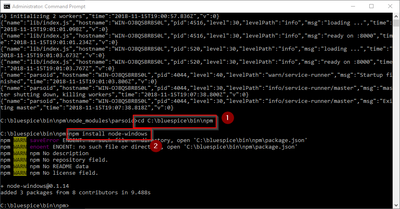
In the command prompt, change to the directory "C:\bluespice\bin\npm" (1) and execute the command "npm install node-windows" (2):
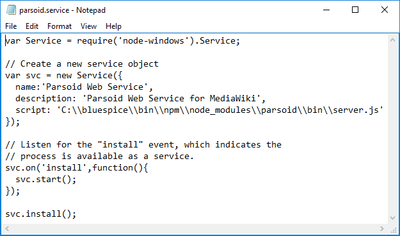
Using a text editor, create the file "C:\bluespice\bin\npm\node_modules\parsoid\ parsoid.service" with the help of this linked content:
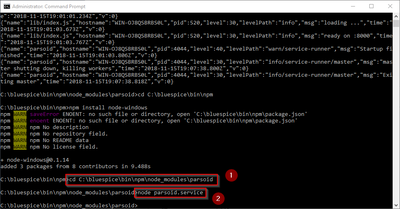
In the command prompt, change into the directory "C:\bluespice\bin\npm\node_modules\ parsoid" (1) and execute the command "node parsoid.service" (2):
You can now close the command prompt.
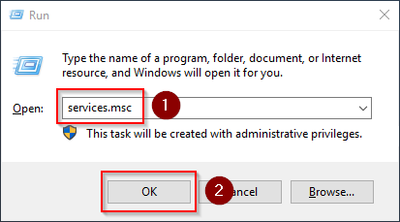
Then enter the key combination Windows+R.
In the following dialog box, enter "services.msc" (1) and confirm with "OK" (2):
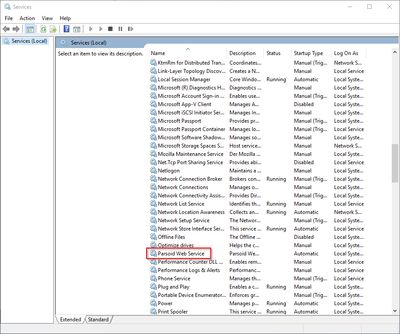
Find the service "Parsoid Web Service" and open it with a double-click:
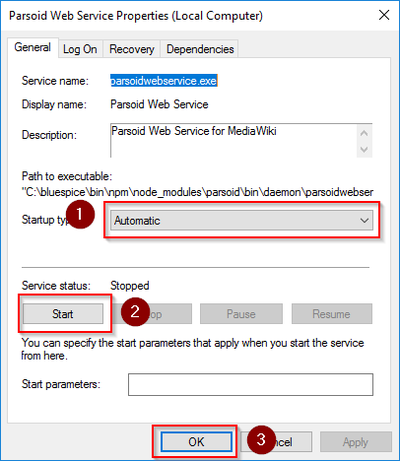
Select the startup type "Automatic" (1) and start the service (2). After the service is started, close the window with "OK" (3):
In Internet Explorer, check the URL "http://localhost:8000", as already explained in the previous step, whether the Parsoid service started successfully.
Next step[edit | edit source]
If you have completed all steps successfully, you can proceed to the next step " Python".