Difference between revisions of "Manual:Extension/BlueSpiceChecklist"
| [unchecked revision] | [quality revision] |
(Tag: 2017 source edit) |
(Changed categories.) |
BlueSpiceChecklist allows inserting checklists and checkboxes for to-do lists with responsibilities and status settings.
Contents
Magic word "checklist"[edit | edit source]
BlueSpiceChecklist enabled inserting checkboxes and comboboxes to the page. These can be changed without the need to edit the page.
Using BlueSpiceChecklist[edit | edit source]
Checklist items can be inserted from "Insert" menu, by clicking on "Insert magic" button, while editing the page. In the list of tags available, choose "checklist" and click "Done". Checkbox will be inserted to page and, below it, a configuration panel will appear.
Here user can choose one of two tabs:
- Checkbox
Only configuration for checkbox is marking it as selected or not selected.
- List
For lists (combobox), a predefined list of options as well as current status can be selected.
Defining lists[edit | edit source]
CheckList Functions[edit | edit source]
The checklist dropdown inserts:
- Recently used lists.
- Single checkbox elements.
- Newly created lists.
Multiple checkboxes and/or checklists can be inserted into an article.
Create Checkboxes[edit | edit source]
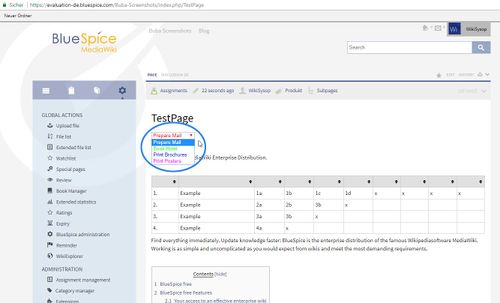
value="" unchecked states table below or the color hex codes further below. Clicking the <bs:checklist value="" /> Prepare Mail
<bs:checklist value="false" /> Book Hotel
Creating Lists[edit | edit source]
|
|
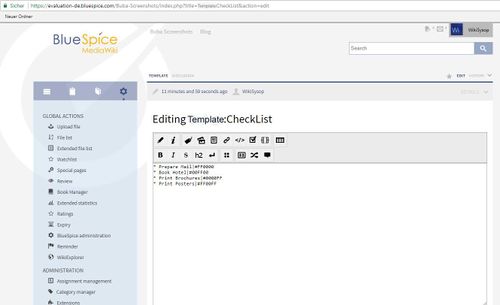
Prepare Checklist : In order to insert a checklist in an article, you must first create a checklist template that contains the necessary check list elements. This is done by creating a new article in the Template namespace. For example create a new article named 'Template:Status'. Then in the Code Editor (i.e. not the WYSIWYG Editor) ad the check list items as exampled above, as a list. Save the Template and remember the Template's name as you need to add this name to Insert list dialogue below.
Assign colors : To facilitate visibility, you can assign list element colors. This is done by entering the pipe symbol ( straight line ) after the item identifier followed by a HEX color code. |
                            * Prepare Mail| #FF9900
* Book Hotel| #00FF00
|
|
Assign colors[edit | edit source]
To support element status visibility color codes can be linked to the list elements. This is done by adding the pipe symbol (straight line) after the list element name followed by the HEX color Code.Typical colors;
| Colour | Name | HEX-Code |
|---|---|---|
| black | #000000 | |
| grey | #888888 | |
| red | #FF0000 | |
| orange | #FF8800 | |
| green | #00FF00 | |
| blue | #0000FF | |
| magenta | #FF00FF |

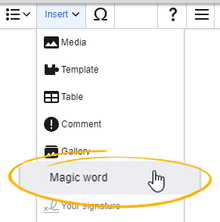
Screenshot Checklist WYSIWYG
|
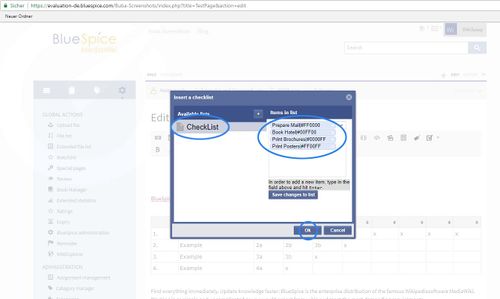
Insert checklist : The WYSIWYG Editor checklist dropdown arrow
To insert a new checklist, select the Insert list item in the dropdown. Then in the popup click on the + sign to add a new template. You must now enter the exact template title created above. Clicking " Ok " inserts the template's checklist items into your current article. |
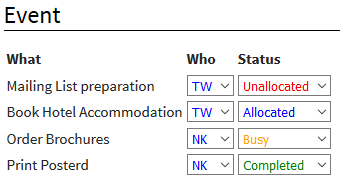
Example of Checklist being used for employee and status allocations.
|
As and example, you can add in multiple table row lists to show a tasks status of tasks , this might look like this. |
Authorisation[edit | edit source]
- Anyone who has write permissions can use the Checklist tag.
- Anyone who has the checklistmodify permission can modify a checklist.
| Designation | Description | Standard group |
|---|---|---|
| checklistmodify | Allows you to change a checklist item | user |
CheckList-Tag Paramaters[edit | edit source]
You can off course also use Wikicode to insert check boxes and checklists. A Checklist-Tag creates a single form field, which depending on the mode is a checkbox or select box. It has the following parameters:| Name | Description | Type / Value range | Default value |
|---|---|---|---|
| type | Modus: If the checklist item as a list or as | check, list | check |
| value | Current value | str | - |
| list | Contains the name of the page in the MediaWiki namespace of the list entries. Mandatory when type is 'list' | str | - |
| id | Optional indication of ID that can be used to identify the items | str | - |
Classic MediaWiki[edit | edit source]
Classic MediaWiki does not provide checklist functionality.
See also[edit | edit source]
Our reference page.
It is easy to insert simple checklists into any wiki page. When a wiki page has a checklist, any user with checklistmodify rights can update the checklist values without switching into edit mode. These are by default users in the role editor, author, maintenanceadmin and bot.
Note: If a user with read permissions changes the value of a checkbox or drop-down list, the value will not be saved. Refreshing the page will show the last value that has been saved before.
To create a checklist item:
-
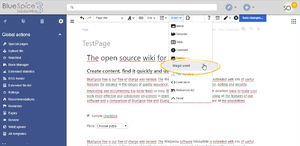
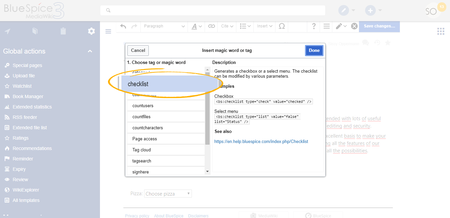
Click Insert > More > Magic word in the visual editor.
-
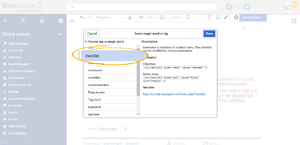
Click checklist in the dialog window.
- Click Done. Another dialog window appears.
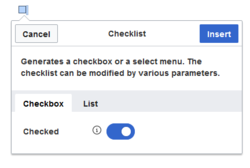
Now select the tab to select your checklist type:
- Checkbox: creates an individual checkbox.
- List: creates a drop-down menu.
A page can contain multiple checkboxes and lists.
Creating a checkbox[edit | edit source]
- Toggle the switch in the dialog window on the checkbox tab to create an unselected checkbox. When this toggle is blue, the checkbox is pre-selected.
- Select insert. The checkbox is now visible on the page. Write the text for a label or for an instruction next to the checkbox
After the page has been saved, all users can activate and deactivate the checkbox.
Creating a drop-down list[edit | edit source]
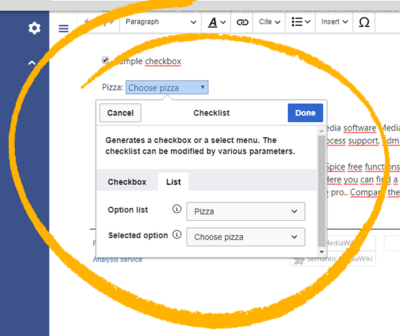
- Select an existing option list in the List tab.
- Under Selected option, choose the default value.
- Click Done.
After saving the page, all users can change the selected list value in read mode.
Defining an option list[edit | edit source]
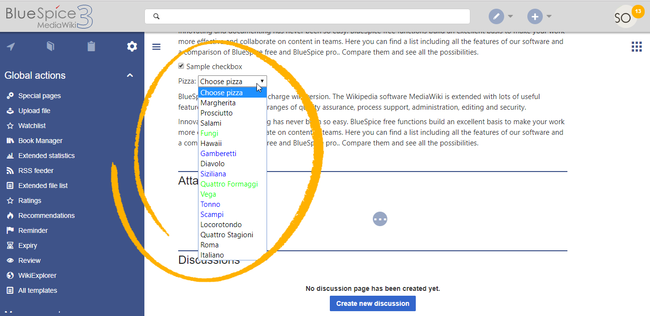
Before a combobox can be created, a template for the list items needs to be available. For example, to create a list of pizzas, you need to create a page Template:Pizza with the following content:
* Choose pizza
* Margherita
* Prosciutto
* Salami
* Fungi|#00FF00
* Hawaii
* Gamberetti|#0000FF
* Diavolo
* Siziliana|#0000FF
* Quattro Formaggi|#00FF00
After saving this page, the list "Pizza" appears in the select menu Option list.
Colors can be assigned to each option using the color's HEX code. The color value #00FF00 shows green text.
* Quattro Formaggi|#00FF00
Without specifying the color, text inherits the text color of the wiki page.
Adding checklists in source editing mode[edit | edit source]
Checklists can also be added to a page using wikitext. The syntax for adding the tag is:
Checkbox: <bs:checklist type="check" checked="true" />
<bs:checklist type="list" list="Template:Pizza" value="Choose pizza" />
Once a checklist tag has been saved on a page, users can change its value in read mode.
Configuration[edit | edit source]
The following configuration can be changed in the Config manager:
-
Mark checklist changes as minor edit: If this setting is active, changes to a checklist (for example, checking a checkbox) in view mode are logged as minor edits. If this setting is inactive, a change to the checklist is recorded as a regular version in the page history.
