Difference between revisions of "Manual:Extension/BlueSpiceInsertCategory"
| [unchecked revision] | [quality revision] |
(→See also) |
m (Tag: 2017 source edit) |
InsertCategory enables viewing and editing category assignments for a page.
Contents
Assigning categories[edit | edit source]
Title section[edit | edit source]
InsertCategory displays all existing categories, helping to keep the terminology uniform. You can then assign the page you are on to one or more of these existing categories. On top of this, you can create new categories here too. The dialogue can be called up from both the "Edit" mode and the "View" mode.
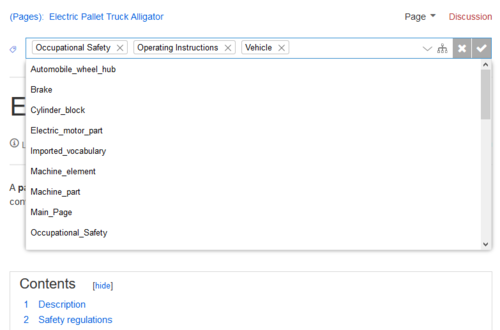
Where to find InsertCategory?Categories can be assigned to a page directly from the title section in view mode. Any user with edit rights can click on the tag-icon above the page title to edit the category assignments.
Page information flyout[edit | edit source]
Inserting categories in the "edit" mode: In the edit view (wiki code and WYSIWYG), click the buttonInserting categories in the "Read" mode:
 Screenshot: Inserting categories in the "Read" mode
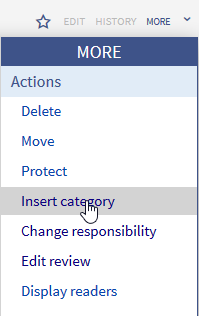
Click on the button "more" ![]() on the right hand side.
on the right hand side.
You will find several orders, one of which is "Insert Category". Here you can add new and insert categories or you can delete categories that don't fit the article.
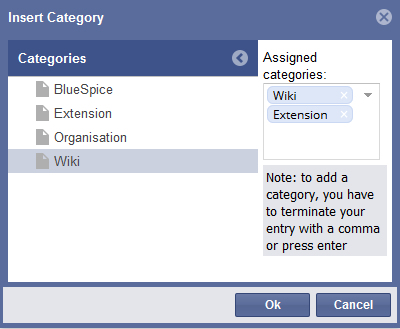 Dialogue of InsertCategoryAs you can see on the screenshot on the left side, in the left column all available categories, in the right column there are all chosen categories for the article and you can add new categories in the same field.
InsertCategory's functions[edit | edit source]
The caregories are listed hierarchically in the left column. The column on the right shows the categories which are already assigned to the article.
- Assigning categories: Click on one of the categories listed, it will appear on the right in the column "Chosen categories" and is then assigned to the article. Is a category is chosen which lies in a deeper level of the category hierarchy, all the categories above it will be transferred into the right hand column too.
- Deleting categories: To remove a category from the site you are on, click on the delete symbol (a red cross).
- Adding new categories: A category can be created and assigned by typing the category's name in the text box and clicking on "Enter". New categories only show up in the dialogue after the page has been saved and the dialogue has been reloaded.
- Ok button: In order to assign the chosen categories to the page, click the "Ok" button. The categories you have chosen will only be added to the page when you do this. Then they are added at the end, in the form .
- Abort: If you do not want to make the change, you can cancel the action with the button "Abort".
Tips for working with InsertCategory[edit | edit source]
By the way: One can set whether categories should be inserted with or without their parent categories in the preferences.
There is no limit on the number of categories to which an article can be assigned.
Classical categories in MediaWiki[edit | edit source]
Here is information about how to add Categories the classical way in MediaWiki.
See also[edit | edit source]
Our user manual.
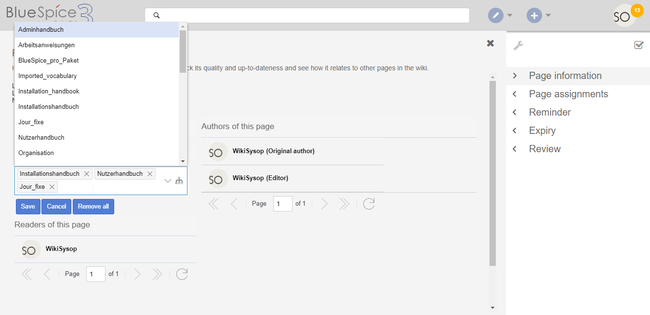
The page categories can also be managed from the Page information flyout in the quality management tools.
To add or remove categories, hover over the this section and click the edit button.
Possible actions:
- Save: Saves the categories in the input field.
- Cancel: Closes the category field without making any changes.
-
Remove all: Removes all assigned categories from the page.
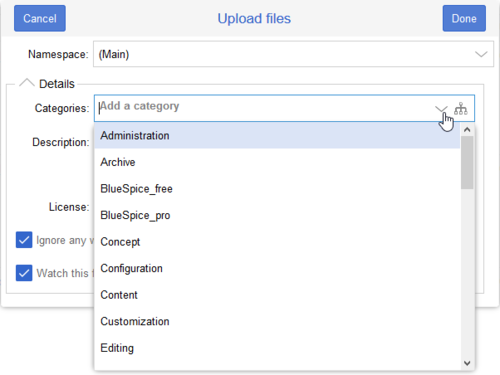
File upload dialog[edit | edit source]
Categories can be assigned to a file during the file upload. If more files are uploaded simultaneously, the same categories will be applied to all files. Select the categories using the arrow icon or the icon for the hierarchical category tree.
Category manager[edit | edit source]
To manage categories on the wiki level, use the Category manager page.
Source editing[edit | edit source]
You can also add to add categories directly in source editing mode.
Configuration[edit | edit source]
In the Config manager, you can change the following settings:
- Insert category with its parents
- Set page categories as default in upload dialog