Difference between revisions of "Manual:Extension/FlexiSkin"
| [quality revision] | [quality revision] |
(Tag: Visual edit) |
(Tag: Visual edit) |
Contents
FlexiSkin allows you to customize the skin look and feel of your wiki. You can change the design of your wiki via a Special page and with a preview function. Easily insert your own logo and favicon and define the colors and font settings you want to achieve a custom look.
Important! FlexiSkin is only available in BlueSpice pro Cloud.
Where to find FlexiSkin?[edit | edit source]
The FlexiSkin settings can be adjusted on the page Special:FlexiSkin (- watch the spelling as the wiki is case-sensitive).
Logo and Favicon[edit | edit source]
Logo[edit | edit source]
The fastest way to customize your wiki is to simply upload your own logo. The wiki will automatically fit the image into the top bar.
Note: The maximum dimensions for the logo are 300 x 64 pixels. If you upload a larger image, it will be cut off.
To upload your logo:
-
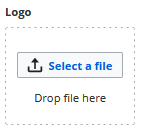
Click Select a file to choose a file from your file explorer or drag the file into the dotted area of the Logo upload area.
-
Click Preview to see the positioning of your logo.
-
Check the logo preview in your wiki.
-
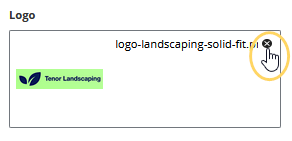
To upload a different logo, click the x-icon in the logo upload area and repeat the previous steps.
-
Save and activate the logo or continue with theming your wiki.
- Click OK to acknowledge that the changes are applied immediately and affect all wiki users.
Tips for working with the logo[edit | edit source]
- Alignment: The logo is placed at the left side of the top bar without any padding or margin applied. The easiest way to make your logo fit: Put it on a 300 x 64 pixel canvas in an image editor and position the actual logo with the desired padding within that area. Then upload your logo.
-
Adjusting placement and size: If you have a standard logo that you don't want to reposition on a canvas before uploading, simply upload your logo and add the following to the Free CSS area in FlexiSkin and save the page.
Note: You will first have to save the page to view the logo changes made in Free Css. The preview does not reflect these changes.
                            @media (min-width: 1001px) {
header nav.navbar {
    padding-left:0; /*add a padding to the left of your logo, e.g. change from 0 10px*/
 }
-
                            .bs-logo {
        width:
-
                            300px; /*sets available logospace to the entire width of the main navigation*/
 }
-
                            .bs-logo a {
    background-size: auto 100%; /* width is set to automatically resize based on height. Set height to up to 90% */
 }
}
 CSS to position the logo
-
You can adjust the background size and left-padding as needed.
Favicon[edit | edit source]
You can also upload your own favicon. The favicon is the image that is shown in the browser tabs. Follow the steps for uploading a logo, just use the favicon upload area instead.
-
- After saving the page, you will see your custom image in the browser tabs of your wiki pages.
-
Theming[edit | edit source]
Color presets[edit | edit source]
The fastest way to customize your wiki colors is to pick a color preset from the available themes. You can fine-tune each theme as needed if one or another color requires tweaking.
The available standard themes are shown here.
Custom color scheme[edit | edit source]
Starting with a custom color scheme, you can further adjust individual skin colors to match your own color scheme.
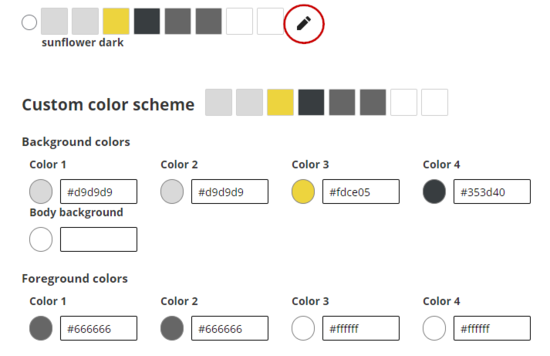
To get started, click on the edit icon next to a color scheme. In my example, I want to have text and a neutral background in my navigation, so I pick "sunflower dark" and then edit it. But first, let's look at the color assignments.
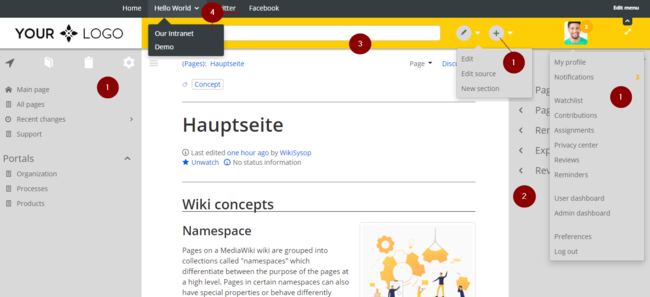
Background color Foreground color (=Text color)
User interface elements Color 1 Color 1 left navigation, edit and create buttons with drop down menus, user profile menu Color 2 Color 2 page tools / quality management tools Color 3 Color 3 top bar (since there is no text in the top bar, the foreground color only sets the color of the toggle icons) Color 4 Color 4 custom menuwith drop down menus Body background - background of page content - the associated text colors in the content area are set in the Content settings of FlexiSkin
- As an example, we make some color changes.
-
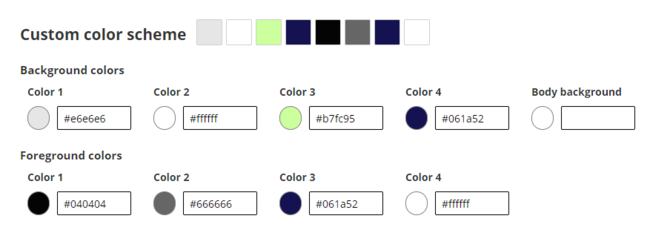
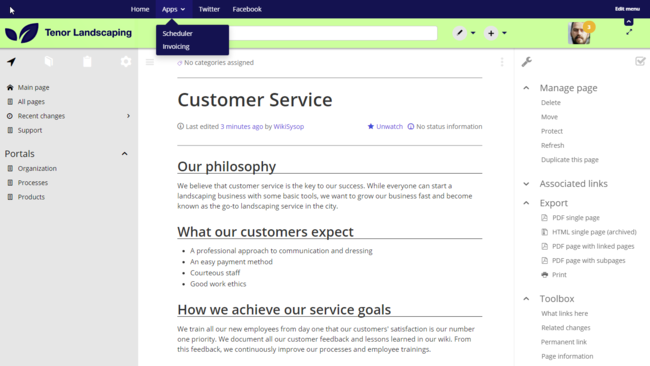
- This results in the following color scheme:
-
Content[edit | edit source]
Free CSS[edit | edit source]
-
        __TOC__


        '''FlexiSkin''' allows you to customize the skin look and feel of your wiki. You can change the design of your wiki via a Special page and with a preview function. Easily insert your own logo and favicon and define the colors and font settings you want to achieve a custom look.


        {{Box Note|boxtype=important|Note text=FlexiSkin is only available in BlueSpice pro Cloud.}}


        ==Where to find FlexiSkin?==


        The FlexiSkin settings can be adjusted on the page ''Special:FlexiSkin'' (- watch the spelling as the wiki is case-sensitive).


        ==Logo and Favicon==


        ===Logo===

        The fastest way to customize your wiki is to simply upload your own logo.  The wiki will automatically fit the image into the top bar.


        {{Box Note|boxtype=note|Note text=The '''maximum dimensions''' for the logo are '''300 x 64 pixels'''. If you upload a larger image, it will be cut off.}}

        '''To upload your logo:'''


        #'''Click''' ''Select a file'' to choose a file from your file explorer '''or drag the file''' into the dotted area of the Logo upload area.  <br />[[File:Manual:logo-upload-dialog.png|alt=Upload area|center|thumb|143x143px|Upload area]]<br />

        #'''Click''' Preview to see the positioning of your logo.  <br />[[File:Manual:logo-preview-button.png|alt=Preview logo|center|thumb|650x650px|Preview logo]]<br />

        #'''Check''' the logo preview in your wiki.  <br />[[File:Manual:logo-preview.png|alt=Logo in the topbar|center|thumb|450x450px|Logo in the topbar]]<br />

        #To '''upload a different logo''', click the x-icon in the logo upload area and repeat the previous steps.  <br />[[File:Manual:logo-delete.png|alt=Alternative text|center|thumb|292x292px|Delete logo]]<br />

        #'''Save and activate''' the logo or continue with theming your wiki. <br />[[File:Manual:flexiskin buttons.png|alt=Save and activate skin changes|center|thumb|285x285px|Save and activate skin changes]]<br />

        #'''Click''' ''OK'' to acknowledge that the changes are applied immediately and affect all wiki users.


        ===Tips for working with the logo===


        *'''Alignment:''' The logo is placed at the left side of the top bar without any padding or margin applied. The easiest way to make your logo fit: Put it on a 300 x 64 pixel canvas in an image editor and position the actual  logo with the desired padding within that area. Then upload your logo.

        *'''Adjusting placement and size:''' If you have a standard logo that you don't want to reposition on a canvas before uploading, simply upload your logo and add the following to the ''Free CSS'' area in FlexiSkin and save the page.


        {{Box Note|boxtype=note|Note text=You will first have to save the page to view the logo changes made in Free Css. The preview does not reflect these changes.}}<br />


        <syntaxhighlight lang="css">

        @media (min-width: 1001px) {

        header nav.navbar {

            padding-left:0; /*add a padding to the left of your logo, e.g. change from 0 10px*/

         }


        #p-logo .bs-logo {

                width:100%300px; /*sets available logospace to the entire width of the main navigation*/

         }


        #p-logo .bs-logo a {

            background-size: auto 100%; /* width is set to automatically resize based on height. Set height to up to 90% */

         }

        }


        </syntaxhighlight>It should look like this:

            [[File:Manual:free css.png|alt=CSS to position the logo|center|thumb|650x650px|CSS to position the logo]]


        You can adjust the background size and left-padding as needed.


        <br />


        ===Favicon===

        You can also upload your own favicon. The favicon is the image that is shown in the browser tabs. Follow the [[Manual:Extension/FlexiSkin#Logo|steps for uploading a logo]], just use the favicon upload area instead.


        <br />


        :[[File:Manual:favicon upload area.png|alt=Favicon upload|center|thumb|155x155px|Favicon upload]]

        ::After saving the page, you will see your custom image in the browser tabs of your wiki pages.

        ::[[File:Manual:favicon-custom.png|alt=Custom favicon|center|thumb|294x294px|Custom favicon]]<br />


        == Theming ==


        ==


            === Color presets ===


        The fastest way to customize your wiki colors is to pick a color preset from the available themes. You can fine-tune each theme as needed if one or another color requires tweaking.


        The available standard themes are shown here.


        <br />


            :::


            <br />


            :::


            <br />

            [[<gallery>

             File:theme-bluespice.png|bluespice

             File:theme-turquoise.png|turquoise

             File:theme-orange.png|orange

             File:theme-crimson.png|crimson

             File:theme-lime.png|lime

             File:theme-turquoise-dark.png|turquoise dark

             File:theme-sunflower-dark.png|sunflower dark


            </gallery>


            === Custom color scheme ===

            Starting with a custom color scheme, you can further adjust individual skin colors to match your own color scheme.


            To get started, click on the edit icon next to a color scheme. In my example, I want to have text and a neutral background in my navigation, so I pick "sunflower dark" and then edit it. But first, let's look at the color assignments.


            <br />

            [[File:Manual:customscheme-pick.png|alt=Customizing a color scheme|center|thumb|550x550px|Customizing a color scheme]]


            <br />

            {| class="wikitable" style="width:100%;"

            |+

            !Background color

            !Foreground color

            (=Text color)

            !User interface elements

            |-

            |Color 1

            |Color 1

            |left navigation, edit and create buttons with drop down menus, user profile menu

            |-

            |Color 2

            |Color 2

            |page tools / quality management tools

            |-

            |Color 3

            |Color 3

            |top bar (since there is no text in the top bar, the foreground color only sets the color of the toggle icons)

            |-

            |Color 4

            |Color 4

            |custom menuwith drop down menus

            |-

            |Body background

            | -

            |background of page content - the associated text colors in the content area are set in the Content settings of FlexiSkin

            |}


            <br />

            [[File:Manual:customscheme-bgcolors.png|alt=Custom background color assignments|center|thumb|650x650px|Custom background color assignments]]


            <br />


            :As an example, we make some color changes.

            :[[File:Manual:customscheme-example-settings.png|alt=Custom color settings|center|thumb|650x650px|Custom color settings]]<br />

            :This results in the following color scheme:

            :[[File:Manual:customscheme-example.png|alt=Custom color scheme|center|thumb|650x650px|Custom color scheme]]<br />


            == Content ==


            == Free CSS ==


            :::


            <br />


            :::


            <br />

[[Category:BlueSpice Cloud]]| Line 2: | Line 2: | ||
__TOC__ | __TOC__ | ||
| − | '''FlexiSkin''' allows you to customize the | + | '''FlexiSkin''' allows you to customize the look and feel of your wiki. You can change the design of your wiki via a Special page and with a preview function. Easily insert your own logo and favicon and define the colors and font settings you want to achieve a custom look. |
{{Box Note|boxtype=important|Note text=FlexiSkin is only available in BlueSpice pro Cloud.}} | {{Box Note|boxtype=important|Note text=FlexiSkin is only available in BlueSpice pro Cloud.}} | ||
| Line 13: | Line 13: | ||
===Logo=== | ===Logo=== | ||
| − | The fastest way to customize your wiki is to simply upload your own logo. | + | The fastest way to customize your wiki is to simply upload your own logo. |
{{Box Note|boxtype=note|Note text=The '''maximum dimensions''' for the logo are '''300 x 64 pixels'''. If you upload a larger image, it will be cut off.}} | {{Box Note|boxtype=note|Note text=The '''maximum dimensions''' for the logo are '''300 x 64 pixels'''. If you upload a larger image, it will be cut off.}} | ||
'''To upload your logo:''' | '''To upload your logo:''' | ||
| Line 27: | Line 27: | ||
*'''Alignment:''' The logo is placed at the left side of the top bar without any padding or margin applied. The easiest way to make your logo fit: Put it on a 300 x 64 pixel canvas in an image editor and position the actual logo with the desired padding within that area. Then upload your logo. | *'''Alignment:''' The logo is placed at the left side of the top bar without any padding or margin applied. The easiest way to make your logo fit: Put it on a 300 x 64 pixel canvas in an image editor and position the actual logo with the desired padding within that area. Then upload your logo. | ||
| − | *'''Adjusting placement and size:''' If you have a standard logo that you don't want to reposition on a canvas before uploading, simply upload your logo and add the following to the ''Free CSS'' area in FlexiSkin and save the page. | + | *'''Adjusting placement and size:''' If you have a standard logo that you don't want to reposition on a canvas before uploading, simply upload your logo and add the following to the ''Free CSS'' area in FlexiSkin and save the page.{{Box Note|boxtype=note|Note text=You will first have to save the page to view the logo changes made in Free Css. The preview does not reflect these changes.}}<br /> |
<syntaxhighlight lang="css"> | <syntaxhighlight lang="css"> | ||
@media (min-width: 1001px) { | @media (min-width: 1001px) { | ||
| Line 33: | Line 33: | ||
padding-left:0; /*add a padding to the left of your logo, e.g. change from 0 10px*/ | padding-left:0; /*add a padding to the left of your logo, e.g. change from 0 10px*/ | ||
} | } | ||
| − | + | .bs-logo { | |
| − | width: | + | width:300px; /*sets available logospace to the entire width of the main navigation*/ |
} | } | ||
| − | + | .bs-logo a { | |
background-size: auto 100%; /* width is set to automatically resize based on height. Set height to up to 90% */ | background-size: auto 100%; /* width is set to automatically resize based on height. Set height to up to 90% */ | ||
} | } | ||
} | } | ||
| − | </syntaxhighlight> | + | </syntaxhighlight> |
| − | |||
| − | |||
| − | |||
You can adjust the background size and left-padding as needed. | You can adjust the background size and left-padding as needed. | ||
<br /> | <br /> | ||
| Line 55: | Line 52: | ||
::[[File:Manual:favicon-custom.png|alt=Custom favicon|center|thumb|294x294px|Custom favicon]]<br /> | ::[[File:Manual:favicon-custom.png|alt=Custom favicon|center|thumb|294x294px|Custom favicon]]<br /> | ||
| − | == Theming == | + | ==Theming== |
| + | |||
| + | === Color presets === | ||
The fastest way to customize your wiki colors is to pick a color preset from the available themes. You can fine-tune each theme as needed if one or another color requires tweaking. | The fastest way to customize your wiki colors is to pick a color preset from the available themes. You can fine-tune each theme as needed if one or another color requires tweaking. | ||
| − | The available themes are shown here. | + | The available standard themes are shown here. |
| + | <gallery> | ||
| + | File:theme-bluespice.png|bluespice | ||
| + | File:theme-turquoise.png|turquoise | ||
| + | File:theme-orange.png|orange | ||
| + | File:theme-crimson.png|crimson | ||
| + | File:theme-lime.png|lime | ||
| + | File:theme-turquoise-dark.png|turquoise dark | ||
| + | File:theme-sunflower-dark.png|sunflower dark | ||
| + | </gallery> | ||
| + | |||
| + | === Custom color scheme === | ||
| + | Starting with a custom color scheme, you can further adjust individual skin colors to match your own color scheme. | ||
| + | |||
| + | To get started, click on the edit icon next to a color scheme. In my example, I want to have text and a neutral background in my navigation, so I pick "sunflower dark" and then edit it. But first, let's look at the color assignments. | ||
<br /> | <br /> | ||
| + | [[File:Manual:customscheme-pick.png|alt=Customizing a color scheme|center|thumb|550x550px|Customizing a color scheme]] | ||
| + | <br /> | ||
| + | {| class="wikitable" style="width:100%;" | ||
| + | |+ | ||
| + | !Background color | ||
| + | !Foreground color | ||
| + | (=Text color) | ||
| + | !User interface elements | ||
| + | |- | ||
| + | |Color 1 | ||
| + | |Color 1 | ||
| + | |left navigation, edit and create buttons with drop down menus, user profile menu | ||
| + | |- | ||
| + | |Color 2 | ||
| + | |Color 2 | ||
| + | |page tools / quality management tools | ||
| + | |- | ||
| + | |Color 3 | ||
| + | |Color 3 | ||
| + | |top bar (since there is no text in the top bar, the foreground color only sets the color of the toggle icons) | ||
| + | |- | ||
| + | |Color 4 | ||
| + | |Color 4 | ||
| + | |custom menuwith drop down menus | ||
| + | |- | ||
| + | |Body background | ||
| + | | - | ||
| + | |background of page content - the associated text colors in the content area are set in the Content settings of FlexiSkin | ||
| + | |} | ||
| + | <br /> | ||
| + | [[File:Manual:customscheme-bgcolors.png|alt=Custom background color assignments|center|thumb|650x650px|Custom background color assignments]] | ||
| + | <br /> | ||
| + | |||
| + | :As an example, we make some color changes. | ||
| + | :[[File:Manual:customscheme-example-settings.png|alt=Custom color settings|center|thumb|650x650px|Custom color settings]]<br /> | ||
| + | :This results in the following color scheme: | ||
| + | :[[File:Manual:customscheme-example.png|alt=Custom color scheme|center|thumb|650x650px|Custom color scheme]]<br /> | ||
| + | |||
| + | == Content == | ||
| + | |||
| + | == Free CSS == | ||
::: | ::: | ||
