Difference between revisions of "Manual:Extension/DynamicPageList3"
| [quality revision] | [quality revision] |
(Tag: 2017 source edit) |
(Tag: 2017 source edit) |
The extension DynamicPageList3 allows you to include lists of wiki pages on any content page.
Contents
- 1 Application examples
- 2 UserManual:VisualEditor/ImagesFiles
- 3 How to insert an image on a page
- 4 Images and namespaces
- 5 Changing an embedded image 6
- do I upload a file?
- 4 Special features when including files
- 5 Maximum file size
- 6 Avoiding unusual file names
- 7 Related info
- 8 List of common parameters
- 7 9 Related info
Application examples[edit | edit source]
You can view a documentation of all selection criteria and formatting options at Gamepedia.
This help page contains some examples of typical applications for this extension as well as a list of common parameters and their values.
List of subpages[edit | edit source]
The following code shows the subpages of the current page in a 3-column layout:
                    {{#dpl:
|titlematch={{PAGENAME}}/%
|shownamespace=false
|replaceintitle=/{{PAGENAME}}\//,
|columns=3
|mode=none
|rowcolformat=width=100%
}}
                    {{#dpl:
|titlematch=VisualEditor/%
|shownamespace=false
|namespace= Manual
|replaceintitle=/VisualEditor\//,
|columns=1
|mode=ubordered
|rowcolformat=width=100%
}}
Output:
Selecting pages by namespace[edit | edit source]
                    {{#dpl:
  |namespace=Manual
  |includesubpages=true
  |shownamespace=false
  |count=5
  |ordermethod=title
}}
Output:
- Admin Manual Introduction
- Archive/Extension/DocumentManager
- Archive:Extension/RatedComments
- BlueSpice Layout
- BlueSpice Layout/Footer
Selecting pages by category[edit | edit source]
                    {{#dpl:
  |category=QM
  |addcategories  = true
  |includesubpages=true
  |shownamespace=false
  |count=5
  |ordermethod=title
  |mode=ordered
}}
Output:
Extension:DynamicPageList (DPL), version 3.3.2: Warning: No results.
Selecting pages with specific naming patterns[edit | edit source]
                    {{#dpl:
 |namespace=File
 |titlematch=A%
 |count=5
 }}
Show a random page in a category[edit | edit source]
                    <div style="border:2px solid #f6f6f6; padding:10px; width:500px; height:500px; overflow-y:auto;">
{{#dpl:
|category=Editing
|randomcount=1
|includepage=*
|includemaxlength=10
|format=,\n==[[%PAGE%]]==\n,,}}
</div>
Output:
Files[edit | edit source]
Warning: Display title "
Insert
a file" overrides earlier display title "Creating page lists with DPL3".
How
do I upload a file?[edit | edit source]
In addition to text, images are probably the most important components of typical content pages. With VisualEditor, the images can be uploaded, inserted and formatted all in one step. Images are inserted via the menu item Insert > Media.
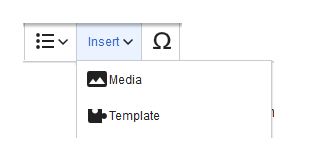 Insert media The dialog box Media Settings opens.
 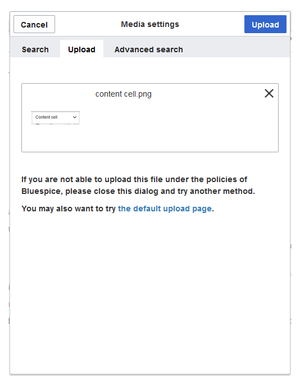 Media settings dialog After uploading, you can edit the image settings: Details, General Settings, and Advanced Settings.
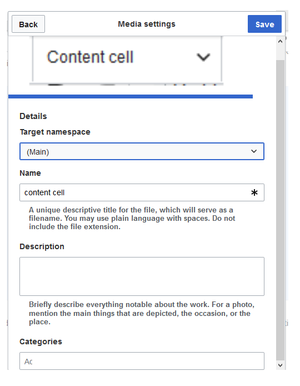
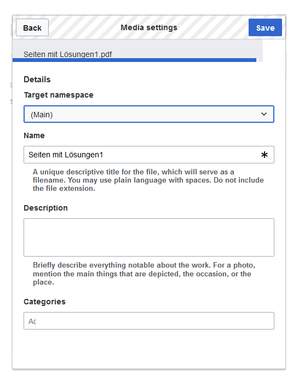
Details[edit | edit source]
 Media settings
Here you can assign a namespace and categories to a picture.
- Target namespace: The picture can be assigned directly to a namespace. The access rights of the namespace are also applied to the image. This means that only users with access to the namespace can view the image on the wiki.
- Name: Choose a name that makes it easy to find the image later during an image search. Or simply leave the current file name.
- Description: The description is mainly useful for photos or infographics when the image name does not adequately describe the image content.
-
Categories: Here, the picture can be assigned to categories.
Note: When uploading a new file, you should check the file/page name for unusual special characters (e.g., ", %, /,< ,>, [ ,], {, }). Change the name to include only standard characters, since the server file system could have problems with them or since some characters have special meanings in MediaWiki. The special characters (, ), &, + can be used and are translated into their equivalent %-hex notation.
Error message when saving: If the image already exists, an error message is displayed. If you want to overwrite the existing file, you can click on the file name and overwrite the file via the image page in the wiki. This is done by clicking the "Upload a new version of this file" link in the "File Versions" section. In VisualEditor itself overwriting an image does not not work.
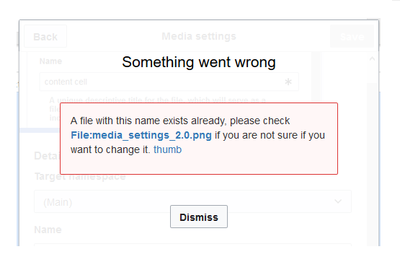 Upload error
General settings[edit | edit source]
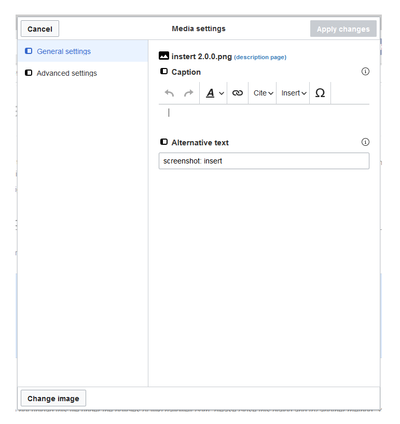
In the general settings, the image descriptions are added.
Caption: The caption is shown with framed images and thumbnails. Note: If you change an image to frameless and then back to "framed", you need to re-enter the caption.
Alternate text: The alternate text should be entered for each image since it replaces the image in certain contexts. For example, this so-called "alt" text is used by users who work with screen readers. Screen readers are used by users with visual limitations, but search engines can also read this text. In some business areas, the indication of the "alt" text is also required by law. If you are not sure, ask your company accordingly.
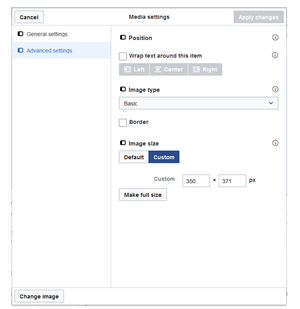
Advanced settings[edit | edit source]
 Advanced settings
In the advanced settings, you can set the position and image size.
The following settings are possible:
-
Position:
-
Wrap text around this item:
- Left: The image is displayed on the left side of the text, starting on the first line of the current paragraph.
- Center: The image is displayed centered over the current paragraph.
- Right: The image is displayed to the right of the text, starting on the first line of the current paragraph.
-
Wrap text around this item:
-
Image type: If you insert an image with VisualEditor, the image is usually linked to the Media Viewer. To suppress the link on an image, you must add an empty link attribute to the image tag in the source code:
-
frameless picture with link (standard):
[[File:adult-chair-company-380769.jpg|frameless]] -
frameless picture without link:
[[File:adult-chair-company-380769.jpg|frameless|link=]]
-
frameless picture with link (standard):
 This is the captionThe preview picture shows the image with a standard width of 300px. The width can be adjusted as required. In addition, the caption is displayed below the picture. A preview icon indicates that the image can be viewed in a larger size.
Frameless
This is the captionThe preview picture shows the image with a standard width of 300px. The width can be adjusted as required. In addition, the caption is displayed below the picture. A preview icon indicates that the image can be viewed in a larger size.
Frameless
The caption does not appear below the picture.
By default, the image is inserted without text wrapping. It will break up a sentence exactly where it is inserted. By default, the image is centered.
However, the image size and position can be adjusted as needed.
Frame
The size cannot be adjusted.
Basic
The basic version is like the frameless version.
By default, text does not wrap, but the text is separated at the point where the image was inserted.
The image is inserted in full width, while the frameless image is inserted in miniature image width (300px). The size can be adjusted.
-
Image size:
- Standard: sets the image width to 300px (unless the standard width has been changed in the user preferences).
- Custom: allows setting a custom size.
- Make full size: resets the size to the actual image size.
Images and namespaces[edit | edit source]
You can save pictures and files in the general namespace (pages). If pictures should be accessible by all users, you can save these pictures in the main namespace if other namespaces have access restrictions. If you have created additional namespaces, you can also save images in these namespaces if you have the necessary access rights. Images are then only shown to users who have the necessary read permissions in these namespaces.
In the upload dialog, the namespace field always suggests the namespace of the current page for the image upload.
Changing an embedded image[edit | edit source]
Different image: In the editing mode of the page, it is possible to edit the image with a double-click. Use the "Change image" button to exchange the image with a different image.
Same image with different version: If you want to use a new version of the same image, open the "Special:Upload file" page in a new browser tab (so that you don't lose any changes on your wiki page). There, you can save already existing pictures with the same name again. The original image is kept as a version.
PDF, xls, docx, ... Files in common formats can easily be uploaded to your wiki with VisualEditor and at the same time inserted into a wiki page. You can find out which file types are allowed in your wiki on the page Special:Upload in your wiki.
In VisualEditor, select the menu item "Insert > Media":
The dialog window "Media Settings" opens. Here, you can connect files with namespaces and categories:
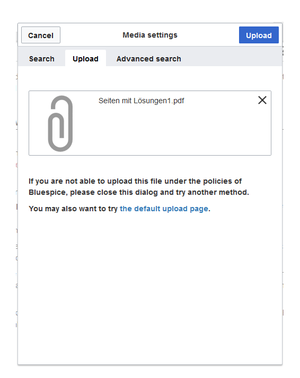
The system detects that it is not an image file and displays a corresponding paper clip as a file icon:.
Now click "Upload":
The general and advanced settings are largely identical to image files. However, there are differences in the linking options, as, for example, a PDF file is not displayed as an image directly on the page.
Special features when including files[edit | edit source]
There are three ways to link a file on a page:
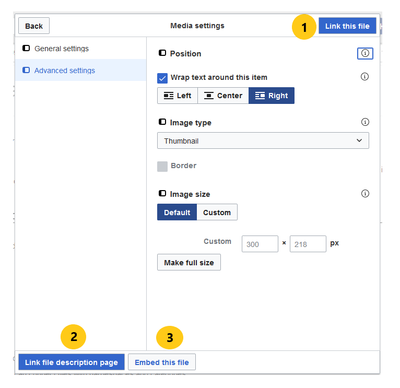
- Link this file (1): The inserted link opens the file.
- Link file description page (2): The link leads to the file page on the wiki. There, you can view the file details or upload a new version of the file.
- Embed this file (3): The link inserts a preview image. The preview image opens the file description page when clicked. This only works with PDF and .tiff files.
General Settings: An alternative text is required if you embed the file on the page. This is done via the corresponding "Embed this file" button. Since a preview image is created here, the alternative text should be used just like with images.
If you link to the file or the file description page, VisualEditor will in both cases inserts the same link text, even though the link will lead to different pages. However, the displayed link text can be changed directly on the page. Just click into the text and change it accordingly.
Note: If you place a file link directly on already selected text, VisualEditor will replace the selected text with the file information. It is therefore advisable to insert a file link via VisualEditor when the cursor is located at a blank space.
Maximum file size[edit | edit source]
The maximum allowed file size cannot be configured in the wiki itself. The maximum allowed limit is defined on the server in the php.ini file in the PHP installation. The actual (possibly smaller) limit, however, is set in the BlueSpice installation in LocalSettings.php or another configuration file in the settings.d folder. The default setting is 32 MB.
Contact your wiki administrator if you receive an error message when trying to upload a larger file.
Avoiding unusual file names[edit | edit source]
Note: When uploading a new file, you should check the file/page name for unusual special characters (e.g., ", %, /,< ,>, [ ,], {, }). Change the name to include only standard characters, since the server file system could have problems with them or since some characters have special meanings in MediaWiki. The special characters (, ), &, + can be used and are translated into their equivalent %-hex notation.
Related info
List of common parameters[edit | edit source]
Criteria for page selection[edit | edit source]
| Parameter | Syntax | Description |
|---|---|---|
| category | |category=QM|Setup... | Pages in the category QM OR Setup |
| |category=QM&Setup&... | Pages in the categories QM AND Setup | |
| |category=QM|Setup...|category=Admin | Pages in the categories QM OR Setup, and pages in the category Admin | |
| notcategory | |notcategory=QM | Pages that are not in the category QM |
| categoriesminmax | |category=QM|categoriesminmax=2 | Pages that are in the category QM and in at least 2 more categories |
| |category=QM|categoriesminmax=,1 | Pages that are only in the category QM and in no other category | |
| namespace | |namespace= | Pages in the namespace (Main) |
| |namespace=Help|Manual | Pages in the namespace Help OR Manual | |
| namespacenot | |namespacenot=Help | Pages that are not in the namespace Help |
| |namespacenot={{NAMESPACE}} | Pages that are not in the namespace of the current wiki page |
Output-Format[edit | edit source]
| Parameter | Syntax | Description |
|---|---|---|
| mode | |mode=ordered | Unordered list |
| |mode=unordered | Numbered list | |
| |mode=none | Line breaks | |
| |mode=category | Pages are grouped alphabetically with a letter heading (similar to category pages) | |
| |mode=inline|inlinetext= • | Page names are listed on the same line and separated with a bullet point |
Sorting[edit | edit source]
| Parameter | Syntax | Description |
|---|---|---|
| ordermethod | |ordermethod=title | Ordered by page (prefix+)title |
| |ordermethod=titlewithoutnamespace | Ordered by page name independent of namespace | |
| |ordermethod=counter | Ordered by number of page views (popularity) | |
| |ordermethod=size | Ordered by page size | |
| |ordermethod=firstedit | Ordered by creation date | |
| |ordermethod=lastedit | Ordered by last edit date | |
| |ordermethod=user,firstedit | Ordered by author, then by creation date | |
| |ordermethod=user,lastedit | Ordered by last editor, then by last edit date | |
| order | |order=ascending | Sorted in ascending order |
| |order=descending | Sorted in descending order |
Display of meta data[edit | edit source]
| Parameter | Syntax | Description |
|---|---|---|
| addcategories | |addcategories=true | Shows all categories of a page after the page name |
| addpagecounter |
|category:QM|ordermethod=counter|order=descending
|addpagecounter=true|count=5 |
Shows the 5 most popular pages in the category QM |
| adduser | |category=QM|ordermethod=lastedit|adduser=true | Adds the name of the last editor in front of the page name |
| addauthor | |category=QM|addauthor=true | Adds the name of the original author in front of the page name. |