Installing and configuring PhantomJS on Windows
-
- Last edited 5 years ago by MLR
-
-
- This page is a draft but has an approved version
Contents
| PhantomJS is a so-called headless browser that can render screenshots of web pages. This is required for the web page preview in Advanced Search and the Recent Changes Overview in your BlueSpice installation. These are functionalities of BlueSpice pro. For this purpose, the steps listed here are reqired for BlueSpice pro. |
DownloadS
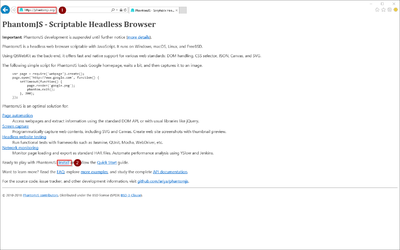
In Internet Explorer, open the official website of the project (1). Click "Install" (2).
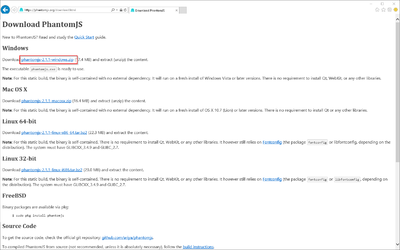
Download the appropriate ZIP archive for Windows.
| Please note that the download on your Windows Server with Internet Explorer will only work if you have configured the Internet Explorer Advanced Security Settings in the Server Manager. Please refer to the technical documentation from Microsoft. |
| In this guide, we use PhantomJS version 2.1.1 as an example. You can download the latest version at the time of installation. |
Installing PhantomJS
PhantomJS does not need to go through a setup process. Unpack the downloaded ZIP archive. In the folder phantomjs-3.1.1-windows\bin you will find the executable file phantomjs.exe.
Simply move tit to C:\bluespice\bin .
{{Template:Hint|text=This guide is based on the folder structure recommended by us [[Setup:Installation Guide/Advanced/Windows Folder Structure|recommended by us]. For this reason, the default path to the folder C:\bluespice\bin is set here. If you have other requirements, you must adapt these paths accordingly.}}
Configuring BlueSpice
BlueSpice must have knowledge of the location of phantomjs.exe. After the BlueSpice installation, proceed as follows:
- Open the folder of your BlueSpice installation
- Switch to the subfolder
settings.d - In this subfolder, create a new file named
090-PhantomJS.php - Fill this file with the following content:
<?php

$bsgArticlePreviewCapturePhantomJSExecutable = "C:\\bluespice\\bin\\phantomjs.exe";
Finishing the system preparation
If you have completed all steps successfully, you can now continue with installing BlueSpice.


