BlueSpiceInsertCategory
-
- Last edited 8 years ago by Angelika
-
-
- No status information
Extension: BlueSpiceInsertCategory
| Overview | |||
|---|---|---|---|
| Description: | Displays all existing categories. | ||
| State: | stable | Dependency: | MediaWiki, BlueSpice |
| Developer: | HalloWelt | License: | - |
| Type: | BlueSpice | Category: | - |
| Edition: | BlueSpiceFree"BlueSpiceFree" is not in the list (BlueSpice pro, BlueSpice free, BlueSpice Farm, BlueSpice Cloud, BlueSpice free (deactivated), BlueSpice pro (deactivated), BlueSpice Farm (deactivated), BlueSpice Cloud (deactivated)) of allowed values for the "BSExtensionInfoEdition" property., BlueSpicePro"BlueSpicePro" is not in the list (BlueSpice pro, BlueSpice free, BlueSpice Farm, BlueSpice Cloud, BlueSpice free (deactivated), BlueSpice pro (deactivated), BlueSpice Farm (deactivated), BlueSpice Cloud (deactivated)) of allowed values for the "BSExtensionInfoEdition" property. | ||
Features
InsertCategory displays all existing categories, helping to keep the terminology uniform. You can then assign the page you are on to one or more of these existing categories. On top of this, you can create new categories here too. The dialogue can be called up from both the "Edit" mode and the "View" mode.
Where can I find InsertCategory?
Inserting categories in the "edit" mode: In the edit view (wiki code and WYSIWYG), click the button ![]() to assign keywords.
to assign keywords.
Inserting categories in the "Read" mode:
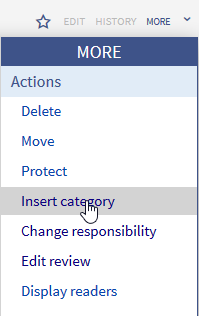
Click on the button "more" ![]() on the right hand side.
on the right hand side.
You will find several orders, one of which is "Insert Category". Here you can add new and insert categories or you can delete categories that don't fit the article.
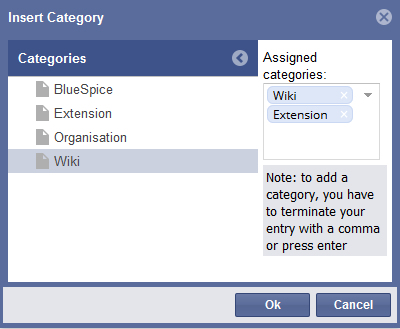
It does not matter if you start from the "Read" or "Edit" mode, when you choose to assign categories, a dialogue opens that looks something like this:
As you can see on the screenshot on the left side, in the left column all available categories, in the right column there are all chosen categories for the article and you can add new categories in the same field.
InsertCategory's functions
The caregories are listed hierarchically in the left column. The column on the right shows the categories which are already assigned to the article.
- Assigning categories: Click on one of the categories listed, it will appear on the right in the column "Chosen categories" and is then assigned to the article. Is a category is chosen which lies in a deeper level of the category hierarchy, all the categories above it will be transferred into the right hand column too.
- Deleting categories: To remove a category from the site you are on, click on the delete symbol (a red cross).
- Adding new categories: A category can be created and assigned by typing the category's name in the text box and clicking on "Enter". New categories only show up in the dialogue after the page has been saved and the dialogue has been reloaded.
- Ok button: In order to assign the chosen categories to the page, click the "Ok" button. The categories you have chosen will only be added to the page when you do this. Then they are added at the end, in the form .
- Abort: If you do not want to make the change, you can cancel the action with the button "Abort".
Tips for working with InsertCategory
By the way: One can set whether categories should be inserted with or without their parent categories in the preferences.
There is no limit on the number of categories to which an article can be assigned.
Video tutorial: How to insert categories?
Classical categories in MediaWiki
Here is information about how to add Categories the classical way in MediaWiki.

