Difference between revisions of "Setup:Installation Guide/System Preparation/Windows/OpenJDK"
← Setup:Installation Guide/System Preparation/Windows/OpenJDK
| [unchecked revision] | [unchecked revision] |
(Created page with "__TOC__ {{Template:Optional|text=Java is a prerequisite for the operation of Advanced Search, PDF export, VisualDiff (BlueSpice pro only) and the LaTeX renderer (BlueSpic...") (Tag: 2017 source edit) |
(translation EN) (Tag: 2017 source edit) |
Contents
|
|
Java is a prerequisite for the operation of Advanced Search, PDF export, VisualDiff (BlueSpice pro only) and the LaTeX renderer (BlueSpice pro only). The steps listed here are optional and only required if you plan to use one or more of these services in your BlueSpice installation. |
Introduction[edit | edit source]
For licensing reasons, we decided instead of the Java Runtime Environment to use the alternative OpenJDK published under the GPL. Of course, you are free to use the JRE of https://java.com/, but here we only document OpenJDK.
Download[edit | edit source]
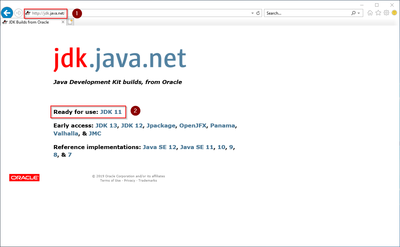
Open the official download page (1) in your browser and select the version marked "Ready for use" (2).
Select the ZIP archive in the 64bit version for Microsoft Windows
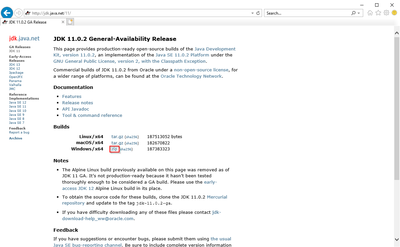
Follow the further download instructions and download the ZIP archive to your hard disk.

|
Please note that the download on your Windows Server with Internet Explorer will only work if you have configured the Internet Explorer Advanced Security Settings in the Server Manager. Please refer to the technical documentation from Microsoft. |
|
|
In this guide, version 11.0.2 of OpenJDK is used and serves only as an example for the latest version, which you can download at the time of your installation. |
Unpacking the ZIP archive[edit | edit source]
Unzip the ZIP archive that you just downloaded into a suitable system path on your hard drive.
{{Template:Hint|text=This documentation is based on the [[Setup: Installation Guide/Advanced/Windows_Folder_Sructure | folder structure recommended by us ]. For this reason, OpenJDK is unpacked into the folder C:\bluespice\bin\jdk-11.0.2. If you have different folder requirements, you must adapt these paths accordingly.}}
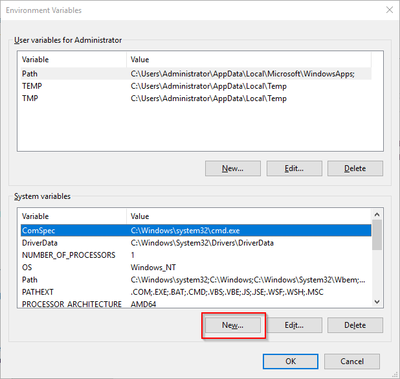
Setting the environment variable[edit | edit source]
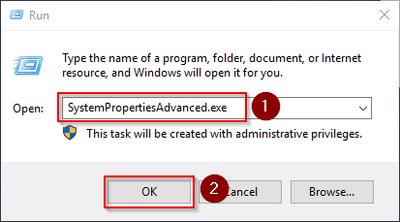
Press the key combination Windows+R.
In the following dialog, enter "SystemPropertiesAdvanced.exe" (1) and confirm with OK (2):
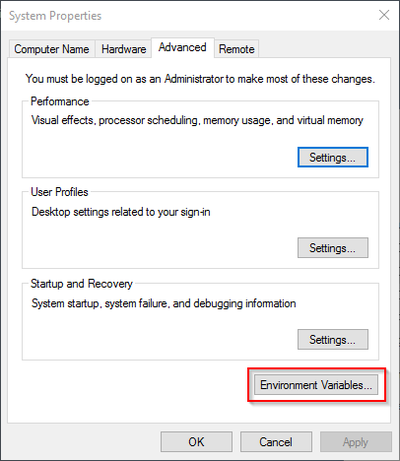
Klicken Sie auf "UmgebungsvariablenClick "environment variables":
Klicken Sie auf Click "NeuNew...":
Legen Sie als Name der Variablen Set the name of the variable "JAVA_HOME" (1) fest, als Wert der Variablen geben Sie das Verzeichnis Ihrer OpenJDK-Installation an, die Sie soeben nach . As the value of the variable, specify the directory of your OpenJDK installation that you have just copied to C:\ bluespice\bin kopiert haben (2). Hier können Sie sich die Arbeit durch Benutzung des "Verzeichnis durchsuchen" Buttons Here you can use the "browse directory" button (3) erleichern. Klicken Sie anschließend auf . Then click "OK" (4):
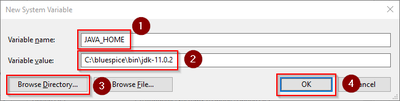
Schließen Sie alle soeben geöffneten Fenster nacheinander wieder mit Klick auf Close all newly opened windows one after the other by clicking on "OK".
Nächster SchrittNext step[edit | edit source]
Haben Sie alle Schritte erfolgreich abgeschlossen können Sie die zuvor heruntergeladene Datei If you have completed all steps successfully, you can delete the previously downloaded "openjdk-11.0.2_windows-x64_bin.zip" von Ihrer Festplatte löschen und zum nächsten Schritt file from your hard disk and go to the next step "Apache Tomcat" weiter gehen.